
Make sure that the contact surfaces are smooth, strictly parallel and fit together over the entire surface. Replace damaged contacts.
Clean the stationary contact if necessary.
Engage the gear and roll the car so that the moving contact moves as far away from the fixed contact as possible.
Slightly loosen the locking screw 1 (see photo) of the breaker contact.
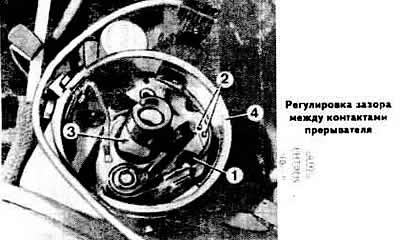
Insert a screwdriver between the two protrusions of the 2nd plate, and the cutout of the breaker contact bar.
Adjust the gap between the breaker contacts by turning the screwdriver; it should be 0.45 mm.
Tighten locking screw 1.
Apply a thin layer of grease to cam 3 or put a few drops of clean engine oil on a lubricating felt and blow out the distributor housing with compressed air.
Check and, if necessary, finally adjust the cam angle or the angle of the closed state of the breaker contacts using appropriate instruments.
Setting the ignition timing
Connect the stroboscope according to the operating instructions and remove the plug from the clutch housing hatch.
Loosen the distributor flange mounting bolt.
With the engine idling, direct the flashing light from the stroboscope into the clutch housing hatch at the initial ignition setting mark and, by turning the distributor housing, align the mark with the installation protrusion on the clutch housing (see photo).

Tighten the distributor flange mounting bolt and check that the ignition timing is set correctly.
(This article was copied from an online resource AudiManual.ru)