
Table of contents: Jacking up with a standard and… ↓ Hanging the car ↓ Transportation of a damaged vehicle ↓
Jacking up with a standard and rolling jack, changing a wheel
Caution: The jack is intended only for short-term lifting of the vehicle when changing a wheel; before performing any work under the car, it must be placed on special reliable supports. No one should be in the car while changing a wheel.
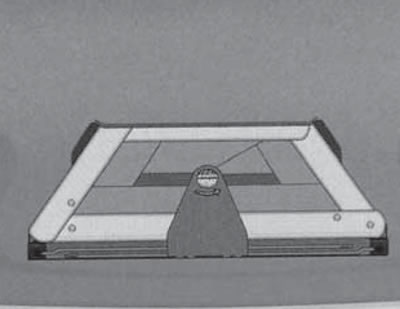
Some models come with a tire repair kit (see illustration 2), consisting of a container with sealant and a compressor, and allowing reliable sealing of damage to the tire caused by a foreign object with a diameter of approximately up to 4 mm (without removing this item). Instructions for using such a kit are provided on the container with sealant and on the compressor.

2. Tire repair kit.
Warning: The speed of a vehicle with a wheel repaired using sealant must not exceed 80 km/h; you should also avoid driving abruptly. The damaged wheel should be replaced as soon as possible.
Park the vehicle on a level, level surface, preferably with a hard surface, as far away from traffic as possible. If a trailer is towed, disconnect it.
Set the front wheels to the straight-ahead position, set the parking brake and lock the steering. On models with automatic transmission, set it to "P" mode. On models with manual transmission, engage first or reverse gear. Ask passengers to get out. Turn off the ignition; if necessary, switch on the hazard warning lights and put out the warning triangle or flashing light. The warning triangle is stored in the boot lid/tailgate; to remove it, turn the lock counterclockwise (see illustration 3).
3. Emergency stop sign.
Open the luggage compartment, lift the floor covering and hang it on the hook handle (From the illustration 4) for the luggage compartment seal. Remove the on-board tool kit (A), jack (B) and spare tire (it is attached in the center by a flywheel).
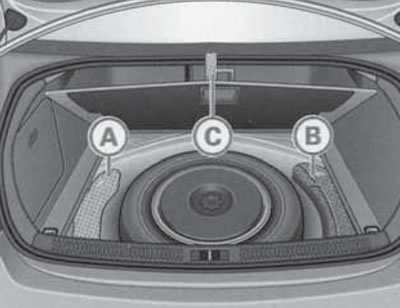
4. Set of on-board tools (A) and jack (B).
The spare wheel may be a compact steel disc or a full-size one. The compact spare wheel may only be used for short periods of time, at speeds of up to 80 km/h. The inflation pressure of the compact spare wheel should be 4.2 bar. If the spare wheel has a directional tread pattern, then if it is necessary to install such a wheel on the side of the vehicle that does not match the pattern, the spare wheel should be replaced as soon as possible.
Support the wheel diagonally opposite the one to be replaced on both sides with wheel chocks or other suitable objects.
Note: When performing the procedure on a slope, wheel chocks should be placed under both wheels of the serviceable axle on the downhill side.
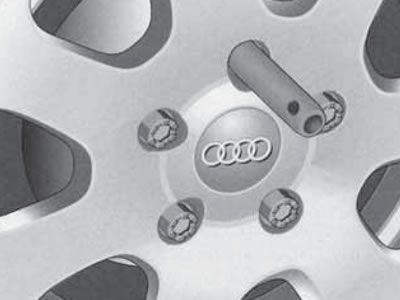
On models with full-size wheel covers, remove the wheel cover from the damaged wheel by pulling the wheel cover with your hand. On models with decorative wheel covers, remove the wire grip from the on-board tool kit, insert it into the hole in the wheel cover, and pull the grip to remove the wheel cover (see illustration 5). If the wheel bolts have protective caps, remove them using the appropriate puller located in the on-board tool kit. To do this, slide the puller onto the cap until it locks, and then pull the puller towards you (see illustration 6).

5. Removing the decorative wheel cap.
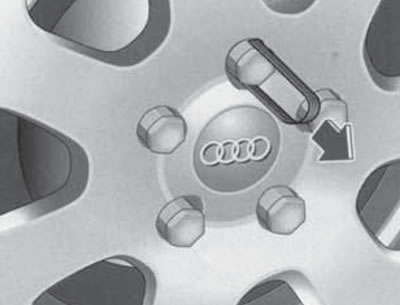
6. Removing the wheel bolt cap.
Loosen the bolts of the broken wheel by half a turn using a wheel wrench (from the on-board tool kit).
Position the jack under the nearest jacking point (see illustration 7). Unfold (fold back) the jack handle and, rotating it, raise the jack so that its head goes onto the edge of the support point of the body (see illustration 8). Make sure that the jack is positioned strictly vertically, and its heel rests on the ground with its entire surface. If the soil is loose, place a suitable pad under the heel of the jack (in winter it is useful to have a piece of wide board in the car).
Attention: Regardless of the slope, the jack must always be in a strictly vertical position! If using a rolling jack, make sure that its support has a special rubber gasket that fits into the groove on the support point of the body.

7. Support points for standard and rolling jacks.
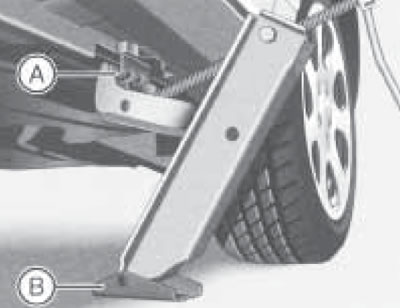
8. Installing the jack.
While continuing to operate the jack handle, raise the vehicle until the damaged wheel is off the ground.
Note: If the vehicle is raised too much on the jack, the vehicle's stability is reduced and it may easily slip off the jack.
Unscrew the upper wheel bolt completely using the hexagon in the handle of a screwdriver from the onboard tool see Figure 9, remove the bolt and replace the safety pin (from the on-board tool kit), - see illustration 10.

9. Using a screwdriver to remove/screw in a wheel bolt.
10. Safety finger.
Remove the remaining wheel bolts using the Allen key in the screwdriver handle and remove the damaged wheel. Clean the mating surfaces of the hub and wheel, as well as the wheel bolts. Mount the spare wheel on the safety pin and tighten the wheel bolts in a cross pattern using the Allen key in the screwdriver handle as tightly as possible.
Lower the vehicle to the ground. Check the inflation pressure of the installed tire and make the appropriate adjustments if necessary (see Specifications).
Remove the jack and tighten the wheel bolts evenly with a wheel wrench in several steps in a diagonal order to a force of approximately 120 Nm.
Place the removed wheel, jack and tools back in their original places and secure them.
Hanging the car
A trolley jack may only be used to lift the front of the vehicle - in this case the jack rests on the points for the standard jack - see Illustration 7. To lift the entire vehicle, use a platform or a lift with four legs, also resting on the points for the standard jack. Between the support of the lift or trolley jack, resting on the side jacking points, and the body, special rubber pads should be installed, covering the rib on the support point of the side member.
Transportation of a damaged vehicle
Caution: Do not tow the vehicle without lifting the drive wheels off the ground if there is no lubrication in the transmission.
The most reasonable way to transport a damaged vehicle is by tow truck. Such transportation can be carried out:
- by fully loading the faulty vehicle onto the tow truck platform (preferably);
- by partial loading method (the front axle is on the lifting frame of the tow truck, and the rear axle is either on a special trolley or on the ground).
Note: This method is not applicable for AWD (Quattro) models with AT.
It is not permitted to lift the vehicle by the towing eye, body parts or chassis.
When towing, the transmission must be in neutral.
Models with manual transmission and front-wheel drive can be towed without lifting the wheels off the ground, as well as with the front or rear axle suspended. The maximum speed is 50 km/h.
Models with automatic transmission and front-wheel drive are allowed to be towed without lifting the wheels off the ground, as well as with the front axle suspended. In this case, the speed should not exceed 50 km/h, and the distance should not exceed 50 km. Towing with the rear axle suspended is not allowed (with support on the front wheels rotating in the opposite direction), because this will lead to damage to the AT.
Models with manual transmission and all-wheel drive may be towed without lifting the wheels off the ground, as well as with the front or rear axle suspended. In this case, the speed should not exceed 50 km/h, and the distance should not exceed 50 km.
Models with automatic transmission and all-wheel drive may be towed without lifting the wheels off the ground. The speed must not exceed 50 km/h and the distance must not exceed 50 km. Towing with the front or rear axle suspended is not permitted.
Preparing for towing
Note: The towing vehicle must be heavier than the vehicle being towed. The removable towing eye is stored in the on-board tool kit (see illustration 4). The towing eye can be screwed into the hole located behind the rectangular plug on the right side of the front bumper (see illustration 11). To remove the plug, press on its lower side. To screw in the eye, it is convenient to use a wheel wrench. Screw the eye until it stops. The rear towing eye is welded on the right side under the rear bumper.
Caution: Do not use towing eyes for other purposes (when transverse forces act on them) for example, to lift a car.

11. Towing eye in the front bumper.
Before towing, turn on the ignition so that the windscreen wipers and exterior lighting can operate: make sure that the steering column lock is released. Set the transmission to neutral and release the parking brake.
The most sensible way to tow is with a rigid hitch, but in this case the towing eyes on both vehicles must be on the same side. If diagonal towing eyes are unavoidable, remember that this creates a lateral force and limits the freedom of maneuver when turning corners. Attach the rigid hitch only to the towing eye, never to any other part.
When towing with a flexible hitch, use only an elastic rope specifically designed for this purpose. Attach the rope only to the towing eye, never attach it to other parts.
Before starting to move, drivers of both vehicles (towing and towed) the route should be agreed upon among themselves.
Towing for the purpose of starting the engine
Starting the engine of AT models by towing or pushing is not possible. Try starting the engine from an auxiliary battery (see the relevant section below).
If the vehicle is equipped with a catalytic converter, tow-start only when the engine is cold. The towing distance should not exceed 50 m.
To start the engine by towing, turn on the ignition and 2nd or 3rd gear of the manual transmission, depress the clutch pedal, and when the car starts moving, slowly release the pedal. After starting the engine, immediately depress the clutch pedal and stop in a safe place.
Towing a damaged vehicle
Note: Towing a vehicle without transmission oil, or if the automatic transmission is faulty, is not permitted without lifting the drive wheels off the ground.
The driver of the towing vehicle should try to move as smoothly as possible, smoothly releasing the clutch when changing gears and, especially, when starting off.
When driving a vehicle towed with a flexible hitch, make sure that the cable remains taut throughout the movement; try to avoid sudden jerks and running over a loose cable.
Remember that when the engine is off, the braking efficiency of the car is significantly reduced due to the fact that the brake booster stops functioning (in this case, you should press the service brake pedal with significantly more force than usual). When maneuvering, you will also have to apply more force to the steering wheel, since the power steering will also not function when the engine is off.
The movement should be carried out along the shortest route. Observe traffic rules, avoid sudden braking, acceleration and excessive maneuvering. Remember that when towing a car along the edge of a dirt road, there is always a risk of skidding to the side of the road.