
Repair Chevrolet Repair Toyota Repair Honda Repair AvtoVAZ Repair Mercedes-Benz Repair BMW Repair Opel
Home  |  Contacts  |  Sitemap  |    
English Русский
Български
Беларускі
Український
Српски
Hrvatski
Română
Polski
Slovenský
Magyar
AudiManual.ru


  • AUDI 80
  • AUDI 100
  • AUDI A3
  • AUDI A4
  • AUDI A6
  • AUDI A8
  • AUDI Q
  • OTHER
  • ARTICLES
B8 (2007-2015) B7 (2004-2008) B6 (2000-2006) B6 (2000-2006, petrol) B5 (1994-2001) B5 (1994-2001, petrol)

Replacing brake pads and their sensors (Audi A4 B7)

  • Home
  • Audi A4
  • B7 (2004-2008)
  • Chassis
  • Brake system
  • Replacing brake pads and their sensors
            0
Table of contents: Front pads ↓ Rear pads ↓
Note: Brake pads should be replaced in pairs, i.e. on both wheels of the same axle.


Front pads


1. Jack up the car and place it on supports.

2. Remove the appropriate wheel.

3. If the pads are to be reused after removal, mark them so that they can be reinstalled in their original locations.

4. Remove the protective caps (see illustration).
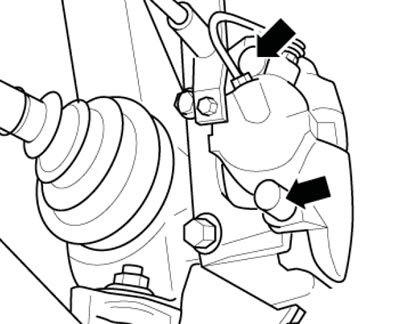
2.4. Protective caps of guide pins

2.4. Protective caps of guide pins


5. If there is a brake pad wear sensor, disconnect the connector (1 in the illustration). To do this, slightly lift the centering lug on the bottom of the connector (2) and turn it 90°. Then lower the bottom of the connector out of the bracket.
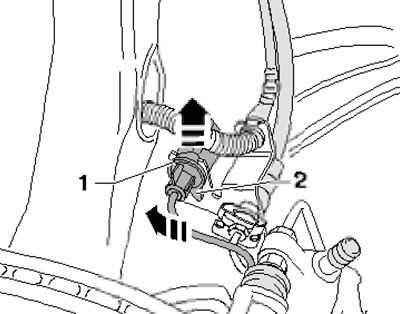
2.5. Brake pad wear sensor connector

2.5. Brake pad wear sensor connector


6. Use a screwdriver to pry up the brake shoe retaining spring and remove it (see illustration).
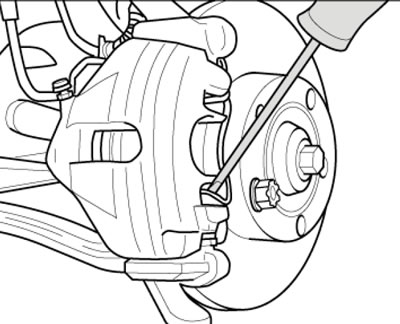


2.6. Removing the retaining spring

2.6. Removing the retaining spring


7. Unscrew and remove the parts located behind the caps (see illustration 2.4) guide pins. Remove the caliper from the anchor bracket and remove the pads from it. Hang the caliper so that the brake hose connected to it is not twisted, pinched or stretched. After removing the caliper, do not press the brake pedal.

8. If necessary, press the piston into the brake cylinder (see accompanying illustration). For example, this may be necessary when installing new pads. When the piston is pressed in, the brake fluid level in the reservoir rises, so make sure that the fluid does not leak out; if necessary, pump out excess fluid.
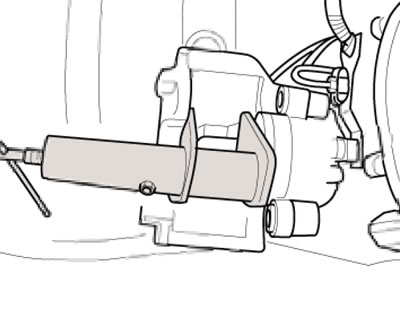
2.8. Pressing the piston into the wheel cylinder

2.8. Pressing the piston into the wheel cylinder


9. Insert the brake pad with the spring into the caliper on the piston side.

Note: On the inner shoe (with spring) there is an arrow that should point in the direction of rotation of the brake disc when the vehicle is moving forward. Remove the protective foil on the outer pad backing and insert the pad into the anchor bracket.
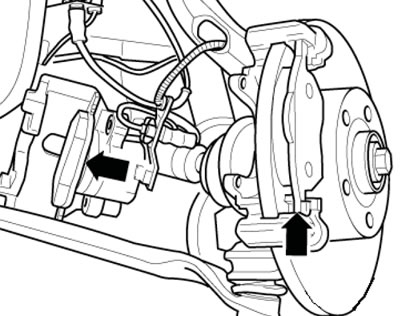

2.9. Brake pads

2.9. Brake pads


10. Install the caliper onto the anchor bracket and tighten the guide pins.

11. Further installation is carried out in the reverse order of dismantling the components. After installation, press the brake pedal hard several times with the car stationary so that the pads are set in the normal position. Check the brake fluid level and correct it if necessary.

Rear pads


12. Jack up the car and place it on supports.

13. Remove the appropriate wheel.

14. If the pads are to be reused after removal, mark them so that they can be reinstalled in their original locations.

15. Remove the caliper mounting bolts while holding the guide pins from turning (see illustration).
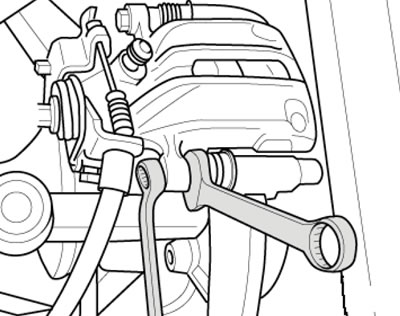
2.15. Unscrewing the caliper mounting bolts

2.15. Unscrewing the caliper mounting bolts


16. Remove the caliper from the anchor bracket and remove the pads from it. Hang the caliper so that the brake hose connected to it is not twisted, pinched or stretched. After removing the caliper, do not press the brake pedal.

17. If new pads are being installed, screw in the piston by turning tool 3272 clockwise (see illustration).
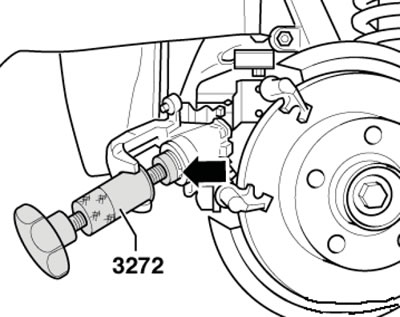
2.17. Screwing in the rear wheel cylinder piston

2.17. Screwing in the rear wheel cylinder piston


18. Install the pads as shown in the illustration, install the caliper and secure it with new self-locking bolts.
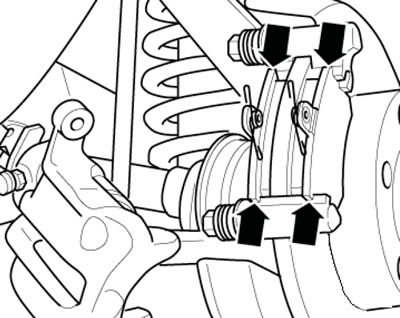
2.18. Rear brake pads

2.18. Rear brake pads


19. Press the brake pedal firmly several times with the vehicle stationary to allow the pads to settle into their normal position.

20. Install the wheels. Check the brake fluid level and correct it if necessary.

(This article was copied from the website: audimanual.ru)
The article was checked by auto expert Timur Bazhenov
This article is available at russian, bulgarian, belarusian, ukrainian, serbian, croatian, romanian, polish, slovak, hungarian

Share information:
Previous articles
Audi A4 B7: Brake system
Next articles

General information and safety precautions
Brake system — specifications
Removal and installation parking brake cables
Removal and installation the parking brake lever, returning it…
Adjusting the parking brake drive
Removal and installation the brake pedal bracket


Similar articles on other Audi car models:
Replacing the front brake pads of the ATE brand Audi 80 B2 (1979-1986)
Front Brake Disc Pads — Checking and Replacing Audi 100 C3 (1982-1990, diesel)
Replacing the front brake pads Audi A3 Type 8L (1996-2003)
Replacing the front brake pads Audi A6 C5 (1997-2004)
Replacing rear brake pads Audi A8 D2 (1994-2002)
Front brake pads FBC-60. Removal Audi Q5 Type 8R (2008-2017)
Brake pads — thickness check Audi A2 (1999-2005)
Link to this page in different formats


Visitor comments

No comments yet


How much will 29 + 19 =


A4(B8, 2007-2015) 
  • General information
  • Operating instructions
  • Power unit
  • Petrol engines 1.8 l
  • Petrol engines 1.8/2.0 l
  • Petrol engines 3.0 l
  • Petrol engines 3.2 l
  • Fuel system (petrol)
  • Diesel engines 2.0 l (CA*)
  • Diesel engines 2.0 l (CJCB)
  • Diesel engines 2.7/3.0 l
  • Diesel engines 3.0 l
  • Fuel system (diesel)
  • Transmission
  • Manual gearbox 0B1
  • Manual gearbox 0B2
  • Manual gearbox 0B3
  • Manual gearbox 0B4
  • Automatic transmission 0B5
  • Automatic transmission 0B6
  • Automatic transmission 0AW
  • All-wheel drive system
  • Chassis
  • Front suspension
  • Rear suspension
  • Brake system
  • Steering system
  • Body
  • Exterior
  • Interior
  • Seats
  • Doors, locks and windows
  • Security system
  • Heating and air conditioning
  • Electrical equipment
  • Audio system
  • Power devices
  • Equipment and devices
  • Lighting and lamps
  • Electrical circuits
 
A4(B7, 2004-2008) 
  • General information
  • Introduction to manual
  • Troubleshooting
  • Operating instructions
  • Maintenance
  • Power unit
  • Petrol engines 2.0 (ALT)
  • Petrol engines 2.0 (TFSI)
  • Petrol engines 1.8 (MPI)
  • Diesel engines
  • Cooling system
  • Air conditioner
  • Fuel and exhaust system
  • Ignition system
  • Starting and charging
  • Transmission
  • Clutch
  • Manual gearbox
  • Automatic gearbox
  • Drive shafts
  • Chassis
  • Brake system
  • Front suspension
  • Rear suspension
  • Steering
  • Body
  • Exterior
  • Interior
  • Electrical equipment
  • Equipment and devices
  • Lighting and signaling
  • Windscreen wipers and washers
  • Electrical diagrams
  • Electrical diagrams (since 2007)
 
A4(B6, 2000-2006) 
  • General information
  • Vehicle Description
  • User manual
  • Maintenance
  • Power unit
  • Gasoline engine
  • Diesel engine
  • Lubrication system
  • Cooling system
  • Supply system
  • Injection system
  • Exhaust system
  • Ignition and control
  • Transmission
  • Gear box
  • Clutch and drive shafts
  • Chassis
  • Brake system
  • Car suspension
  • Steering
  • Body
  • Heating and ventilation
  • Exterior (external elements)
  • Interior (internal elements)
  • Electrical equipment
  • Power devices
  • Lighting and appliances
  • Electrical circuits
 
A4(B6, 2000-2006, petrol) 
  • General information
  • Introduction to the guide
  • Car care
  • Power unit
  • Engine repair
  • Lubrication system
  • Cooling system
  • Injection and control system
  • Ignition system
  • Power and exhaust system
  • Transmission
  • Clutch and drive shafts
  • Car gearbox
  • Chassis
  • Suspension and wheels
  • Steering
  • Brake system
  • Body
  • Interior
  • Exterior
  • Electrical equipment
  • Equipment and devices
  • Lighting and signaling
  • Power devices
  • Electrical circuits
 
A4(B5, 1994-2001) 
  • General information
  • Introduction to the guide
  • Car care
  • Maintenance (gasoline)
  • Maintenance (diesel)
  • Power unit
  • Gasoline engines
  • Diesel engines
  • Engine overhaul
  • Cooling system
  • Fuel injection (gasoline)
  • Fuel system (diesel)
  • Exhaust system
  • Ignition system
  • Transmission
  • Clutch
  • Mechanical gearbox
  • Automatic gearbox
  • Drive shafts
  • Chassis
  • Brake system
  • Car suspension
  • Steering
  • Body
  • Exterior
  • Interior
  • Doors, locks and windows
  • Heating and ventilation
  • Electrical equipment
  • Power devices
  • Equipment and devices
  • Electrical circuits
 
A4(B5, 1994-2001, petrol) 
  • General information
  • Vehicle description
  • Maintenance
  • Power unit
  • Engine repair
  • Turbocharging
  • Exhaust system
  • Cooling system
  • Ignition system
  • Fuel system
  • Motronic injection system
  • MPI and MPFI injection system
  • Transmission
  • Clutch
  • Gearbox and shafts
  • Chassis
  • Steering
  • Car suspension
  • Brake system
  • Wheels and tires
  • Body
  • Heating and ventilation
  • Body parts
  • Electrical equipment
  • Fuses and relays
  • Power devices
  • Lighting and lamps
  • Tools and devices
  • Electrical circuits
 
AudiManual.ru © 2017-2026 · Mobile version · Feedback · Sitemap: EN BG BY UA RS HR RO PL SK HU · Site search · News and articles
80 B2 · 80 B3 petrol · 80 B3 · 80 B4 · 100 C3 diesel · 100 C3 petrol · 100 C3 · 100 C4 petrol · 100 C4 · A3 Type 8L · A4 B5 petrol · A4 B5 · A4 B6 petrol · A4 B6 · A4 B7 · A4 B8 · A6 C4 · A6 C5 · A6 C5 Allroad · A8 D2 · Q5 Type 8R · Q7 Typ 4L · Audi A2 ·
This site uses cookies 🍪. Click the button to accept this fact.