
Table of contents: Repair kit for correcting stone… ↓ Repair damage to the varnish coating… ↓ Repairing damage from rock strikes ↓ Removal small scratches ↓ Repairing large scratches ↓ Varnish like a pro ↓
When driving, stones that are caught in the movement constantly hit the body. At high speed, even tiny grains of sand turn into projectiles that crash into the paint like meteorites. In winter, when gravel hits the metal sheets, the front and hood are especially at risk. However, damage from stone impacts does not represent a catastrophe. Scratches that occur due to impacts during parking should not be a reason for panic. Such spots are often easily removed along with the paint from someone else's car when polishing with a paint care product or a grinding polish.
Repair kit for correcting stone impact marks
Many manufacturers offer repair kits for damage caused by rock strikes (pinhead-sized lesions). These kits are no more difficult to use than a bottle of nail polish. An alternative is a special polish for repairing minor damage to the varnish coating, in which case the hole is filled with a brush. In the case of regular varnishes, wax crayons of the appropriate color also help. However, the wax film only lasts a few washes, after which it must be renewed. The varnish designation and the car color code can be found in the car documentation.
Repair damage to the varnish coating promptly
Imperfections in the varnish coating cannot be ignored. Rust can penetrate the adjacent varnish layer. Under unfavorable conditions (heat and moisture) this can happen within a few days. So remember: paint damage should be repaired as quickly as possible. If rust has been allowed to spread unchecked for months or years, it usually shows up as unsightly pits or holes in the sheets that make up the body. Such damage can be dealt with by expensive restoration work, but this requires experience in handling the appropriate materials. This work, like the repair of sheet metal damage, is not described in this book.
This basic equipment will help you deal with scratches:
- Sticky tape (use materials for professional work).
- Newspapers or film for pasting.
- Sanding block made of wood or cork for sanding surfaces.
- Sanding paper of different grain sizes for wet and dry sanding.
- Putty and putty mass, hardener. Special spatula for leveling small irregularities.
- Adhesion primer as a base for paint and varnish coating.
- Top coat of the appropriate color.
- Care product for varnish coating, preservative, polish.
Repairing damage from rock strikes
1. Remove scratches with protruding edges using a thin needle.
2. If rust has formed, carefully scrape it off with a sharp knife. Apply one drop of rust modifier to the area, wait about one hour.
3. Clean the damaged area with cleaning gasoline or solvent, dry it thoroughly.
4. Spray some adhesion primer into the lid of the spray can and apply it in a thin layer using a brush or your fingertip. Wait until the primer dries.
5. Using your fingertip or a small plastic knife, press a small amount of filler into the groove, flush with the adjacent varnish surface. Allow the filler to dry. Have a rag and solvent handy to wipe any filler stains off the varnish immediately.
6. If you have applied too much filler: Place a narrow strip of fine-grit sandpaper around the tip of a pencil and, rotating the pencil, sand away any excess filler.
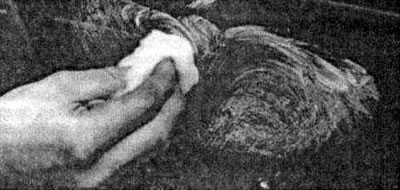
7. Spray a little polish on the lid and wait one minute. Use your fingertip or a thin brush to apply a very thin layer of polish.
8. When the varnish is completely dry (in summer the varnish dries in about two days, in winter - in five days), treat the repaired area with polish, if necessary, treat the transition areas with a varnish coating care product.
Removal small scratches
1. Clean the damaged area with cleaning gasoline or solvent.
2. If there is varnish from another car in the area of the scratch, remove it from the topcoat in several operations using polishing cotton, sanding polish or varnish care product. The polished area should be kept as small as possible.
3. If the edges of the scratch remain rough, sand the area thoroughly with a small strip of fine-grit wet sanding paper (minimum grain size 600). Keep the sanding paper moist at all times. Be careful not to sand through the topcoat.
4. Polish the damaged area with a soft polish. This will distribute paint particles from adjacent areas over the scratch.
5. At the end of the work, treat the sanded area with a preservative.
6. If you attach great importance to uniformity of gloss, polish the entire car.
Repairing large scratches
1. In case of deep scratches on the bumper or fender, before repairing the paint coating, remove the corresponding body part, so the repair will go faster and easier.
2. Smooth out the damaged surface by sanding, the grit of the sanding paper should be 80 or 100. If rust is present, sand to bare metal, apply a rust modifier and let it work for an hour.
3. Clean and degrease the repair area with cleaning gasoline or solvent, then let it dry.
4. Mix the filler and hardener. The filler mass makes the damaged area flush with the adjacent varnish coating. Be careful, the filler can only be used for a few minutes, as the hardener sets quickly. For small irregularities, you can also use spray filler.
5. Apply the putty evenly and quickly in several thin layers. The layer hardens in about an hour.
6. Carefully polish any uneven areas with dry sanding paper (grain size 240). For final sanding, use wet sanding paper (grain size 400), the surface must be sanded with slight pressure.
7. If there are still scratches, level them using spray putty, and after the putty has dried, sand the surface completely.
8. Before varnishing, carefully remove sanding dust.
Varnish like a pro
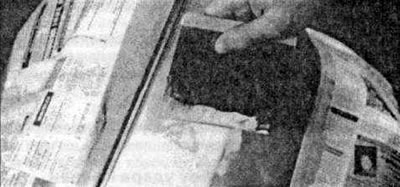
9. Cover the damaged area with waterproof and elastic adhesive tape for varnishing, film or old newspapers. Cheap adhesive tape will quickly soften and let the paint through. When varnishing, toxic fumes are produced, so make sure the work area is well ventilated.
10. Spray on an adhesion primer as a fine-pored base for the top coat (filler). Work carefully, as the gradual application of varnish will not remove the unevenness and build-up, but rather increase it. Let the primer dry, then sand flat with wet sanding paper (grain size 600). Wipe off any sanding residue.
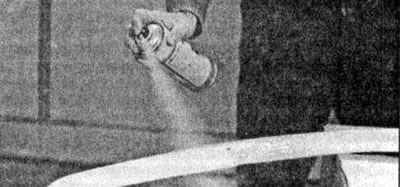
11. Apply several layers of topcoat varnish evenly and quickly from an aerosol can. The distance from the spray head to the surface to be varnished should be approximately 20 - 30 cm. Before varnishing, heat the can briefly in hot water. This technique makes the stream thinner and leaves the can under greater pressure, which allows you to get a smoother surface.
12. Separate and bend back the edges of the adhesive tape at the area to be repaired, then apply additional spraying, this allows you to achieve a smooth transition to the original varnish coating.
13. When the varnish is completely dry (in summer the varnish dries in about two days, in winter - in five days), treat the repaired area with polish, and the transitions - with a varnish coating care product. If you attach great importance to the uniformity of the gloss, polish the entire car.
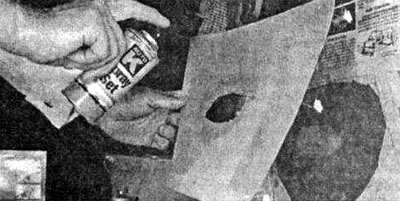
If you are using an aerosol can for varnishing, cut a hole in a large piece of cardboard the size of the damaged area. In this case, the spray will cover only the surface that needs to be treated.
If there is still at least a small amount of topcoat varnish left in the damaged area, the scratches can be removed using a sanding polish or a varnish care product. Use only high-quality material, such material can be purchased at an automotive accessories store.
Wrap the sanding block with sandpaper. Sand the damaged area, the movements should be even and in one direction. Constantly lower the block into water to wash off the sanding dust.

If you are working with putty for the first time, then before you start working, practice in this matter. Make a test pass on an old metal sheet, this will allow you to acquire the necessary skills and confidence in handling the material.
The spray can should be held calmly over the surface to be varnished. Direct the stream of sprayed varnish past the object to be varnished, without stopping or making oval movements backwards - this will help to avoid the formation of drips.
Content source: the specified website: AudiManual