
1. To remove the center console, unfasten the cover for the switches 2 above the drink holder. The handbrake must be applied. In the case of an automatic transmission, move the selector to the rearmost position.
2. In the right and left front footwell, remove cover 3 from the side of the console and loosen screws 4.
3. After removing the trim for the handbrake handle, cover 5 can be removed from the front.
4. Loosen the two Phillips head screws 7 on the connecting piece 6 and remove the connecting piece, otherwise it will be impossible to remove the trim through the handbrake lever.
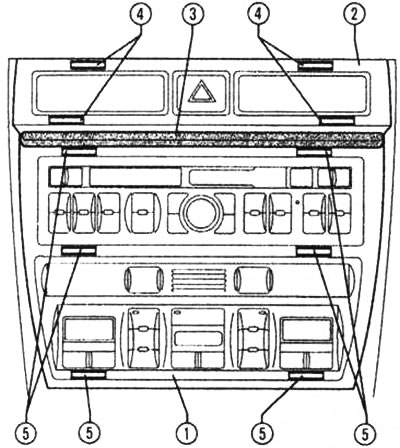
Switch Panel Cover and Blank: Before you begin removing the center console, carefully unfasten these parts. 1 - Cover, 2 - Switch Panel Blank, 3 - Radio Cover, 4 and 5 - Mounting Brackets (10 pcs.)
5. For an automatic transmission, unfasten the switch cover at the top. For a manual transmission, loosen the gearshift boot mounting frame and remove the boot.
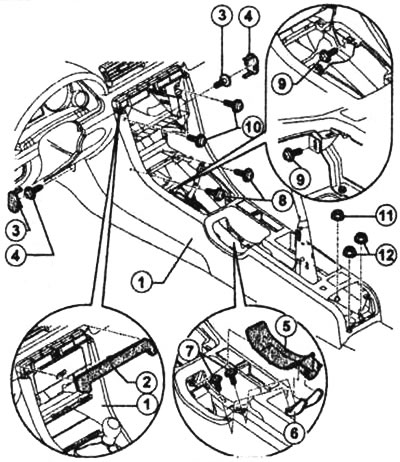
Removal the center console takes time: 1 - middle console, 2 - plug for panel with switches, 3 - cover (2 pcs.), 4 - two screws (5 Nm), 5 - cover for handbrake lever, 6 - connecting part, 7 - two screws (2 Nm), 8 - two screws (5 Nm), 9 - four screws (5 Nm), 10 - two screws (5 Nm), 11 - hex nut (26 Nm), 12 - two hex nuts (26 Nm).
6. Remove the front ashtray 1 and loosen the two screws 2 in the ashtray hole (see picture).
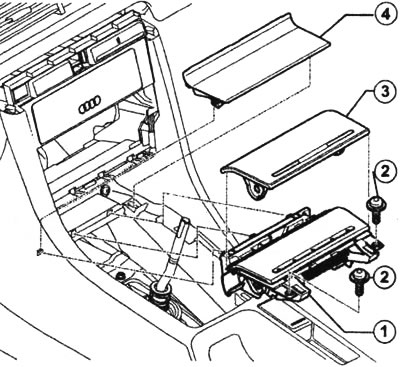
After unscrewing the ashtray, unfasten the plug 3. After this, you can also remove the plug of the drawer for small items 4
7. Around the gearbox, loosen the four screws 9 that hold the center console.
8. Disconnect the cigarette lighter or navigation module connector. Loosen the two screws 10.
9. In vehicles with a center armrest, it is necessary to loosen the hex nut 11 and two hex nuts 12.
10. Pull the center console back with force and remove it from the car. Sometimes the console is difficult to separate from the cast part.
11. Installation of the middle console is carried out in the reverse order.
[The original article is available on the website: AudiManual]