
Table of contents: Installing new injectors ↓ Installation of previously used… ↓
Remove the engine cover.
Caution! Mark the injectors to the cylinders. Re-installation is only permitted on the same cylinder. When working on the injection system, observe the rules for maintaining cleanliness. Immediately close open connections with a special cap.
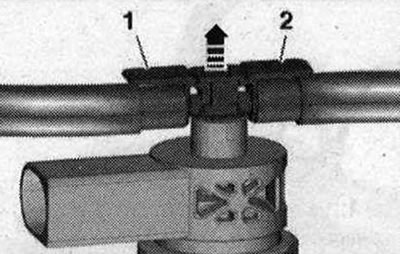
Disconnect the return line pipes from the injectors; to do this, press the clamps "1" and "2" down and simultaneously pull the release bolt up "arrow".
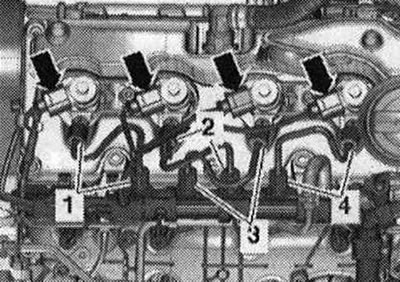
Disconnect the electrical plug connections of the injectors "arrows". Loosen the union nuts of the high-pressure lines "from 1 to 4".
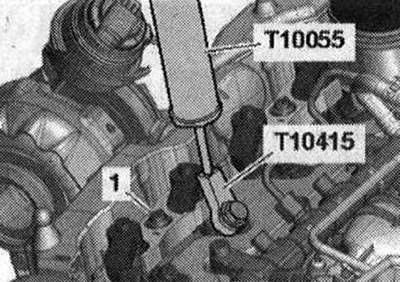
Unscrew bolt "1" of the clamp. The clamp remains in the installation position until the adjacent injector is removed. Risk of damage due to skewing of the clamp on the injector. First remove the injector of cylinders 2 and 4, then the injector of cylinders 1 and 3, simultaneously removing the clamp. Install the puller "T10055" with the puller "T10415" as shown in the figure, and remove the injector in an upward direction. To avoid damaging the sealing edge, remove the injector using rotational movements. Place the removed injectors on a clean rag.
Installing new injectors
When installing a new injector, replace the following parts: copper sealing ring, O-ring for the injector socket, sealing ring for the fuel return line nipple.
Note: When reusing high-pressure lines, observe the corresponding cylinder designation. High-pressure lines may be reused after the following checks. Check the sealing cone of the respective line for deformations and cracks. The bore must not be deformed, narrowed or damaged. Lines with corrosion must not be reused.
Installation of previously used injectors
When installing a previously used injector, replace the following parts: copper sealing ring, circular sealing ring for the injector socket, sealing ring for the fuel return line nipple. Treat the lower part of the injector with rust remover. After about 5 minutes, remove any rust or oil particles with a clean rag. If the injector is heavily contaminated, additionally clean its lower part with a soft brass brush to facilitate removal of the copper gasket (do not allow the brass brush to come into contact with the nozzle sprayer). To remove the old copper gasket from the injector, carefully clamp the gasket in a vice so that it is clamped between the clamping jaws directly when turning. Using light turning and pulling movements of the hand, remove the injector from the copper gasket. Use a scraper to clean off deposits under the copper sealing ring.
Caution! To remove soot particles from the injector sealing surface, clean the injector seat in the cylinder head with a rag soaked in oil or rust remover. Do not damage the sealing surface.

Replace the O-ring for the injector seat using the installation mandrel "T10377". Install the injectors. Tighten the union nuts of the high-pressure fuel lines by hand, without tightening. Pay attention to the installation without stress. Carefully install the connecting elements of the return lines onto the injector through the lip seal with pressure (pre-check the lip seal for damage). The lock must click into place and then carefully press the release bolt down. After installing 1 or more injectors, it is necessary to enter the "fuel quantity correction (IMA)" and "voltage correction (ISA)" for the new injectors in the engine control unit. Additionally, check all other injectors for "fuel quantity correction (IMA)" and "voltage correction (ISA)" and the correctness of the specified correction values. If the engine control unit contains the correct correction values, do not re-enter them under any circumstances. Bleed air from the fuel system and check for leaks. Do not open the high-pressure terminals to bleed air; air from the fuel system is removed automatically. Let the engine idle for a few minutes and then turn it off again. Switch off the ignition. Check the tightness of the entire fuel system and the terminals of the return lines (4 pieces). If the tightness is broken, despite the correct tightening torque, replace the faulty unit. Carry out a test drive with at least one acceleration under maximum load and then recheck the high-pressure circuit for leaks. Air in the fuel system during the test drive may cause the engine to operate in limp mode. Switch off the engine and clear the event memory. Continue the test drive.