
Table of contents: Pumping with a device ↓ Bleeding through the brake circuit ↓
Air must be removed from the clutch drive if the clutch pedal does not return to the upper position or takes this position slowly, as well as in cases where gear shifting is difficult or if the clutch hydraulic drive has been opened.
Since the hydraulic clutch system operates on brake fluid, please refer to the relevant provisions in the chapter "Bleeding air from the brake system".
Warning! Brake fluid is poisonous and should never be sucked out with your mouth through a hose. Use special containers to collect brake fluid to prevent its accidental use.
Caution! Avoid allowing brake fluid to come into contact with the gearbox housing. If fluid does come into contact with the gearbox, remove it immediately with a rag.
Attention! There are two ways to remove air from the clutch hydraulic drive. One of them is to use a special device that increases the pressure in the expansion tank (max, up to 2.5 bar). This method is used to remove air when repairing a car in a specialized workshop. If the above-mentioned device is not available, bleeding of the clutch hydraulic drive is performed through the brake system circuit, since the clutch operates from brake fluid.
Pumping with a device
1. Place the vehicle on jack stands and remove the engine splash guard.
2. Check the brake fluid level in the expansion tank. If necessary, top up the fluid to the MAX mark.
3. Remove the dust cap from the bleed nipple on the clutch slave cylinder and connect hose A of the tool to it (see arrow in illustration). Place the free end of the hose in a container filled with brake fluid.
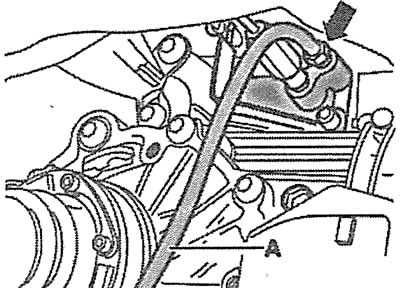
5.3. Remove the dust cap from the bleed nipple on the slave cylinder and connect hose A of the device to it (see arrow)
4. Turn on the device and drain approximately 100 cm³ of brake fluid through the nipple by opening the nipple.
5. Tighten the nipple, turn off the device, press the clutch pedal several times and add brake fluid to the expansion tank up to the MAX mark. Screw on the tank cap.
6. Repeat the bleeding procedure and if there are no air bubbles in the outgoing brake fluid, then finish bleeding.
Bleeding through the brake circuit
7. Add brake fluid up to the MAX mark on the reservoir.
8. Remove the dust caps from the bleed nipple on the slave cylinder and from the nipple on the front left wheel brake mechanism.
9. Attach a transparent hose to the bleed nipple on the left wheel brake caliper.
10. Open the bleed nipple on the caliper to start the fluid flowing out. Before doing this, ask an assistant to press the brake pedal and hold it in this position. After filling the hose with brake fluid, tighten the nipple and ask the assistant to release the pedal. Repeat this procedure several times to fill the hose with brake fluid. To prevent fluid from flowing out of the hose, plug its free end with your finger.
Caution! Do not allow the brake fluid level in the expansion tank to drop significantly. If necessary, add fresh fluid to the tank.
11. Place the free end of the transparent hose on the clutch slave cylinder bleed nipple and open both nipples.
12. Press the brake pedal and close the nipple on the left wheel caliper. Release the brake pedal. Repeat this procedure until air bubbles stop appearing in the brake fluid in the expansion tank. In this case, constantly add brake fluid to the expansion tank.
13. Close the nipples on the caliper and on the clutch slave cylinder. Remove the transparent hose and put protective caps on the nipples.
14. Lower the car onto its wheels.
15. Add brake fluid to the expansion tank up to the MAX mark.
16. Press the clutch pedal a little. This will force out the remaining air from the system.
17. Check the functioning of the brake system and clutch.
Attention! When removing air, a small amount of air may still remain in the hydraulic system. This will be felt by scratching noises when changing gears and difficulty in disengaging them. In this case, it is recommended to contact a workshop to perform bleeding using a special device.
18. Reinstall the engine splash guard.