
Table of contents: Parking assistant ↓ Removal and installation the parking… ↓ Removal and installation the parking… ↓ Removal and installation the front… ↓ Removal and installation the rear… ↓ Removal and installation front… ↓ Removal and installation front… ↓ Removal and installation front… ↓ Removal and installation rear… ↓
Parking assistant
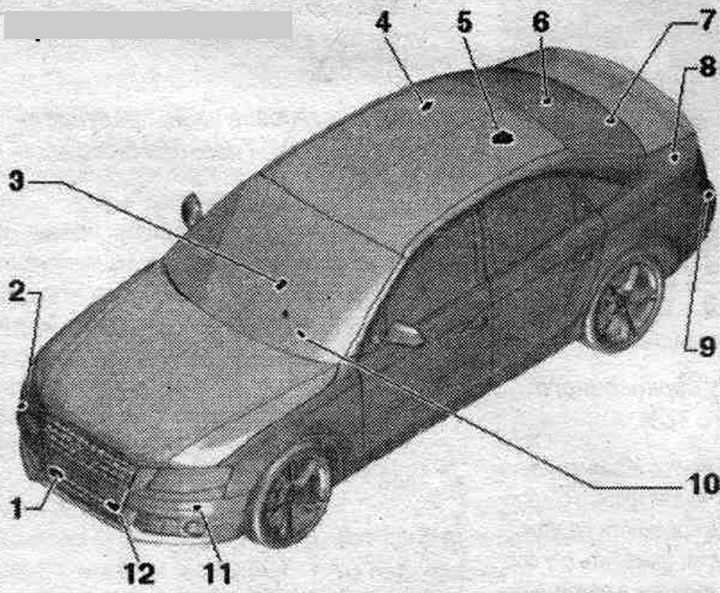
1. Front right middle sensor "G253": in the radiator grille.
2. Front right sensor "G252": in the front bumper.
3. Parking assistant button "E266": only if the 8-channel parking assistant is installed.
4. Rear warning buzzer "H15": at the belt turning point on the rear right.
5. Used parking assistant "J446": depending on the design, since model year 2013, it is built into the used on-board network "J519".
6. Rear right sensor "G206": in the rear bumper.
7. Rear right middle sensor "G205": in the rear bumper.
8. Rear left middle sensor "G204": in the rear bumper.
9. Rear left sensor "G203": in the rear bumper.
10. Front parking aid warning light "H22": only with 8-channel parking aid; on the lane bracket. pan. controls, behind the lane trim. panels on the driver's side.
11. Front left sensor "G255"; in front, bumper.
12. Front left middle sensor "G254": in the radiator grille.
Location of the parking assistant switch "E266"
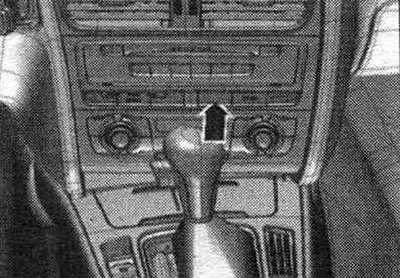
In the center console switch modules, the "arrow" symbol appears. The figure shows the MMI-Comfort configuration
Tightening torque for the mounting frame of the parking aid control unit "J446"
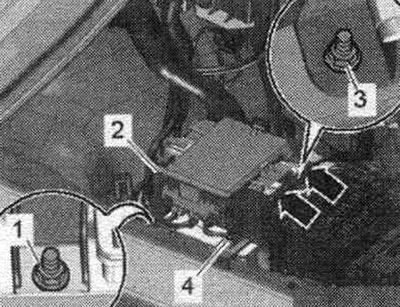
1/3. Nut - 3 Nm.
2. Mounting frame for used parking assistant "J446".
4. Cable ties.
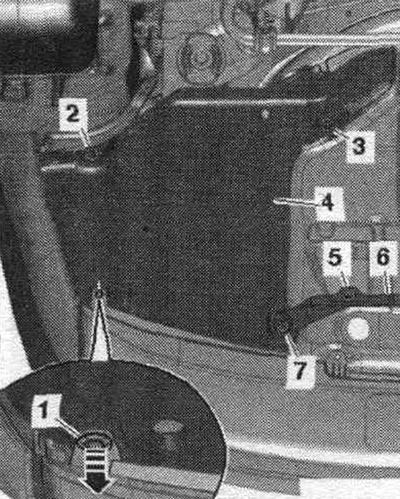
Removal and installation the parking assistant control unit "J446" - a vehicle without a towbar
The used parking assistant, depending on the design, since the 2013 model year is integrated into the used on-board network "J519" and cannot be replaced separately in the event of a malfunction. Replace the used on-board network. When replacing a used one, select the Guided search for faults mode. or the Guided Functions function "Replacement of the corresponding used one." Open the right side trunk trim. Unlock the locks "2" and remove the used parking aid "J446" "pos. 1" from the frame. Disconnect the plug connections "3...5".
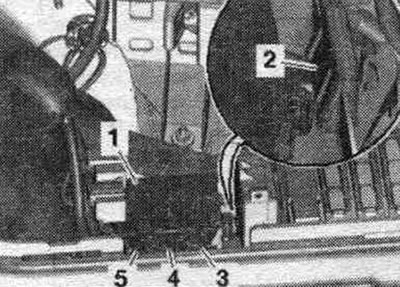
Installation in reverse order.
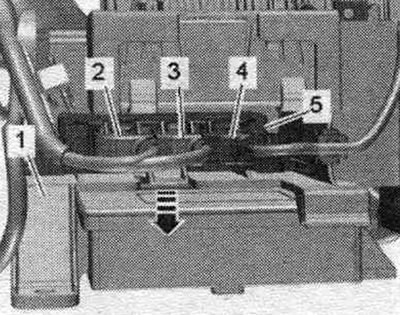
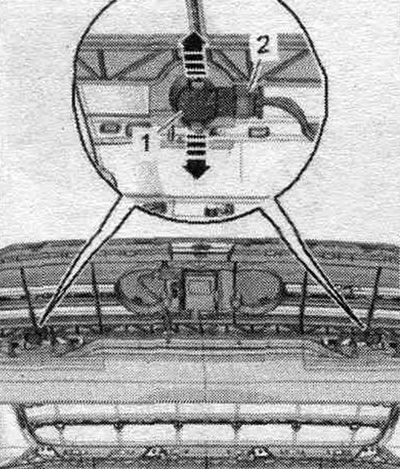
Removal and installation the parking assistant control unit "J446" - vehicle with a towing hitch
The used parking assistant, depending on the design, since the 2013 model year is integrated into the used on-board network "J519" and cannot be replaced separately in the event of a malfunction. Replace the used on-board network. When replacing a used one, select the Guided search for faults mode. or the Guided Functions function "Replacement of the corresponding used one." Open the right side trunk trim. Loosen nuts "1" and "3." Remove the electrical cable from the guides "arrows" on the mounting frame "2" and disconnect the cable tie "4." Lift the mounting frame upward. Disconnect plug connections "2...4". Unlock the "arrow" latches and remove the used parking aid "G446" "pos. 5" from the mounting frame "1".
Installation in reverse order.
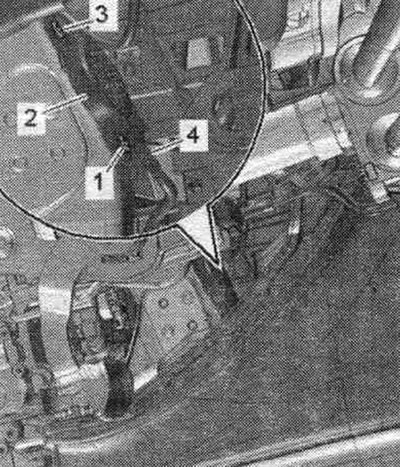
Removal and installation the front parking assistant warning signal "H22" - 8-channel parking assistant
Turn off the ignition. Remove the front cover. panel on the driver's side. Unscrew bolts "1" and "3" and remove the front parking assistant warning buzzer "H22" "pos. 2". Disconnect the plug connection "4".
Installation in reverse order. Install the front cover. panels on the driver's side..
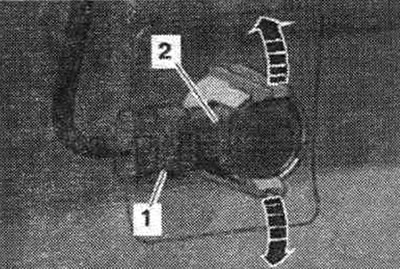
Removal and installation the rear warning buzzer of the parking assistant "H15"
Turn off the ignition. Remove the right belt guide. Extract the back. parking assistant warning buzzer "H15" "pos. 1" with right belt guide "2" "in the direction of the arrow".
Installation in reverse order. Install the right belt guide.
Removal and installation front parking sensors "G252"/"G253"/"G254"/"G255", Sedan and Avant up to model year 2012
External sensor: Remove the front wheel arch liner. Move both clamps towards the "arrow" and simultaneously press sensor "2" from the outside inward. Disconnect plug connection "1" on the sensor. If, due to the vehicle's equipment, the front left sensor cannot be removed in the manner described above, it is necessary to remove the front trim panel. bumpers.
Internal sensor: Insert your hand through the holes in the radiator grille behind the fasteners and press both latches towards the "arrow", while simultaneously pressing sensor "2" from the outside inwards. Disconnect plug connection "1" on the sensor.
Installation in reverse order. External sensor: Install the front wheel arch liner.
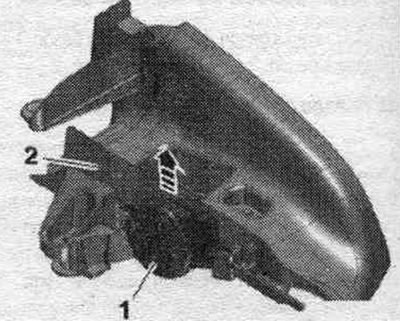
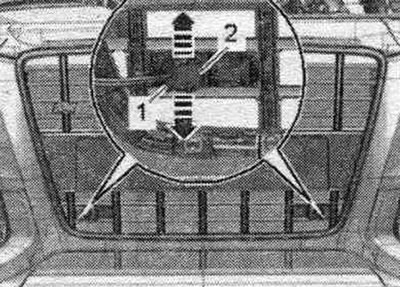
Removal and installation front parking assist sensors "G252"/"G253"/"G254"/"G255", Sedan and Avant since 2013 model year
External sensor: Removing the headlight housing: halogen headlights, gas discharge headlights. Move both clamps towards the "arrow" and simultaneously press sensor "2" from the outside inward. Disconnect plug connection "1" on the sensor.
Internal sensor: Remove the lock support trim. Insert your hand through the holes in the radiator grille behind the fasteners and press both clamps towards the "arrow", while simultaneously pressing sensor "1" from the outside inwards. Disconnect plug connection "2" on the sensor.
Installation in reverse order. External sensor: removing the headlight housing: halogen headlights, gas discharge headlights. Internal sensor: Install the lock support trim.
Removal and installation front parking sensors "G252"/"G253"/"G254"/"G255", allroad
External sensor: Remove the front wheel arch liner. Move both clamps towards the "arrow" and simultaneously press sensor "2" from the outside inward. Disconnect plug connection "1" on the sensor.
Internal sensor: Remove the air intake grille. Place your hand through the hole under the air intake grille and press both latches towards the "arrow", while simultaneously pushing sensor "2" from the outside inwards. Disconnect plug connection "1" on the sensor.
Installation in reverse order. External sensor: Install the front wheel arch liner. Interior sensor: Install air intake grille.
Removal and installation rear parking sensors "G203"/"G204"/"G205"/"G206"
External sensor: Unscrew the "arrow" bolts on the lower part of the bumper cover.
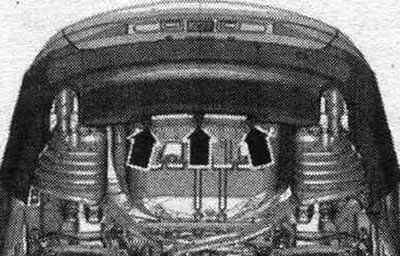
Cars with additional muffler: Unscrew nuts "5" and "7" and remove retaining bar "6". Remove clamping pin "arrow" and remove clamping clip "1". Unscrew nuts "2" and "3" and remove CW underbody lining "4".
All: Place your hand underneath the bumper trim.
Interior sensor, Sedan: Remove rear trim. bumpers.
All: Move both clamps towards the "arrow" and move sensor "2" from the outside to the inside. Disconnect plug connection "1" on the sensor.
Installation in reverse order. Interior sensor - Sedan: Install rear trim. bumpers. Vehicles with lane change assist: If the bumper cover has been removed, then the lane change assist is used "J769"/"J770" must be recalibrated. External sensor: Install the lower part to the bumper cover.
[The original material is located on the website: audimanual]