
Repair Chevrolet Repair Toyota Repair Honda Repair AvtoVAZ Repair Mercedes-Benz Repair BMW Repair Opel
Home  |  Contacts  |  Sitemap  |    
English Русский
Български
Беларускі
Український
Српски
Hrvatski
Română
Polski
Slovenský
Magyar
AudiManual.ru


  • AUDI 80
  • AUDI 100
  • AUDI A3
  • AUDI A4
  • AUDI A6
  • AUDI A8
  • AUDI Q
  • OTHER
  • ARTICLES
B8 (2007-2015) B7 (2004-2008) B6 (2000-2006) B6 (2000-2006, petrol) B5 (1994-2001) B5 (1994-2001, petrol)

Center console — removal and installation (Audi A4 B8)

  • Home
  • Audi A4
  • B8 (2007-2015)
  • Body
  • Interior
  • Center console — removal and installation
            0
Table of contents: Center console ↓ Removal and installation of the… ↓ Removal and installation the center… ↓ Removal and installation of the… ↓ Removal and installation the front… ↓ Removal and installation the ashtray… ↓ Removal and installation the center… ↓ Removal and installation the storage… ↓ Removal and installation the center… ↓ Removal and installation the… ↓ Removal and installation the drink… ↓ Removal and installation the storage… ↓ Removal and installation the center… ↓

Center console


Option with front armrest
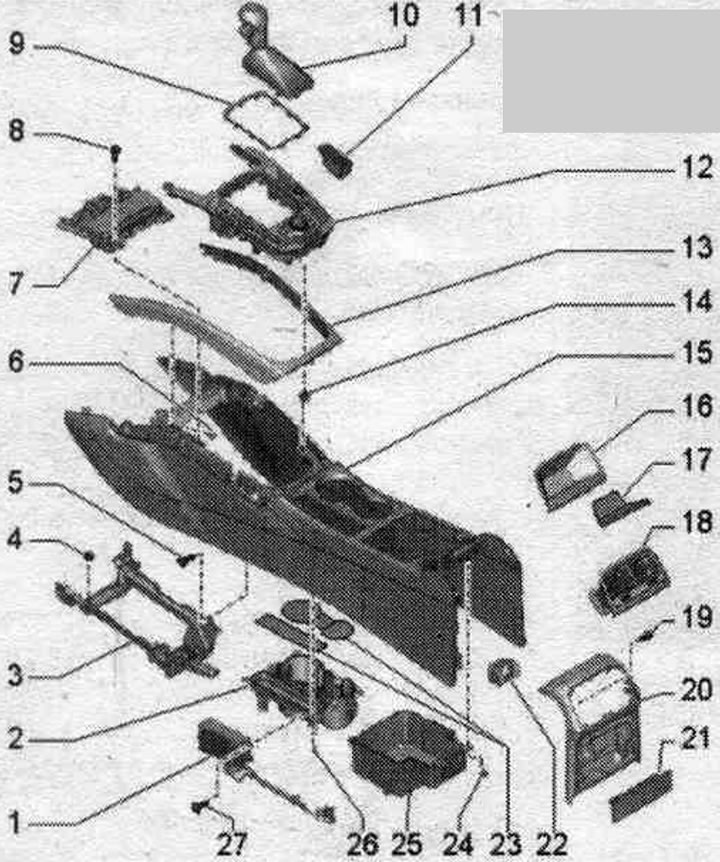


1. Inverter with socket, 12 V. 230 V «U13»: configuration option; only in combination with armrest.

1. Inverter with socket, 12 V. 230 V "U13": configuration option; only in combination with armrest.
2. Drink holder.
3. Holder: for center console.
4. Nut: 4 pcs.; 8 Nm.
5. Bolt: 4 pcs.; 3 Nm.
6. Bolt: 8 pcs.; 1.4 Nm.
7. Front ashtray.
8. Bolt: 2 pcs.; 2.5 Nm.
9. Decorative frame.
10. Gear shift lever or selector.
11. Coin box.
12. Insert: for center console.
13. Decorative trim: for center console.
14. Clamp: 6 pcs.; insert into the center console.
15. Center console.
16. Storage compartment at the back.
17. Facing panel.
18. Rear deflector.
19. Bolt: 2.5 Nm.
20. Rear flap: for center console.
21. Rear ashtray.
22. 12V socket.
23. Facing panel.
24. Bolt: 4 pcs.; 1.4 Nm.
25. Storage compartment.
26. Bolt: 8 pcs.; 1.4 Nm.
27. Bolt: 2 pcs.


Configuration option without front. armrest
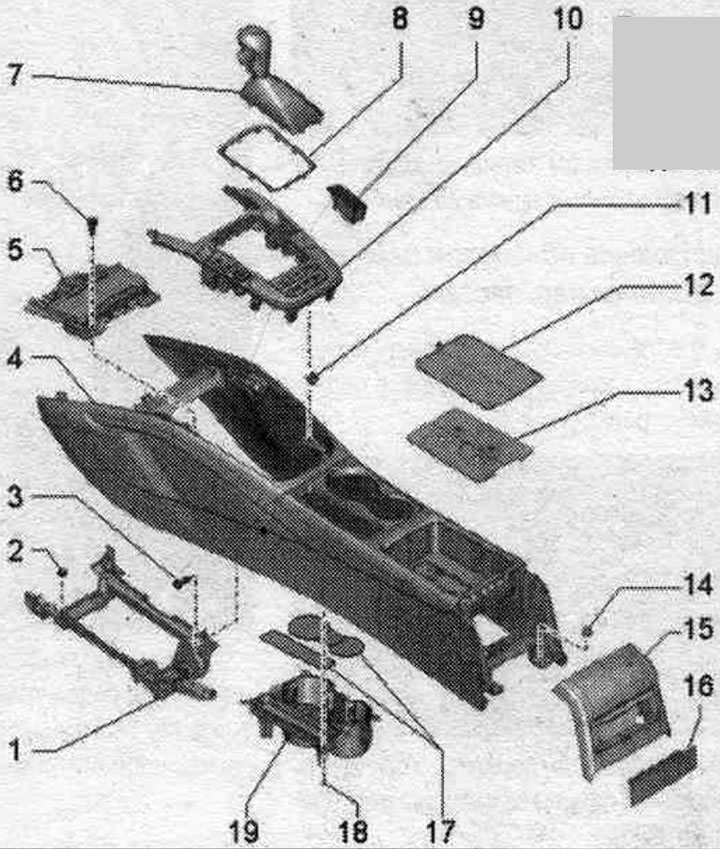


1. Holder: for center console.

1. Holder: for center console.
2. Nut: 4 pcs.; 8 Nm.
3. Bolt: 4 pcs.; 3 Nm.
4. Central console.
5. Front ashtray.
6. Bolt: 2 pcs.; 2.5 Nm.
7. Gear shift lever or selector.
8. Decorative frame.
9. Coin box.
10. Insert: for center console.
11. Clamp: 6 pcs.; insert into the center console.
12. Facing panel.
13. Lining.
14. Nut: 2 pcs.; 4 Nm.
15. Cover: for center console.
16. Rear ashtray.
17. Facing panel.
18. Bolt: 8 pcs.; 1.4 Nm.
19. Drink holder.


Removal and installation of the rear. center console trim


Option with storage compartment: remove rear. storage compartment with center console. Option with deflector: remove rear. deflector. Unscrew the bolt "2". Carefully unlock the trim "3" on the sides from below with a small screwdriver "arrows". Tilt the trim upwards, unlock the retainer "1" and remove it from the center console. If present, disconnect the plug connection.
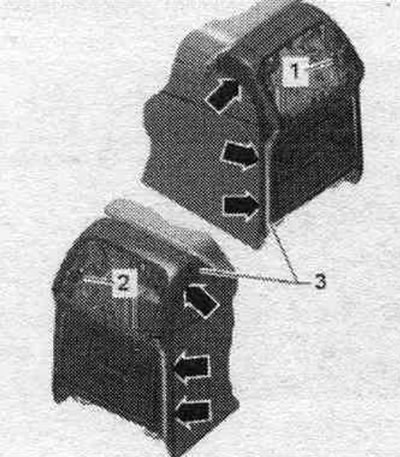
Option with storage compartment: remove rear. storage compartment with center console. Option with…


Option with inverter and socket, 12 V; 230 V "U13": unlock the "arrow 1" latches and remove the 230 V "arrow 2" socket.
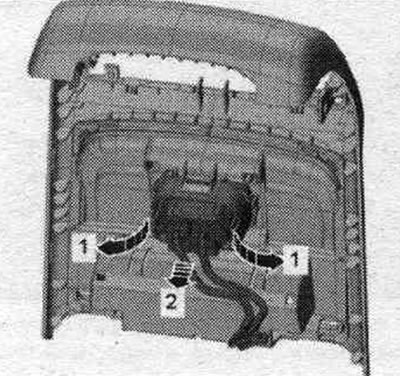


Option with inverter and socket, 12 V; 230 V «U13»: unlock the «arrow 1» latches and remove the 230…


Installation in reverse order. Place the overlay on top, tilt it down and fix it. Install the rear center console trim into the center console until it clicks into place.

Removal and installation the center console trim


Carefully, but not completely loosen the side trim "1," starting from the bottom, using a small screwdriver marked "arrows." Tilt the trim upward and remove it from the center console.
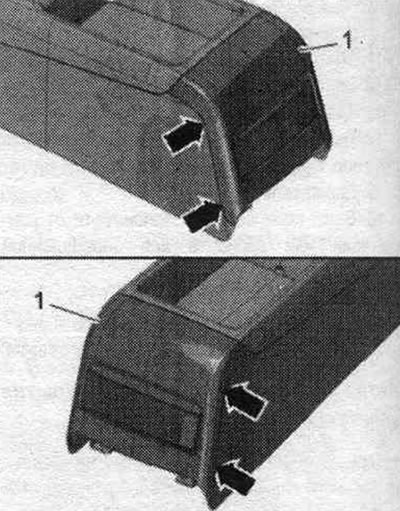
Carefully, but not completely loosen the side trim «1,» starting from the bottom, using a small…


Installation in reverse order. Place the trim on top, tilt it down and fix it. Install the center console trim onto the center console until it clicks into place.

Removal and installation of the rear. ashtrays


Open the rear ashtray. Press cover "1" down and remove rear ashtray "2".
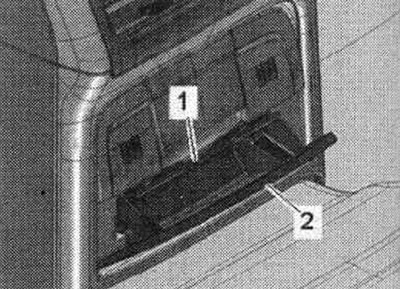
Open the rear ashtray. Press cover «1» down and remove rear ashtray «2».


Installation in reverse order.


Removal and installation the front ashtray


Remove the center console insert. Unscrew bolts "4" and "5". Pull ashtray "1" backwards from mount "2" and disconnect the cigarette lighter plug connection.
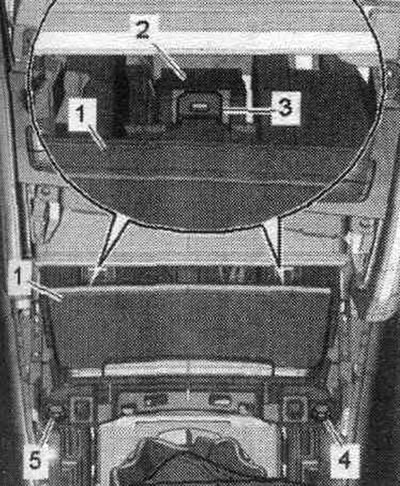
Remove the center console insert. Unscrew bolts «4» and «5». Pull ashtray «1» backwards from mount…


Installation in reverse order. Install the front ashtray "1" with the rubber tip "3" into the mounts "2".

Removal and installation the ashtray cover


Remove the front ashtray. Open the ashtray lid. Lift up the clips "2" from the bottom side with a small screwdriver. Remove cover "1" from the ashtray lid by pressing on the cover in the direction of the arrow.
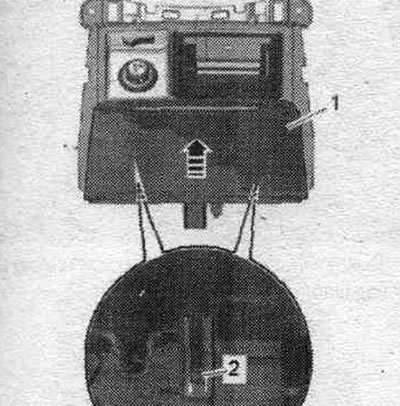
Remove the front ashtray. Open the ashtray lid. Lift up the clips «2» from the bottom side with a…


Installation in reverse order. Install the ashtray lid cover until it clicks into place.

Removal and installation the center console insert


Automatic transmission version: move the automatic transmission selector to position "S". Turn off the ignition. Remove the used Climatronic "J255". Carefully slide the selector/gearbox lever gaiter sideways with the removal wedge "3409" or a small screwdriver "arrows" and fold it upwards.
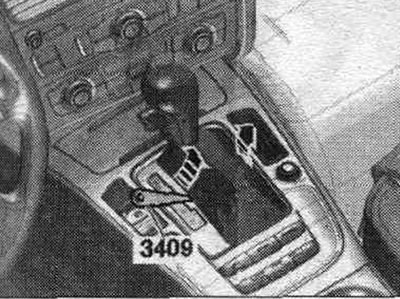


Automatic transmission version: move the automatic transmission selector to position «S». Turn off…


Tape the center console trim around the center console insert to prevent damage to the surface. Careless removal of the center console insert may damage the system button mounts. authorization of access and engine start "E408", since the wire to the button is not long enough. Carefully unscrew the center console insert and remove it in an upward direction. Grasp the center console insert "arrow A" from below and carefully pull it upwards out of the center console "arrow B". Disconnect the plug connections and carefully remove the center console insert above the automatic transmission selector/gear shift lever.
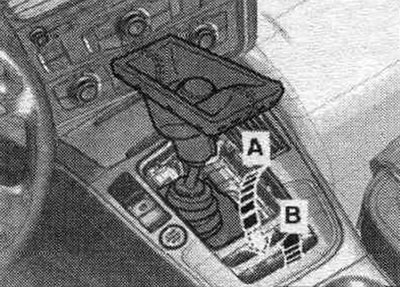
Tape the center console trim around the center console insert to prevent damage to the surface.…


Installation in reverse order. Insert the center console insert until it clicks into place.


Removal and installation the storage compartment in the rear center console


Carefully remove the trim panel "1" from the "arrow" fasteners.
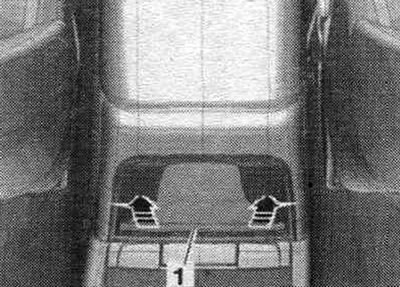
Carefully remove the trim panel «1» from the «arrow» fasteners.


Install hook "3438" into the holes at the bottom of the storage compartment, while simultaneously inserting wedge for dismantling "3409" into the gap between the storage compartment and the center console. Unlock all fasteners around the perimeter of the storage compartment and remove the compartment.
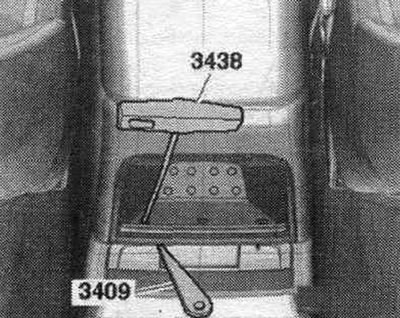
Install hook «3438» into the holes at the bottom of the storage compartment, while simultaneously…


Installation in reverse order. Insert the storage compartment from below, turn it upwards and press it until it stops in the mount. hole.

Removal and installation the center console


Remove the center console insert. Remove the front ashtray. Version with 12V socket: Disconnect plug connection "2". Unscrew bolts "1" and "3". Version with front armrest: Remove the front armrest.
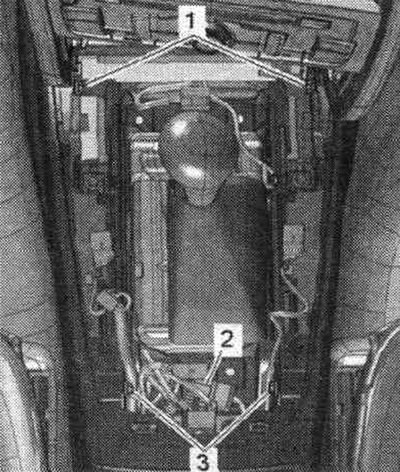


Remove the center console insert. Remove the front ashtray. Version with 12V socket: Disconnect…


Configuration option without front. armrest: Remove the center console trim and unscrew the nuts "1". Telephone/mobile phone version: Disconnect the plug connections. Lift the center console, pull it out of the dashboard towards the rear and remove it above the automatic transmission selector/gear shift lever.
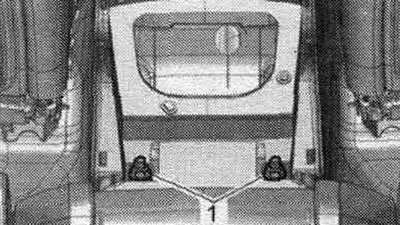
Configuration option without front. armrest: Remove the center console trim and unscrew the nuts…


Installation in reverse order. Make sure that the center console fits snugly against the dashboard.

Removal and installation the decorative trim on the center console


Remove the center console. Unscrew bolts "1...8" and remove decorative trim "9" of the center console.
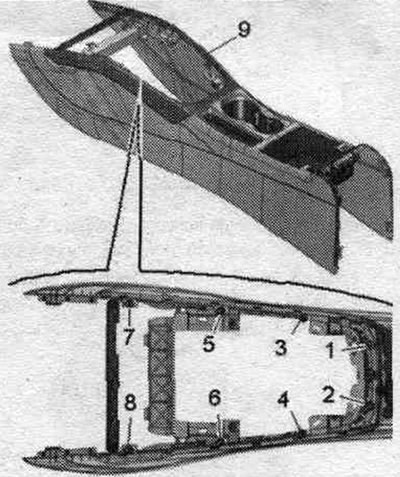
Remove the center console. Unscrew bolts «1...8» and remove decorative trim «9» of the center…


Installation


Installation in reverse order. On both sides, install felt strips (45X8 mm) "pos. 2" at a distance "a" from the edge of the decorative trim "1" of the center console. Gap size "a" = 7 mm.
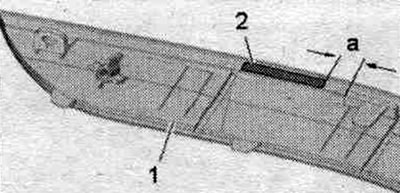


Installation in reverse order. On both sides, install felt strips (45X8 mm) «pos. 2» at a distance…


Tighten the bolts in sequence. "1...8".

Removal and installation the drink holder


Remove the center console. Unscrew bolts "2...9" and remove drink holder "1" downwards.
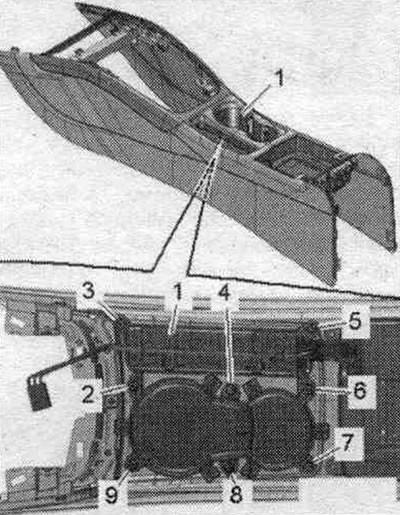
Remove the center console. Unscrew bolts «2...9» and remove drink holder «1» downwards.


Option with inverter and socket, 12 V; 230 V "U13": unscrew the "arrow" bolts, remove the inverter with the socket "pos. 1" from the drink holder "2".
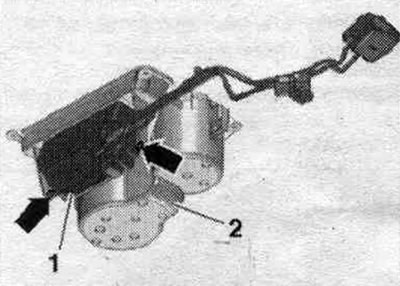
Option with inverter and socket, 12 V; 230 V «U13»: unscrew the «arrow» bolts, remove the inverter…


Installation in reverse order.

Removal and installation the storage compartment


Remove the center console. Unscrew bolts "2...5" and remove storage compartment "1" downwards. Option with telephone/mobile phone: remove telephone/mobile phone.
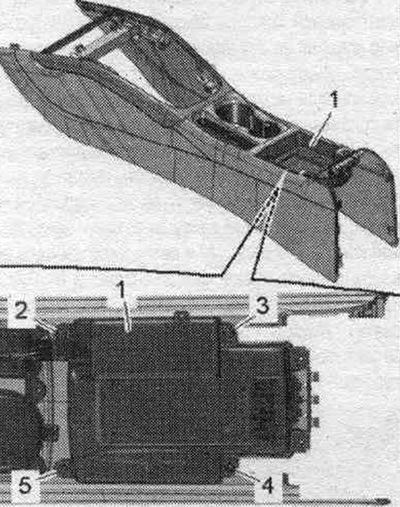
Remove the center console. Unscrew bolts «2...5» and remove storage compartment «1» downwards.…


Installation in reverse order.

Removal and installation the center console holder


Remove the center console. Option with antenna system. access control and engine start right: remove antenna 1 in the passenger compartment of the vehicle. Access control and engine start right system "R138". Unscrew nuts "3" and "4". Detach holder "5" from covers "1" and "2" and remove.
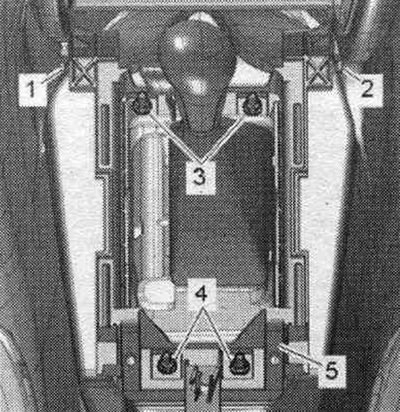
Remove the center console. Option with antenna system. access control and engine start right:…


Installation in reverse order.

The original article is located on the online resource: audimanual
The article was checked by auto expert Timur Bazhenov
This article is available at russian, bulgarian, belarusian, ukrainian, serbian, croatian, romanian, polish, slovak, hungarian

Share information:
Previous articles
Audi A4 B8: Interior
Next articles

Storage compartments/pads
Front center armrest — removal and installation
Rearview mirror — removal and installation
Front panel — removal and installation
Front Panel Center Pipe — Removal and Installation


Similar articles on other Audi car models:
Center console — removal and installation Audi 80 B3 (1986-1991, petrol)
Removal and installation the center console Audi 100 C3 (1982-1990)
Removal and installation the lower center console Audi A3 Type 8L (1996-2003)
Front center console Audi A6 C5 (1997-2004)
Central console Audi A8 D2 (1994-2002)
Insert for center console Audi Q5 Type 8R (2008-2017)
Removal and installation the side trim of the rear part of the… Audi A2 (1999-2005)
Link to this page in different formats


Visitor comments

No comments yet


How much will 43 + 29 =


A4(B8, 2007-2015) 
  • General information
  • Operating instructions
  • Power unit
  • Petrol engines 1.8 l
  • Petrol engines 1.8/2.0 l
  • Petrol engines 3.0 l
  • Petrol engines 3.2 l
  • Fuel system (petrol)
  • Diesel engines 2.0 l (CA*)
  • Diesel engines 2.0 l (CJCB)
  • Diesel engines 2.7/3.0 l
  • Diesel engines 3.0 l
  • Fuel system (diesel)
  • Transmission
  • Manual gearbox 0B1
  • Manual gearbox 0B2
  • Manual gearbox 0B3
  • Manual gearbox 0B4
  • Automatic transmission 0B5
  • Automatic transmission 0B6
  • Automatic transmission 0AW
  • All-wheel drive system
  • Chassis
  • Front suspension
  • Rear suspension
  • Brake system
  • Steering system
  • Body
  • Exterior
  • Interior
  • Seats
  • Doors, locks and windows
  • Security system
  • Heating and air conditioning
  • Electrical equipment
  • Audio system
  • Power devices
  • Equipment and devices
  • Lighting and lamps
  • Electrical circuits
 
A4(B7, 2004-2008) 
  • General information
  • Introduction to manual
  • Troubleshooting
  • Operating instructions
  • Maintenance
  • Power unit
  • Petrol engines 2.0 (ALT)
  • Petrol engines 2.0 (TFSI)
  • Petrol engines 1.8 (MPI)
  • Diesel engines
  • Cooling system
  • Air conditioner
  • Fuel and exhaust system
  • Ignition system
  • Starting and charging
  • Transmission
  • Clutch
  • Manual gearbox
  • Automatic gearbox
  • Drive shafts
  • Chassis
  • Brake system
  • Front suspension
  • Rear suspension
  • Steering
  • Body
  • Exterior
  • Interior
  • Electrical equipment
  • Equipment and devices
  • Lighting and signaling
  • Windscreen wipers and washers
  • Electrical diagrams
  • Electrical diagrams (since 2007)
 
A4(B6, 2000-2006) 
  • General information
  • Vehicle Description
  • User manual
  • Maintenance
  • Power unit
  • Gasoline engine
  • Diesel engine
  • Lubrication system
  • Cooling system
  • Supply system
  • Injection system
  • Exhaust system
  • Ignition and control
  • Transmission
  • Gear box
  • Clutch and drive shafts
  • Chassis
  • Brake system
  • Car suspension
  • Steering
  • Body
  • Heating and ventilation
  • Exterior (external elements)
  • Interior (internal elements)
  • Electrical equipment
  • Power devices
  • Lighting and appliances
  • Electrical circuits
 
A4(B6, 2000-2006, petrol) 
  • General information
  • Introduction to the guide
  • Car care
  • Power unit
  • Engine repair
  • Lubrication system
  • Cooling system
  • Injection and control system
  • Ignition system
  • Power and exhaust system
  • Transmission
  • Clutch and drive shafts
  • Car gearbox
  • Chassis
  • Suspension and wheels
  • Steering
  • Brake system
  • Body
  • Interior
  • Exterior
  • Electrical equipment
  • Equipment and devices
  • Lighting and signaling
  • Power devices
  • Electrical circuits
 
A4(B5, 1994-2001) 
  • General information
  • Introduction to the guide
  • Car care
  • Maintenance (gasoline)
  • Maintenance (diesel)
  • Power unit
  • Gasoline engines
  • Diesel engines
  • Engine overhaul
  • Cooling system
  • Fuel injection (gasoline)
  • Fuel system (diesel)
  • Exhaust system
  • Ignition system
  • Transmission
  • Clutch
  • Mechanical gearbox
  • Automatic gearbox
  • Drive shafts
  • Chassis
  • Brake system
  • Car suspension
  • Steering
  • Body
  • Exterior
  • Interior
  • Doors, locks and windows
  • Heating and ventilation
  • Electrical equipment
  • Power devices
  • Equipment and devices
  • Electrical circuits
 
A4(B5, 1994-2001, petrol) 
  • General information
  • Vehicle description
  • Maintenance
  • Power unit
  • Engine repair
  • Turbocharging
  • Exhaust system
  • Cooling system
  • Ignition system
  • Fuel system
  • Motronic injection system
  • MPI and MPFI injection system
  • Transmission
  • Clutch
  • Gearbox and shafts
  • Chassis
  • Steering
  • Car suspension
  • Brake system
  • Wheels and tires
  • Body
  • Heating and ventilation
  • Body parts
  • Electrical equipment
  • Fuses and relays
  • Power devices
  • Lighting and lamps
  • Tools and devices
  • Electrical circuits
 
AudiManual.ru © 2017-2026 · Mobile version · Feedback · Sitemap: EN BG BY UA RS HR RO PL SK HU · Site search · News and articles
80 B2 · 80 B3 petrol · 80 B3 · 80 B4 · 100 C3 diesel · 100 C3 petrol · 100 C3 · 100 C4 petrol · 100 C4 · A3 Type 8L · A4 B5 petrol · A4 B5 · A4 B6 petrol · A4 B6 · A4 B7 · A4 B8 · A6 C4 · A6 C5 · A6 C5 Allroad · A8 D2 · Q5 Type 8R · Q7 Typ 4L · Audi A2 ·
This site uses cookies 🍪. Click the button to accept this fact.