
Repair Chevrolet Repair Toyota Repair Honda Repair AvtoVAZ Repair Mercedes-Benz Repair BMW Repair Opel
Home  |  Contacts  |  Sitemap  |    
English Русский
Български
Беларускі
Український
Српски
Hrvatski
Română
Polski
Slovenský
Magyar
AudiManual.ru


  • AUDI 80
  • AUDI 100
  • AUDI A3
  • AUDI A4
  • AUDI A6
  • AUDI A8
  • AUDI Q
  • OTHER
  • ARTICLES
B8 (2007-2015) B7 (2004-2008) B6 (2000-2006) B6 (2000-2006, petrol) B5 (1994-2001) B5 (1994-2001, petrol)

Rearview mirror — removal and installation (Audi A4 B8)

  • Home
  • Audi A4
  • B8 (2007-2015)
  • Body
  • Interior
  • Rearview mirror — removal and installation
            0
Table of contents: Rearview mirror. species ↓ Interior rearview mirror. view with… ↓ Removal and installation the… ↓ Turning the auto function on and… ↓ Turning the compass display off and… ↓

Rearview mirror. species
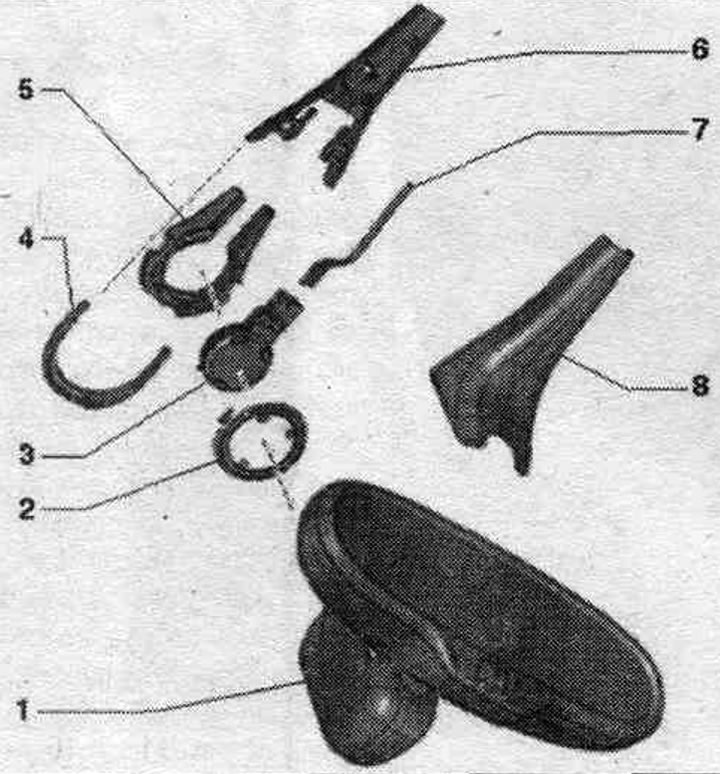


1. Rear mirror. species.

1. Rear mirror. species.
2. Retaining spring.
3. Rain and light sensor "G397".
4. Upper overlay.
5. Mounting plate: glued to the windshield.
6. Upper overlay.
7. Electric wire.
8. Bottom cover.


Interior rearview mirror. view with lane keeping assist
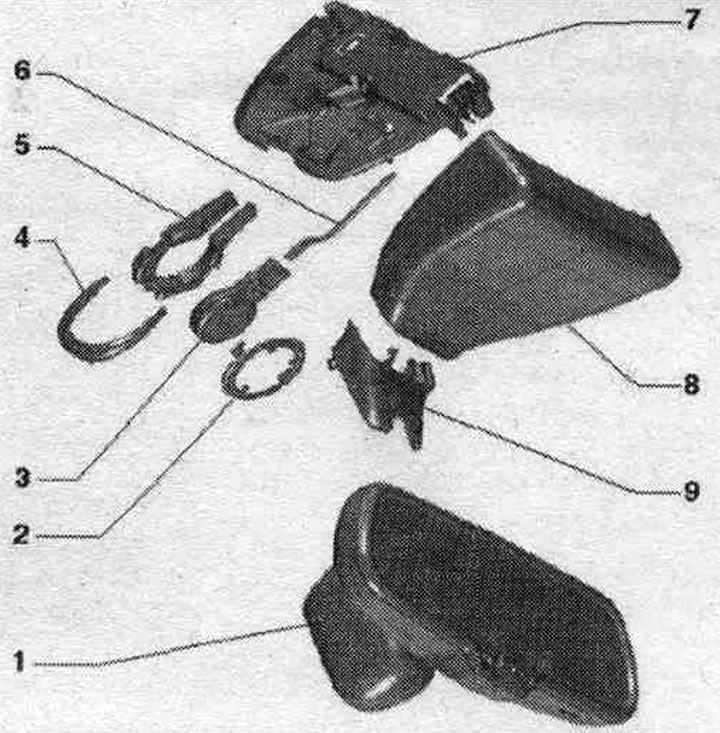


1. Rear mirror. species.

1. Rear mirror. species.
2. Retaining spring.
3. Rain and light sensor "G397".
4. Upper overlay.
5. Mounting plate: glued to the windshield.
6. Electric wire.
7. Upper overlay.
8. Bottom cover.
9. Mirror leg cover.


Removal and installation the interior rearview mirror. species


When removing and installing, take into account safety regulations. and general instructions for handling the interior rearview mirror. species.


Lane Keeping Assist option: Unlock the lower cover "1" of the "arrow." Use a screwdriver to pry the lower cover off.
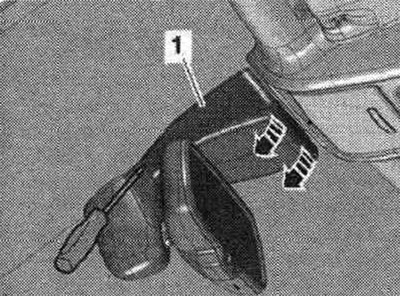
Lane Keeping Assist option: Unlock the lower cover «1» of the «arrow.» Use a screwdriver to pry the…


Using a screwdriver, unlock cover "1" on the mirror base and remove it.
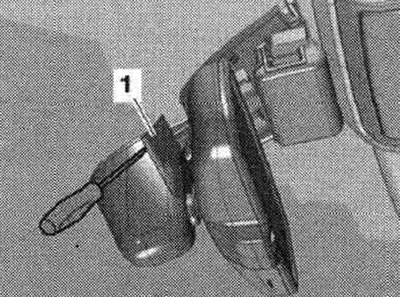
Using a screwdriver, unlock cover «1» on the mirror base and remove it.


Configuration without lane keeping assist: Remove cover "1" from below the "arrow" mirror base.
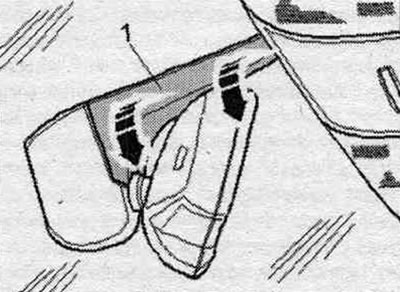
Configuration without lane keeping assist: Remove cover «1» from below the «arrow» mirror base.


All


Remove the plug connection from the mount. Disconnect plug connection "2". Turn the interior mirror by leg "1" counterclockwise "arrow" until it stops. Remove the interior mirror from the mounting plate.
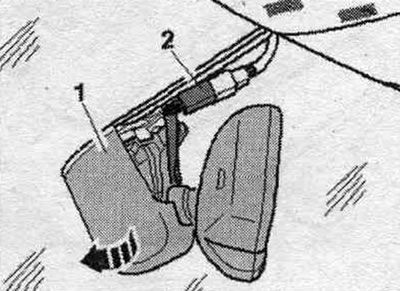


Remove the plug connection from the mount. Disconnect plug connection «2». Turn the interior mirror…


Installation in reverse order. Apply the interior mirror at an angle of 30° relative to its mounting position. Then turn the mirror clockwise until it stops.

Turning the auto function on and off. darkening
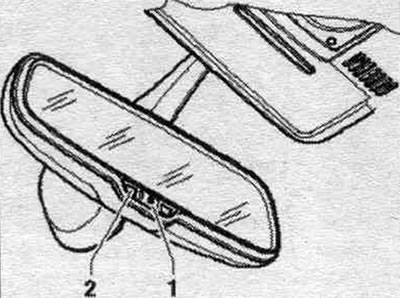


Turning the auto function on and off. darkening


Automatic dimming is turned on and off by briefly pressing (less than 3 seconds) keys "1". Automatic dimming function "On": Indicator "2" lights up. Automatic dimming function "Off": Indicator "2" goes out. Automatic dimming is activated every time the ignition is turned on. If you turn off the automatic dimming function, the ignition is turned off. if the interior mirror dims, the automatic dimming of the exterior mirrors will also turn off. In dimming mode, the mirror surface becomes lighter if the interior light or reverse gear is turned on. please note that the automatic dimming of the interior mirror only works properly if the rear sunshade is raised. glass.


Turning the compass display off and on
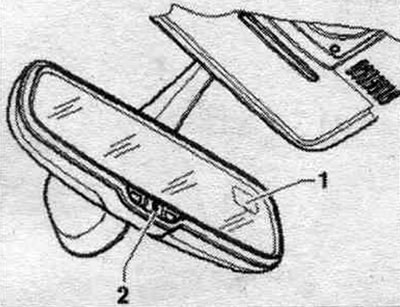


Turning the compass display off and on


Press and hold key "2" for 3 to 6 seconds. Compass display "1" toggles between "On" and "Off.". Compass display "On" - the cardinal direction indicator lights up. Compass display "Off" - cardinal direction is not displayed.

Checking the operation of the interior rearview mirror. auto-darkening type


The interior mirror is installed, the ignition is on, the reverse gear is not engaged, the auto function. the dimming system must be turned on, the corresponding indicator must be lit, the doors and glove compartment must be closed, and the interior lighting must be turned off. Cover the "arrow" photo sensor on the side of the housing "1." Shine a flashlight, for example, on the photo sensor from the side of mirror "2." After a short time, the interior mirror should darken.
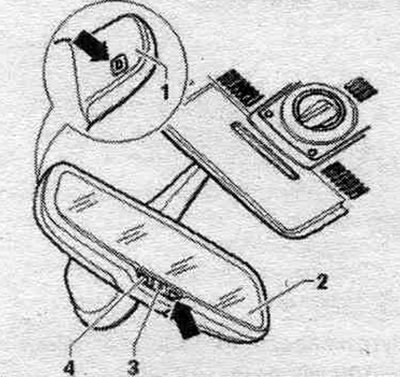
The interior mirror is installed, the ignition is on, the reverse gear is not engaged, the auto…


(This article was copied from the website: Audimanual.ru)
The article was checked by auto expert Timur Bazhenov
This article is available at russian, bulgarian, belarusian, ukrainian, serbian, croatian, romanian, polish, slovak, hungarian

Share information:
Previous articles
Audi A4 B8: Interior
Next articles

Front center armrest — removal and installation
Center console — removal and installation
Storage compartments/pads
Front panel — removal and installation
Front Panel Center Pipe — Removal and Installation
Interior trim — removal and installation
Sunshade on the rear window


Similar articles on other Audi car models:
Outside mirror — removal and installation Audi 80 B3 (1986-1991, petrol)
Removal and installation the outside rearview mirror Audi 100 C3 (1982-1990)
Removal and installation interior mirror Audi A3 Type 8L (1996-2003)
Mechanism for adjusting the position of the outside rearview… Audi A6 C5 (1997-2004)
Interior rear view mirror Audi A8 D2 (1994-2002)
Removal and installation the outside rearview mirror Audi Q7 Typ 4L (2005-2015, diesel)
Removal and installation the interior rearview mirror Audi A2 (1999-2005)
Link to this page in different formats


Visitor comments

No comments yet


How much will 23 + 39 =


A4(B8, 2007-2015) 
  • General information
  • Operating instructions
  • Power unit
  • Petrol engines 1.8 l
  • Petrol engines 1.8/2.0 l
  • Petrol engines 3.0 l
  • Petrol engines 3.2 l
  • Fuel system (petrol)
  • Diesel engines 2.0 l (CA*)
  • Diesel engines 2.0 l (CJCB)
  • Diesel engines 2.7/3.0 l
  • Diesel engines 3.0 l
  • Fuel system (diesel)
  • Transmission
  • Manual gearbox 0B1
  • Manual gearbox 0B2
  • Manual gearbox 0B3
  • Manual gearbox 0B4
  • Automatic transmission 0B5
  • Automatic transmission 0B6
  • Automatic transmission 0AW
  • All-wheel drive system
  • Chassis
  • Front suspension
  • Rear suspension
  • Brake system
  • Steering system
  • Body
  • Exterior
  • Interior
  • Seats
  • Doors, locks and windows
  • Security system
  • Heating and air conditioning
  • Electrical equipment
  • Audio system
  • Power devices
  • Equipment and devices
  • Lighting and lamps
  • Electrical circuits
 
A4(B7, 2004-2008) 
  • General information
  • Introduction to manual
  • Troubleshooting
  • Operating instructions
  • Maintenance
  • Power unit
  • Petrol engines 2.0 (ALT)
  • Petrol engines 2.0 (TFSI)
  • Petrol engines 1.8 (MPI)
  • Diesel engines
  • Cooling system
  • Air conditioner
  • Fuel and exhaust system
  • Ignition system
  • Starting and charging
  • Transmission
  • Clutch
  • Manual gearbox
  • Automatic gearbox
  • Drive shafts
  • Chassis
  • Brake system
  • Front suspension
  • Rear suspension
  • Steering
  • Body
  • Exterior
  • Interior
  • Electrical equipment
  • Equipment and devices
  • Lighting and signaling
  • Windscreen wipers and washers
  • Electrical diagrams
  • Electrical diagrams (since 2007)
 
A4(B6, 2000-2006) 
  • General information
  • Vehicle Description
  • User manual
  • Maintenance
  • Power unit
  • Gasoline engine
  • Diesel engine
  • Lubrication system
  • Cooling system
  • Supply system
  • Injection system
  • Exhaust system
  • Ignition and control
  • Transmission
  • Gear box
  • Clutch and drive shafts
  • Chassis
  • Brake system
  • Car suspension
  • Steering
  • Body
  • Heating and ventilation
  • Exterior (external elements)
  • Interior (internal elements)
  • Electrical equipment
  • Power devices
  • Lighting and appliances
  • Electrical circuits
 
A4(B6, 2000-2006, petrol) 
  • General information
  • Introduction to the guide
  • Car care
  • Power unit
  • Engine repair
  • Lubrication system
  • Cooling system
  • Injection and control system
  • Ignition system
  • Power and exhaust system
  • Transmission
  • Clutch and drive shafts
  • Car gearbox
  • Chassis
  • Suspension and wheels
  • Steering
  • Brake system
  • Body
  • Interior
  • Exterior
  • Electrical equipment
  • Equipment and devices
  • Lighting and signaling
  • Power devices
  • Electrical circuits
 
A4(B5, 1994-2001) 
  • General information
  • Introduction to the guide
  • Car care
  • Maintenance (gasoline)
  • Maintenance (diesel)
  • Power unit
  • Gasoline engines
  • Diesel engines
  • Engine overhaul
  • Cooling system
  • Fuel injection (gasoline)
  • Fuel system (diesel)
  • Exhaust system
  • Ignition system
  • Transmission
  • Clutch
  • Mechanical gearbox
  • Automatic gearbox
  • Drive shafts
  • Chassis
  • Brake system
  • Car suspension
  • Steering
  • Body
  • Exterior
  • Interior
  • Doors, locks and windows
  • Heating and ventilation
  • Electrical equipment
  • Power devices
  • Equipment and devices
  • Electrical circuits
 
A4(B5, 1994-2001, petrol) 
  • General information
  • Vehicle description
  • Maintenance
  • Power unit
  • Engine repair
  • Turbocharging
  • Exhaust system
  • Cooling system
  • Ignition system
  • Fuel system
  • Motronic injection system
  • MPI and MPFI injection system
  • Transmission
  • Clutch
  • Gearbox and shafts
  • Chassis
  • Steering
  • Car suspension
  • Brake system
  • Wheels and tires
  • Body
  • Heating and ventilation
  • Body parts
  • Electrical equipment
  • Fuses and relays
  • Power devices
  • Lighting and lamps
  • Tools and devices
  • Electrical circuits
 
AudiManual.ru © 2017-2026 · Mobile version · Feedback · Sitemap: EN BG BY UA RS HR RO PL SK HU · Site search · News and articles
80 B2 · 80 B3 petrol · 80 B3 · 80 B4 · 100 C3 diesel · 100 C3 petrol · 100 C3 · 100 C4 petrol · 100 C4 · A3 Type 8L · A4 B5 petrol · A4 B5 · A4 B6 petrol · A4 B6 · A4 B7 · A4 B8 · A6 C4 · A6 C5 · A6 C5 Allroad · A8 D2 · Q5 Type 8R · Q7 Typ 4L · Audi A2 ·
This site uses cookies 🍪. Click the button to accept this fact.