
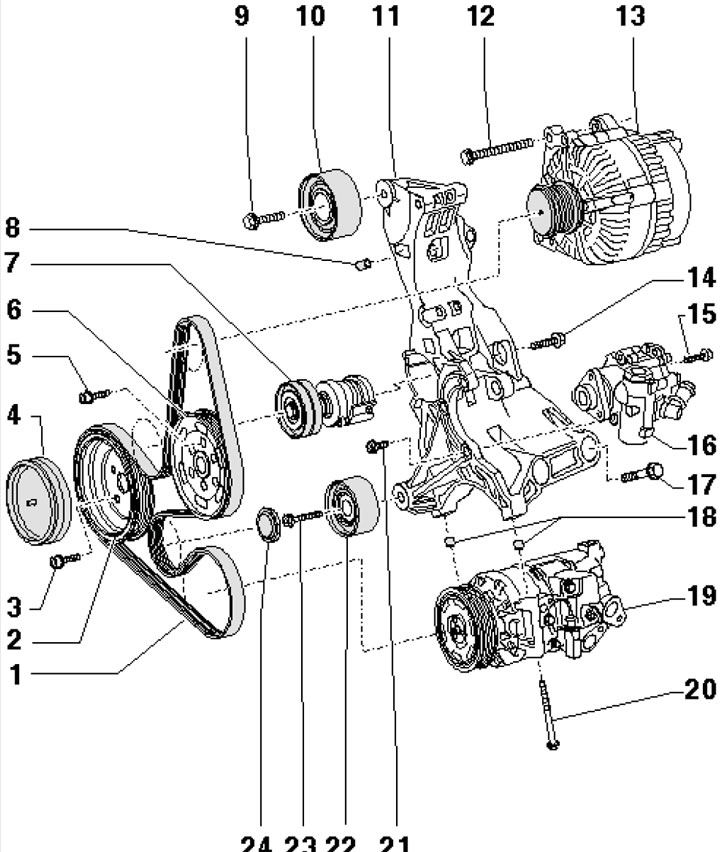
41.1. Generator Belt Installation Details 1. Generator belt; 2. Crankshaft pulley; 3. Crankshaft pulley mounting bolts, 10 Nm, then tighten to an angle of 90°, subject to replacement; 4. Pulley plug 2; 5. Pulley mounting bolts 6, 23 Nm; 6. Power steering pump pulley; 7. Belt tensioner 1; 8. Centering sleeve; 9, 10. Not used; 11. Auxiliary units bracket; 12. Generator mounting bolt, 23 Nm; 13. Generator; 14. Tensioner mounting bolt 7, 23 Nm; 15. Pump mounting bolt 19, 23 Nm; 16. Power steering pump; 17. Bracket mounting bolt 11, 23 Nm; 18. Centering bushings; 19. Air conditioning compressor; 20. Compressor mounting bolt 19, 25 Nm; 21. Bracket mounting bolt 11, 23 Nm; 22. Intermediate roller; 23. Roller mounting bolt 222, 20 Nm, then tighten to an angle of 90°, subject to replacement; 24. Roller plug 22
2. On models with independent/additional heating, remove the screw (1 in illustration 5.4) its exhaust pipe on a sound-insulating casing.
3. Unscrew the fasteners (1 and 2 in Illustration 5.5) and remove the front soundproofing screen.
4. Remove the plugs, give away the nuts (see illustration 40.11) and remove the top engine cover, if necessary, remove the dipstick to measure the oil level. If present, remove the sound insulation located under the top cover.
5. Remove the bolts (arrows in illustration 17.11) and remove the air ducts and 2).
6. Release the clamps (arrows in the illustration) and remove the upper timing belt cover.

41.6. Timing Belt Upper Cover Fasteners
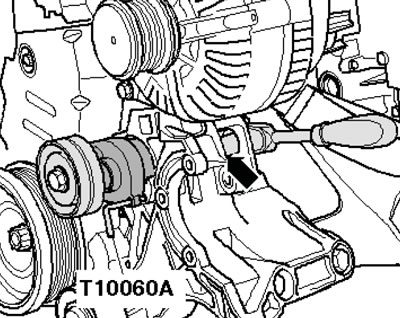
7. Mark the alternator belt with chalk or a felt-tip pen to indicate the direction of rotation so that you can install the belt in the same way. Loosen the belt tension by turning the tensioner in the direction of the arrow (see illustration 40.23), And (if tensioner or pulley removal is required) secure the tensioner with tool No. T10060A. Remove the belt from the generator pulley.
8. If necessary, after removing the tensioner, unscrew the bolt (arrow on the illustration) and remove the tensioner.
41.8. Removing the tensioner
9. If it is necessary to remove the crankshaft pulley, unscrew the bolts that secure it (3 in illustration 41.1), holding the shaft from turning by the central bolt.
10. Installation is carried out in the reverse order of dismantling the components. Before installing the belt, make sure that all units are (generator, compressor, power steering pump) are mounted securely. Install the used belt so that it runs in the same direction as before. Pay attention to the correct seating of the belt on the pulleys and its running.
The full version is posted on the resource AUDIMANUAL.ru