
Table of contents: Checking the initial position of the… ↓ Setting the guide link to its… ↓
1. Close the sliding panel.
2. Remove the front ceiling light, refer to Section Removal and installation interior lighting fixtures.
3. Loosen the mounting screws and remove the sliding panel motor.
4. Do not disconnect the electric motor wires.
5. Turn on the ignition.
6. Set the rotary switch to the "Roof closed" position. The electric motor operates automatically and stops in the zero position.
7. In this position, install the electric motor with the roof closed and secure it.
8. Install the front lamp.
Checking the initial position of the rocker guide
Warning: The starting position can be checked using a pocket mirror and flashlight with the sliding panel installed.
1. Remove the side trims on the left and right, refer to the corresponding Section.
2. Open and close the sliding panel again.
3. Slide the ceiling panel all the way back.
4. Place the pocket mirror on the sliding panel and check the original position. When installed correctly, the rectangular groove in the sliding mechanism of the slide guide (1) should match the groove (arrow on the accompanying illustration). Otherwise, make adjustments.
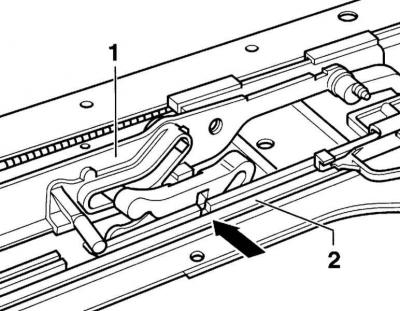
Setting the guide link to its original position
1. Remove the sliding panel.
2. Remove the panel motor.
3. Remove the side covers, refer to the relevant Section.
4. Move the rocker guides (1) on both sides from the rear position to the front.
5. Install the rectangular groove in the slide guide extension mechanism (1) so that it coincides with the groove (arrow) on the guide rail (2) of the ceiling panel. This sets the initial position of the slide guide.
6. Return the sliding panel motor to its original position.
7. Install the side trims.
(The original source of the article can be found on the website: AudiManual)