Repair Chevrolet Repair Toyota Repair Honda Repair AvtoVAZ Repair Mercedes-Benz Repair BMW Repair Opel
Home  |  Contacts  |  Sitemap  |    
English Русский
Български
Беларускі
Український
Српски
Hrvatski
Română
Polski
Slovenský
Magyar
AudiManual.ru


  • AUDI 80
  • AUDI 100
  • AUDI A3
  • AUDI A4
  • AUDI A6
  • AUDI A8
  • AUDI Q
  • OTHER
  • ARTICLES
B8 (2007-2015) B7 (2004-2008) B6 (2000-2006) B6 (2000-2006, petrol) B5 (1994-2001) B5 (1994-2001, petrol)

Radiator — removal, inspection and installation (Audi A4 B5)

  • Home
  • Audi A4
  • B5 (1994-2001)
  • Power unit
  • Cooling system
  • Radiator — removal, inspection and installation
            0
Table of contents: Removal ↓ Examination ↓ Installation ↓

Removal


1. Disconnect the negative battery cable. Remove the front bumper as described in chapter 11.

2. Drain the coolant as described in the relevant section chapters 1.

3. If there is a fan switch screwed into the radiator, disconnect the wiring from it.

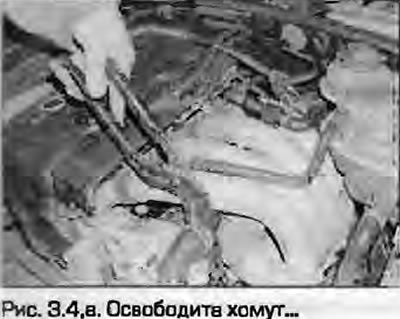
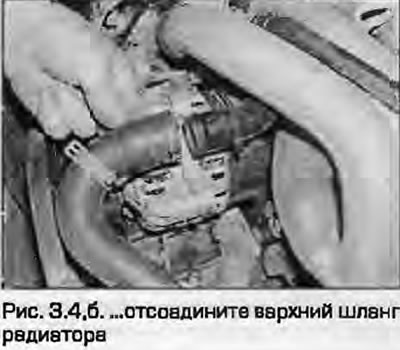
4. Loosen the clamps and disconnect the upper and lower hoses from the radiator, remembering the routing (fig. 3.4, a, b).

4. Loosen the clamps and disconnect the upper and lower hoses from the radiator, remembering the…

5. On models with automatic transmission, clean the areas around the hydraulic tube connections to the radiator. Loosen the mounting bolts, then carefully pull both tubes away from the radiator. Tighten the tube openings to prevent dirt from getting into the system. Discard the sealing rings; new ones will be required for installation.


6. On models with air conditioning, remove the nuts and bolts securing the condenser to the radiator and all the nuts and bolts securing the pipes. Release the condenser from the radiator and suspend it so as not to put any stress on the pipes. DO NOT DISCONNECT the refrigerant pipes (see paragraph 10).

7. On models with air conditioning, disconnect the wiring from the pressure sensor on the right side of the radiator.

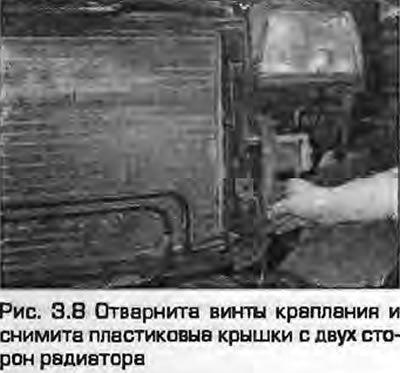
8. Loosen the mounting bolts and remove the plastic covers from the left and right sides of the radiator. If necessary, loosen the mounting screws of the air intake duct to the top of the radiator (Fig. 3.8).

8. Loosen the mounting bolts and remove the plastic covers from the left and right sides of the…


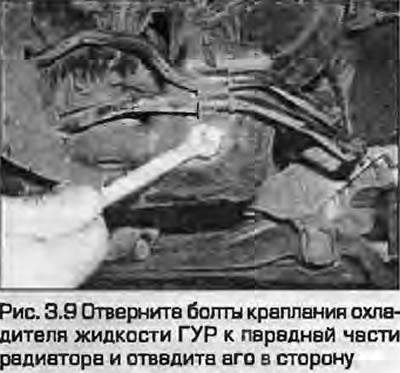
9. Unscrew the bolts securing the power steering cooler to the front of the radiator and move it to the side (Fig. 3.9). Tie the cooler to the body so as not to put stress on the hoses.

9. Unscrew the bolts securing the power steering cooler to the front of the radiator and move it to…


10. Remove the upper radiator mounts, tilt the radiator forward and remove it from the lower supports. On models with air conditioning, proceed with extreme caution to avoid damaging the condenser.


Examination


11. If the radiator was removed for flushing, flush it in the reverse direction as described in paragraph 32 of chapter 1A or 1B. Remove dirt from the outside of the radiator cells, using compressed air and a brush. Be careful, as the cells are very fragile.

12. If necessary, contact a specialist for help in determining the suitability of the radiator.

13. Take the leaking radiator to a specialized radiator repair shop. Do not try to weld or solder the radiator yourself, you can damage the plastic components - experience is needed.

14. If the radiator is to be sent for repair, remove all sensors and hoses from it.

15. Check the condition of the radiator supports, replace any defective parts.

Installation


13. Installation - reverse procedure. Please note the following:
  • a) Make sure that the radiator is securely fastened to the lower supports and upper fasteners.
  • b) On automatic models, install new O-rings on the tube mounts, lubricating them with clean transmission fluid before installation to make installation easier. Push both tubes in until they stop, then install the mounting bolts and tighten them securely.
  • c) Make sure that the hoses are connected correctly and that their clamps are securely tightened.
  • d) Fill the system with coolant as described in the relevant section chapters 1.
  • d) On models with automatic transmission, finally check the fluid level in the box and top up the fluid if necessary, as described in the relevant section chapters 1.
The article was checked by auto expert Timur Bazhenov
This article is available at russian, bulgarian, belarusian, ukrainian, serbian, croatian, romanian, polish, slovak, hungarian

Share information:
Previous articles
Audi A4 B5: Cooling system
Next articles

Coolant Hoses — Disconnecting and Replacing
Cooling system — general information
Cooling and Heating System Specifications
Thermostat — Removal, Checking and Installation
Electric Fan — Checking, Removing and Installing
Electrical system sensors — checking, removal and installation
Water pump — removal and installation


Similar articles on other Audi car models:
Radiator — removal, inspection, cleaning and installation Audi 80 B3 (1986-1991, petrol)
Radiator — removal, inspection, cleaning and installation Audi 100 C3 (1982-1990, diesel)
Removal and installation the radiator and fan Audi A3 Type 8L (1996-2003)
Clutch — removal, installation and inspection Audi A6 C5 Allroad (1999-2005)
Removal and installation the radiator Audi A8 D2 (1994-2002)
Removal and installation the radiator, its casing and fans Audi Q7 Typ 4L (2005-2015, diesel)
Removal and installation an oil radiator Audi A2 (1999-2005)
Link to this page in different formats


Visitor comments

No comments yet


How much will 25 + 12 =


A4(B8, 2007-2015) 
  • General information
  • Operating instructions
  • Power unit
  • Petrol engines 1.8 l
  • Petrol engines 1.8/2.0 l
  • Petrol engines 3.0 l
  • Petrol engines 3.2 l
  • Fuel system (petrol)
  • Diesel engines 2.0 l (CA*)
  • Diesel engines 2.0 l (CJCB)
  • Diesel engines 2.7/3.0 l
  • Diesel engines 3.0 l
  • Fuel system (diesel)
  • Transmission
  • Manual gearbox 0B1
  • Manual gearbox 0B2
  • Manual gearbox 0B3
  • Manual gearbox 0B4
  • Automatic transmission 0B5
  • Automatic transmission 0B6
  • Automatic transmission 0AW
  • All-wheel drive system
  • Chassis
  • Front suspension
  • Rear suspension
  • Brake system
  • Steering system
  • Body
  • Exterior
  • Interior
  • Seats
  • Doors, locks and windows
  • Security system
  • Heating and air conditioning
  • Electrical equipment
  • Audio system
  • Power devices
  • Equipment and devices
  • Lighting and lamps
  • Electrical circuits
 
A4(B7, 2004-2008) 
  • General information
  • Introduction to manual
  • Troubleshooting
  • Operating instructions
  • Maintenance
  • Power unit
  • Petrol engines 2.0 (ALT)
  • Petrol engines 2.0 (TFSI)
  • Petrol engines 1.8 (MPI)
  • Diesel engines
  • Cooling system
  • Air conditioner
  • Fuel and exhaust system
  • Ignition system
  • Starting and charging
  • Transmission
  • Clutch
  • Manual gearbox
  • Automatic gearbox
  • Drive shafts
  • Chassis
  • Brake system
  • Front suspension
  • Rear suspension
  • Steering
  • Body
  • Exterior
  • Interior
  • Electrical equipment
  • Equipment and devices
  • Lighting and signaling
  • Windscreen wipers and washers
  • Electrical diagrams
  • Electrical diagrams (since 2007)
 
A4(B6, 2000-2006) 
  • General information
  • Vehicle Description
  • User manual
  • Maintenance
  • Power unit
  • Gasoline engine
  • Diesel engine
  • Lubrication system
  • Cooling system
  • Supply system
  • Injection system
  • Exhaust system
  • Ignition and control
  • Transmission
  • Gear box
  • Clutch and drive shafts
  • Chassis
  • Brake system
  • Car suspension
  • Steering
  • Body
  • Heating and ventilation
  • Exterior (external elements)
  • Interior (internal elements)
  • Electrical equipment
  • Power devices
  • Lighting and appliances
  • Electrical circuits
 
A4(B6, 2000-2006, petrol) 
  • General information
  • Introduction to the guide
  • Car care
  • Power unit
  • Engine repair
  • Lubrication system
  • Cooling system
  • Injection and control system
  • Ignition system
  • Power and exhaust system
  • Transmission
  • Clutch and drive shafts
  • Car gearbox
  • Chassis
  • Suspension and wheels
  • Steering
  • Brake system
  • Body
  • Interior
  • Exterior
  • Electrical equipment
  • Equipment and devices
  • Lighting and signaling
  • Power devices
  • Electrical circuits
 
A4(B5, 1994-2001) 
  • General information
  • Introduction to the guide
  • Car care
  • Maintenance (gasoline)
  • Maintenance (diesel)
  • Power unit
  • Gasoline engines
  • Diesel engines
  • Engine overhaul
  • Cooling system
  • Fuel injection (gasoline)
  • Fuel system (diesel)
  • Exhaust system
  • Ignition system
  • Transmission
  • Clutch
  • Mechanical gearbox
  • Automatic gearbox
  • Drive shafts
  • Chassis
  • Brake system
  • Car suspension
  • Steering
  • Body
  • Exterior
  • Interior
  • Doors, locks and windows
  • Heating and ventilation
  • Electrical equipment
  • Power devices
  • Equipment and devices
  • Electrical circuits
 
A4(B5, 1994-2001, petrol) 
  • General information
  • Vehicle description
  • Maintenance
  • Power unit
  • Engine repair
  • Turbocharging
  • Exhaust system
  • Cooling system
  • Ignition system
  • Fuel system
  • Motronic injection system
  • MPI and MPFI injection system
  • Transmission
  • Clutch
  • Gearbox and shafts
  • Chassis
  • Steering
  • Car suspension
  • Brake system
  • Wheels and tires
  • Body
  • Heating and ventilation
  • Body parts
  • Electrical equipment
  • Fuses and relays
  • Power devices
  • Lighting and lamps
  • Tools and devices
  • Electrical circuits
 
AudiManual.ru © 2017-2026 · Mobile version · Feedback · Sitemap: EN BG BY UA RS HR RO PL SK HU · Site search · News and articles
80 B2 · 80 B3 petrol · 80 B3 · 80 B4 · 100 C3 diesel · 100 C3 petrol · 100 C3 · 100 C4 petrol · 100 C4 · A3 Type 8L · A4 B5 petrol · A4 B5 · A4 B6 petrol · A4 B6 · A4 B7 · A4 B8 · A6 C4 · A6 C5 · A6 C5 Allroad · A8 D2 · Q5 Type 8R · Q7 Typ 4L · Audi A2 ·
This site uses cookies 🍪. Click the button to accept this fact.