
Table of contents: Execution order ↓ Replacing graphite brushes ↓ Dismantling the electromagnetic… ↓
Dismantled starter (5)
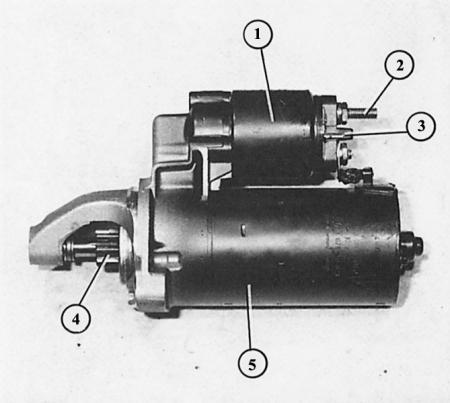
- 1 - electromagnetic switch;
- 2 - terminal 30 wire (from battery);
- 3 - terminal 50 wire (from the ignition switch);
- 4 - starter drive gear.
Here the starter is disassembled
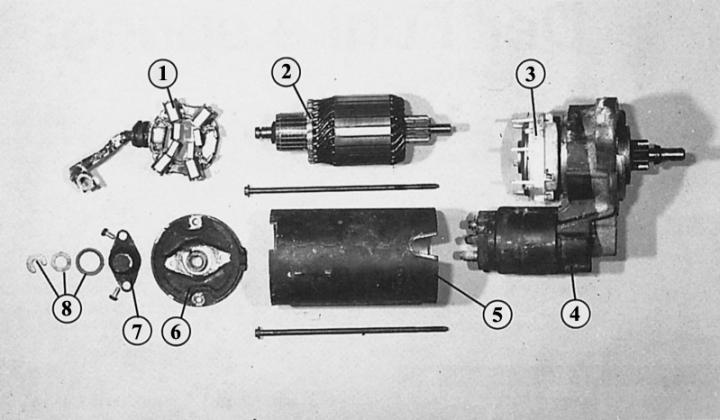
- 1 - graphite brush bracket;
- 2 - anchor;
- 3 - gear transmission;
- 4 - bearing housing;
- 5 - body;
- 6 - housing cover;
- 7 - bearing cap;
- 8 - safety washer, mounting washer and gasket.
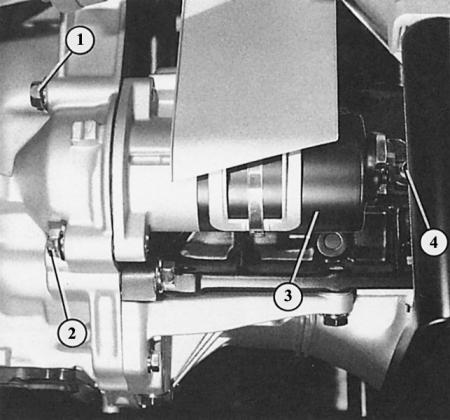
The numbers "1", "2" and "4" indicate the bolts that must be unscrewed when removing the starter (3) (four-cylinder engine).
Execution order
1. Disconnect the ground wire on the battery, otherwise a short circuit may occur.
2. Remove the lower engine trim (chapter Body parts).
3. Raise the right front part of the vehicle and secure it.
4. Four-cylinder engine: Disconnect all wires at the magnetic switch.
5. Where available, remove the bracket on the starter in front of you in the direction of travel.
6. Unscrew the mounting bolts and nuts on the starter mounting flange (in the direction of travel from behind).
7. Remove the starter.
8. Six-cylinder engine: remove the generator ventilation hose.
9. Unscrew the oil pipe bracket (automatic transmission) on the crankcase and gearbox housing.
10. Remove the wires from the starter solenoid switch.
11. Remove the cover.
12. Remove the D+ wire on the generator.
13. Hang the wires to the starter and generator from the brackets on the body, unscrew the brackets.
14. Unscrew the mounting bolts and nuts on the starter mounting flange (in the direction of travel from behind).
15. Remove the starter from the gearbox bell housing by tilting it downwards.
16. Now press the starter up and pull it out to the side over the gearbox.
17. This work deals with millimeters.
Replacing graphite brushes
If the starter is on strike, then perhaps only the graphite brushes are worn out. These graphite brushes are sold only assembled with a mounting plate. Since the sealing must be broken after opening the starter housing, you need to buy D3 sealant from a spare parts warehouse. With a four-cylinder engine, you also need a powerful soldering iron and solder.
1. Remove the starter.
2. Remove the two slotted head screws on the small bearing cover on the back of the starter and remove the cover.
3. Remove the safety washer and the mounting washer from the end of the shaft located underneath it.
4. Remove both slotted head screws (or nuts with expansion pins) on the back cover of the case and remove the cover.
5. Measure the length of the graphite brushes – minimum length 8 mm.
6. To replace the graphite brushes, unscrew the mounting plate from its connection point on the electromagnetic switch.
7. Reinstall the starter, sealing the housing cover, mounting screws and bearing cover with sealant.
Dismantling the electromagnetic switch
1. Remove the starter.
2. Unscrew the starter wire.
3. Remove the three slotted head screws on the electromagnetic switch mounting flange.
4. Pull the electromagnetic switch back slightly and remove the eye from the starter trigger.