
Table of contents: Windscreen wipers ↓ Is the wiper motor or supply wire… ↓ Removal the windshield wiper motor ↓ Installing a new windshield wiper… ↓
Windscreen wipers
|
Malfunction
|
Its reasons
|
Your help
|
| A. Windscreen wipers don't work | 1. Defective fuse
2. Defect in the unloading relay 3. The windshield wiper drive crank has come loose 4. No continuity in the blue/red lead wire from the fuse box to the windshield wiper switch 5. No conductivity in the motor wire to the mass 6. The windshield wiper motor burned out 7. The windshield wiper switch is faulty |
Replace
Check the relay Screw it on Check the wire
Replace
|
| IN. Windscreen wipers do not work in stage I mode | 1. Defect in terminal 53 of the windshield wiper motor
2. No conductivity in terminals 53a/53 in the windscreen wiper switch |
Replace the engine
Replace the switch |
| WITH. Windscreen wipers do not operate in stage II mode | 1. No conductivity in the wire of terminal 53b from the windshield wiper switch
to the engine
2. No conductivity in terminals 53a/53b in the windscreen wiper switch 3. Defect in terminal 53b on the windshield wiper motor |
Check the wire
Replace the switch Replace the engine |
|
D. Windscreen wipers only work in step mode II |
No conductivity in the wire terminal 53 from the windshield wiper switch to the engine | Check the wire |
| E. Windscreen wipers do not return to their original position | 1. There is no conductivity in the wire of terminal 53e between the windshield wiper switch
and the engine (works via windshield wiper/washer relay)
2. The windshield wiper motor is faulty |
Check the wire
Check with a test lamp: between terminal 53a and ground the lamp should light constantly. Between terminal 53e and ground the lamp should go out before reaching parking positions. When checking in the opposite direction between terminal 53e and the positive the battery lamp should light before reaching the parking position. If not, replace the engine |
| F. Windscreen wipers do not work at intervals | 1. The windshield wiper/washer relay is faulty
2. No continuity in the wire of terminal J between the windshield wiper switch and relay 3. Defect in the contact of terminal J in the windshield wiper switch |
Replace
Check the wire Replace the switch |
|
G.
Intermittent wiper mode does not turn off
|
1. See E 1
2. See F 1 3. Contact J in the windscreen wiper switch does not open 4. Short circuit in the wire of terminal J to the windshield wiper switch |
Replace the switch
Repair the wire |
| N. Windscreen wipers do not wipe dry after use into action of windshield washers | See F 1 | |
| I. Windscreen wipers do not stay in position after switching off parking or stay for a short time | Insufficient sliding contact in the windshield wiper motor | Disassemble the windshield wiper motor, clean the contacts. If necessary, replace the engine |
Is the wiper motor or supply wire faulty?
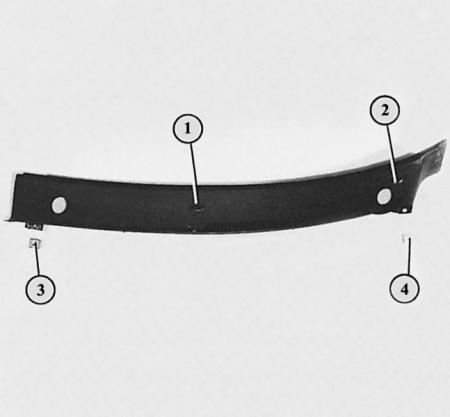
To remove the windshield wiper motor, you need to remove the left side of the black trim under the windshield. To do this, use a coin to turn the rotary locks (1 and 2) to the left and remove both metal clips (3 and 4) on the lower edge.
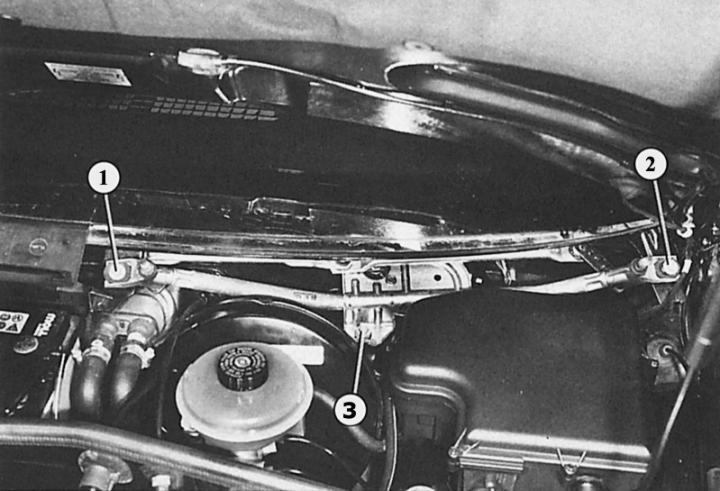
The windscreen wiper linkage together with the motor can be removed from the box by rotating it with the trim removed after loosening the three mounting screws (1–3).
To find out if the windshield wiper motor or the supply wire and switch are OK, the following check will help you:
1. Remove the windshield wiper motor together with the linkage.
2. Disconnect the multi-pin connector on the wiper motor.
3. Now two auxiliary wires are laid. One from the positive battery terminal to terminal 53 or 53b (black/gray or green/yellow wire connectors).
4. The second wire is laid from the negative battery terminal to terminal 31 on the windshield wiper motor (where the brown wire was connected).
5. The windscreen wiper should now operate in stage I or II, depending on the terminal used. If it does not operate, it is faulty.
6. If it now works, then the defect is in the switch or the supply wire.
Removal the windshield wiper motor
1. Turn on the ignition and move the windshield wipers to the end position.
2. Remove the windshield wiper arms.
3. Remove the left side of the black plastic trim under the windshield. To do this, use a coin to turn the rotary lock a quarter turn to the left and additionally press both metal clips at the bottom of the trim.
4. Unscrew the cover of the electronic box.
5. Loosen the two mounting nuts on the outside and inside of the bottom of the electronic box.
6. Remove the electronic box mounting pin from the eye and move the box slightly forward.
7. Remove the two Allen bolts at the top of the wiper shafts and one at the bottom of the wiper motor.
8. Remove the linkage together with the windshield wiper motor.
9. Disconnect the multi-pin connector on the wiper motor.
10. Press the control rods towards the wiper shafts.
11. Remove the three screws on the windshield wiper motor. To access all the screws, you will need to turn the windshield wiper motor crank a little further.
Installing a new windshield wiper motor
To install a new wiper motor or if the old motor has been removed from the mounting console:
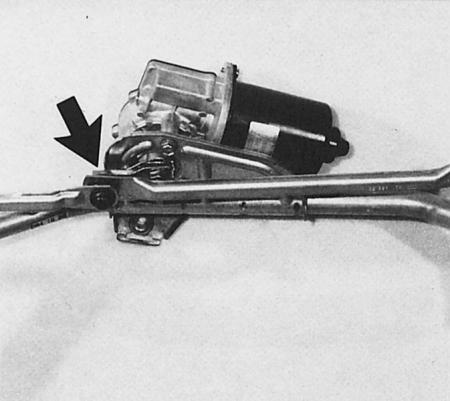
The photo shows how the windshield wiper motor crank (arrow) should be positioned during installation: it is parallel to the wiper arm control rod on the passenger side next to the driver.
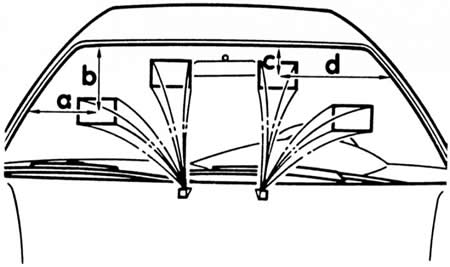
This is how the windshield washer system sprayers are correctly adjusted: a = 235 mm, b = 445 mm, c = 80 mm, d = 620 mm.
1. Connect the engine to the power supply and let it run for a while. Turn it off and wait until it returns to the parking position.
2. Mount the engine in the console, install the drive crank and wiper rods.
3. The control rod of the left wiper axis goes down to the engine crank, the rod of the right wiper axis goes to the engine crank from above.
4. Screw the drive crank so that it is in the position shown in the photo above.
5. If the drive crank is not secured in this specific position, the wiper arm will move downwards at the start of the movement.
6. Mount the engine assembly with the lever mechanism.
Read the original source on the website AUDIMANUAL