Repair Chevrolet Repair Toyota Repair Honda Repair AvtoVAZ Repair Mercedes-Benz Repair BMW Repair Opel
Home  |  Contacts  |  Sitemap  |    
English Русский
Български
Беларускі
Український
Српски
Hrvatski
Română
Polski
Slovenský
Magyar
AudiManual.ru


  • AUDI 80
  • AUDI 100
  • AUDI A3
  • AUDI A4
  • AUDI A6
  • AUDI A8
  • AUDI Q
  • OTHER
  • ARTICLES
B8 (2007-2015) B7 (2004-2008) B6 (2000-2006) B6 (2000-2006, petrol) B5 (1994-2001) B5 (1994-2001, petrol)

Work on the rear axle (Audi A4 B5)

  • Home
  • Audi A4
  • B5 (1994-2001, petrol)
  • Chassis
  • Car suspension
  • Work on the rear axle
            0
Table of contents: Removal the rear shock absorber ↓ Removal the rear shock absorber ↓

Removal the rear shock absorber


Front wheel drive cars


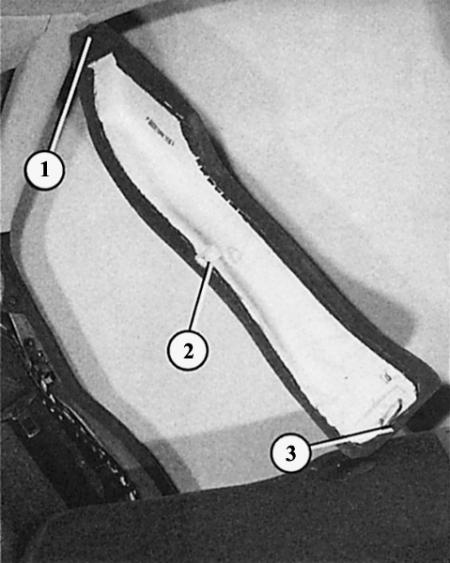
The side cover of the backrest is secured in three places. The cover is put on at the top and bottom (1 and 3), in the middle (2) there is a screw connection, which is accessible from the inside of the car.

The side cover of the backrest is secured in three places. The cover is put on at the top and…


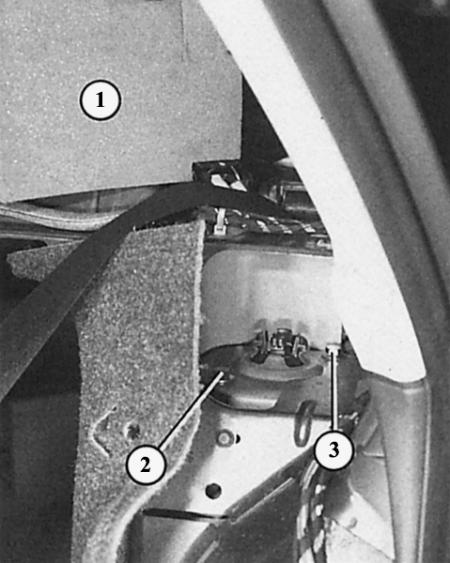
To access the upper mounting bolts (2 and 3) of the rear shock absorber in a front-wheel drive vehicle, remove the rear seat back or the side seat back cover. Then remove the foam sound insulation (1).

To access the upper mounting bolts (2 and 3) of the rear shock absorber in a front-wheel drive…


1. The shock absorber strut connection bolt and its self-locking nut must be replaced.

2. Raise the car on both sides.

3. Secure the raised vehicle.

4. Unscrew the wheel.


5. Support and lift the axle by approximately 10 mm on the side where the shock absorber strut is to be removed.

6. Loosen the mounting bolt at the bottom of the shock absorber strut.

7. Remove the support and take out the shock absorber strut.

8. Remove the seat back cover or backrest (Chapter Salon).

9. Loosen the two mounting bolts on the interior side.

10. Raise the shock absorber strut by turning it slightly and remove it downwards.

11. Installation: Replace the gasket at the top of the shock absorber strut.

12. First hang the shock absorber strut on the mounting tabs at the top (slight rotation).

13. If the shock absorber strut is inserted correctly, then screw it to the wheel arch with a tightening torque of 25 Nm.

14. Tighten the lower shock absorber mount by hand.

15. Place the car on the ground on all four wheels.

16. Only now tighten the lower mounting bolt on the shock absorber strut to 50 Nm. After that, tighten it another 1/4 turn.

17. Do not tighten the bolts on a raised vehicle – the rubber-metal support will become deformed.

Removal the rear shock absorber


Quattro cars


The rear shock absorber strut is removed together with the upper tie rod. In this case, new self-locking nuts are used in the outer screw connection of the upper tie rod and the inner mount of the shock absorber strut. In addition, you need a new bolt and a new washer for the outer screw connection of the tie rod.

1. Raise the vehicle.

2. Secure the raised vehicle.

3. Unscrew the wheel.

4. Support the transverse steering rod on which the shock absorber strut is to be removed.


5. Loosen and remove the mounting bolt at the bottom of the shock absorber strut.

6. Unscrew the upper tie rod mounting bolt on the wheel bearing housing (steering knuckle). Make sure that the wheel bearing housing does not hit the inside edge of the fender.

7. Loosen the four mounting bolts connecting the shock absorber strut to the wheel arch. Hold the shock absorber strut in place while doing this.

8. Remove the shock absorber strut.

9. When installing, tighten the lower shock absorber mount by hand.

10. Then screw the shock absorber strut to the wheel arch at 55 Nm.

11. Also tighten the upper tie rod mounting bolt by hand.

12. Place the car on the ground on all four wheels. If the wheel suspension bolts are tightened on a raised car, the rubber-metal support will be deformed.

13. Only then tighten the lower mounting nut on the shock absorber strut and shock absorber to 70 Nm and then tighten it another 1/4 turn.

14. Tighten the upper tie rod mounting bolt nut to 50 Nm and then tighten it another 1/4 turn.
The article was checked by auto expert Georgy Rodionov
This article is available at russian, bulgarian, belarusian, ukrainian, serbian, croatian, romanian, polish, slovak, hungarian

Share information:
Previous articles
Audi A4 B5: Car suspension
Next articles

Disassembling the front wheel suspension
Do-it-yourself work on the chassis and steering
Incorrect wheel alignment
Measuring wheel alignment
Replacing the rear shock absorber


Similar articles on other Audi car models:
Rear axle — removal and installation Audi 80 B3 (1986-1991, petrol)
Checking the oil level in the rear axle drive Audi 100 C4 (1990-1994, petrol)
Electric windows and rear view mirrors Audi A3 Type 8L (1996-2003)
Rear wheel axle Audi A6 C4 (1994-1997)
Rear drive shafts Audi A8 D2 (1994-2002)
Replacing the front silent block of the rear axle main… Audi Q5 Type 8R (2008-2017)
Rear axle beam with parts Audi A2 (1999-2005)
Link to this page in different formats


Visitor comments

No comments yet


How much will 20 + 31 =


A4(B8, 2007-2015) 
  • General information
  • Operating instructions
  • Power unit
  • Petrol engines 1.8 l
  • Petrol engines 1.8/2.0 l
  • Petrol engines 3.0 l
  • Petrol engines 3.2 l
  • Fuel system (petrol)
  • Diesel engines 2.0 l (CA*)
  • Diesel engines 2.0 l (CJCB)
  • Diesel engines 2.7/3.0 l
  • Diesel engines 3.0 l
  • Fuel system (diesel)
  • Transmission
  • Manual gearbox 0B1
  • Manual gearbox 0B2
  • Manual gearbox 0B3
  • Manual gearbox 0B4
  • Automatic transmission 0B5
  • Automatic transmission 0B6
  • Automatic transmission 0AW
  • All-wheel drive system
  • Chassis
  • Front suspension
  • Rear suspension
  • Brake system
  • Steering system
  • Body
  • Exterior
  • Interior
  • Seats
  • Doors, locks and windows
  • Security system
  • Heating and air conditioning
  • Electrical equipment
  • Audio system
  • Power devices
  • Equipment and devices
  • Lighting and lamps
  • Electrical circuits
 
A4(B7, 2004-2008) 
  • General information
  • Introduction to manual
  • Troubleshooting
  • Operating instructions
  • Maintenance
  • Power unit
  • Petrol engines 2.0 (ALT)
  • Petrol engines 2.0 (TFSI)
  • Petrol engines 1.8 (MPI)
  • Diesel engines
  • Cooling system
  • Air conditioner
  • Fuel and exhaust system
  • Ignition system
  • Starting and charging
  • Transmission
  • Clutch
  • Manual gearbox
  • Automatic gearbox
  • Drive shafts
  • Chassis
  • Brake system
  • Front suspension
  • Rear suspension
  • Steering
  • Body
  • Exterior
  • Interior
  • Electrical equipment
  • Equipment and devices
  • Lighting and signaling
  • Windscreen wipers and washers
  • Electrical diagrams
  • Electrical diagrams (since 2007)
 
A4(B6, 2000-2006) 
  • General information
  • Vehicle Description
  • User manual
  • Maintenance
  • Power unit
  • Gasoline engine
  • Diesel engine
  • Lubrication system
  • Cooling system
  • Supply system
  • Injection system
  • Exhaust system
  • Ignition and control
  • Transmission
  • Gear box
  • Clutch and drive shafts
  • Chassis
  • Brake system
  • Car suspension
  • Steering
  • Body
  • Heating and ventilation
  • Exterior (external elements)
  • Interior (internal elements)
  • Electrical equipment
  • Power devices
  • Lighting and appliances
  • Electrical circuits
 
A4(B6, 2000-2006, petrol) 
  • General information
  • Introduction to the guide
  • Car care
  • Power unit
  • Engine repair
  • Lubrication system
  • Cooling system
  • Injection and control system
  • Ignition system
  • Power and exhaust system
  • Transmission
  • Clutch and drive shafts
  • Car gearbox
  • Chassis
  • Suspension and wheels
  • Steering
  • Brake system
  • Body
  • Interior
  • Exterior
  • Electrical equipment
  • Equipment and devices
  • Lighting and signaling
  • Power devices
  • Electrical circuits
 
A4(B5, 1994-2001) 
  • General information
  • Introduction to the guide
  • Car care
  • Maintenance (gasoline)
  • Maintenance (diesel)
  • Power unit
  • Gasoline engines
  • Diesel engines
  • Engine overhaul
  • Cooling system
  • Fuel injection (gasoline)
  • Fuel system (diesel)
  • Exhaust system
  • Ignition system
  • Transmission
  • Clutch
  • Mechanical gearbox
  • Automatic gearbox
  • Drive shafts
  • Chassis
  • Brake system
  • Car suspension
  • Steering
  • Body
  • Exterior
  • Interior
  • Doors, locks and windows
  • Heating and ventilation
  • Electrical equipment
  • Power devices
  • Equipment and devices
  • Electrical circuits
 
A4(B5, 1994-2001, petrol) 
  • General information
  • Vehicle description
  • Maintenance
  • Power unit
  • Engine repair
  • Turbocharging
  • Exhaust system
  • Cooling system
  • Ignition system
  • Fuel system
  • Motronic injection system
  • MPI and MPFI injection system
  • Transmission
  • Clutch
  • Gearbox and shafts
  • Chassis
  • Steering
  • Car suspension
  • Brake system
  • Wheels and tires
  • Body
  • Heating and ventilation
  • Body parts
  • Electrical equipment
  • Fuses and relays
  • Power devices
  • Lighting and lamps
  • Tools and devices
  • Electrical circuits
 
AudiManual.ru © 2017-2026 · Mobile version · Feedback · Sitemap: EN BG BY UA RS HR RO PL SK HU · Site search · News and articles
80 B2 · 80 B3 petrol · 80 B3 · 80 B4 · 100 C3 diesel · 100 C3 petrol · 100 C3 · 100 C4 petrol · 100 C4 · A3 Type 8L · A4 B5 petrol · A4 B5 · A4 B6 petrol · A4 B6 · A4 B7 · A4 B8 · A6 C4 · A6 C5 · A6 C5 Allroad · A8 D2 · Q5 Type 8R · Q7 Typ 4L · Audi A2 ·
This site uses cookies 🍪. Click the button to accept this fact.