
Repair Chevrolet Repair Toyota Repair Honda Repair AvtoVAZ Repair Mercedes-Benz Repair BMW Repair Opel
Home  |  Contacts  |  Sitemap  |    
English Русский
Български
Беларускі
Український
Српски
Hrvatski
Română
Polski
Slovenský
Magyar
AudiManual.ru


  • AUDI 80
  • AUDI 100
  • AUDI A3
  • AUDI A4
  • AUDI A6
  • AUDI A8
  • AUDI Q
  • OTHER
  • ARTICLES
Q7 Typ 4L (2005-2015, diesel) Q5 Type 8R (2008-2017)

Replacing the belt pulley together with the magnetic clutch (Audi Q5-8R)

  • Home
  • Audi Q
  • Q5 Type 8R (2008-2017)
  • Body
  • Ventilation and heating
  • Replacing the belt pulley together with the magnetic clutch
            0

Replacing the belt pulley together with the magnetic clutch "N₂5"
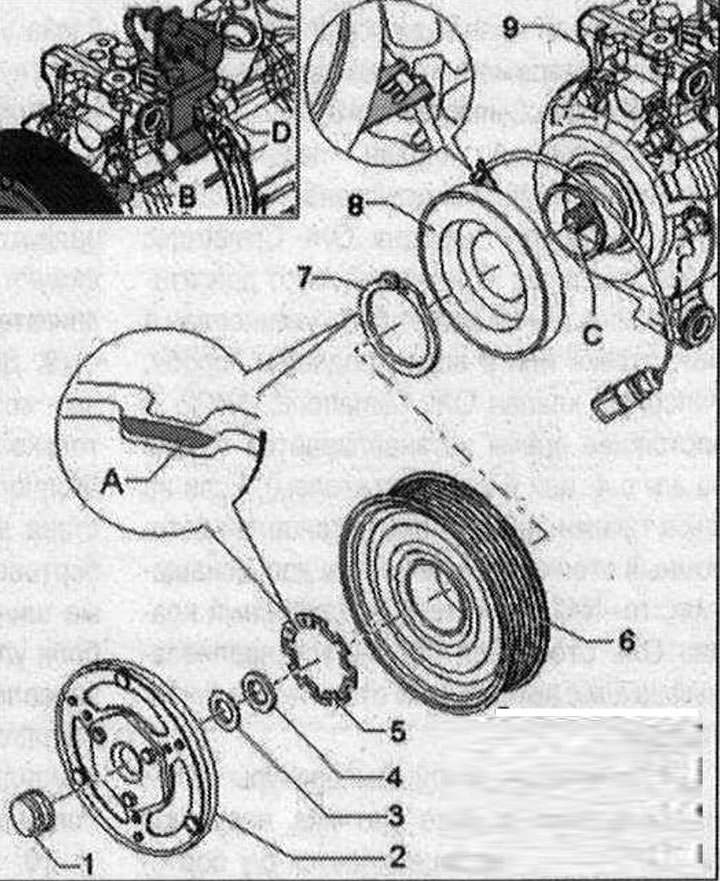


Replacing the belt pulley together with the magnetic clutch «N₂5»


Note: If the pulley overload protection has been triggered, check the compressor for ease of movement before replacing it. If the air conditioner compressor moves with difficulty, replace it as an assembly. The compressor does not need to be removed from the engine to remove the belt pulley. Depending on the engine version, it may be necessary to remove the panel from the car and move it slightly forward (to free up some space). Depending on the compressor type and engine model, different pulley models may be installed (different diameters). As a spare part, you can get a belt pulley with a magnetic clutch by the part number. The belt pulley and the driven disk are fastened with a bolt (the bolt is not needed and is disposed of). During manufacturing, a prescribed amount of a certain lubricant is introduced into the thread of the driven disk through this bolt; this volume of lubricant is sufficient for a single installation of the driven disk on the compressor shaft (therefore, the removed slave disk cannot be reused).


1. Cap. Not always installed


2. Clutch slave disk. Replace. Secured to the air conditioning compressor drive shaft. Clean the mating surfaces of the clutch disk and belt pulley before tightening. Clean the threads of the compressor shaft before tightening the clutch disk. After tightening, measure and, if necessary, adjust the gap between the belt pulley and the clutch disk. The threads of the new clutch disk are already lubricated with the prescribed amount of a certain grease during production. Various designs. Overload protection is triggered if the torque is too high (eg, difficult operation of the compressor), and the pulley rotates freely without transmitting torque to the compressor when the magnetic clutch "N₂5" is engaged. To remove, hold the compressor shaft "C" and turn the clutch shaft with a suitable tool in the direction of the arrow (counterclockwise); as described for the driven disk for the air conditioning compressor without magnetic clutch. Tightening torque 30 N·m

3. Disk

4. Distance washer. For adjusting the gap size between the friction disc and the belt pulley

5. Retaining ring. Replace. Install correctly (flat side to compressor). When installing the retaining ring, make sure that the ring is not bent more than necessary. Insert the retaining ring with the correct side, the side with the bevel "A" facing away from the compressor (the flat side faces the compressor)

6. Belt pulley. The belt pulley is not resistant to impacts, so

mu it should be handled with care. Before installing the pulley, clean the compressor flange. Different designs (for example, depending on the engine type). If the belt pulley cannot be removed from the air conditioning compressor flange manually


7. Retaining ring. Replace. Install correctly (flat side to compressor). When installing the retaining ring, make sure that the ring is not bent more than necessary. Insert the retaining ring with the correct side, the side with the bevel "A" facing away from the compressor (the flat side faces the compressor)

8. Electromagnet coil. When installed

novke ensure that the cable holder "B" is correctly positioned. Depending on the version, plug "D" can be secured to the holder on the air conditioning compressor

9. Compressor climate, installation. Depending on the engine model and export versions of the car, different models can be installed. Before installing the pulley, clean the compressor flange. Clean the compressor shaft thread and lightly lubricate it
The article was checked by auto expert Timur Bazhenov
This article is available at russian, bulgarian, belarusian, ukrainian, serbian, croatian, romanian, polish, slovak, hungarian

Share information:
Previous articles
Audi Q Q5 Type 8R: Ventilation and heating
Next articles

Removal the refrigerant pressure and temperature sensor
Overview of the coolant circuit components
Replacing the air conditioner compressor pulley
Removal the compressor from the mount and installing it (cars…
Removal the clutch disc
Components of the air conditioning control and regulation system…
Removal the outside temperature sensor
Elements outside the cabin, set of elements


Similar articles on other Audi car models:
Air Conditioning Compressor Magnetic Clutch — Adjustment Audi 80 B3 (1986-1991, petrol)
Replacing the timing belt Audi 100 C4 (1990-1994, petrol)
Checking the timing belt for damage, measuring wear Audi A3 Type 8L (1996-2003)
Cylinder block from the belt pulley side Audi A4 B8 (2007-2015)
Checking and replacing the multi-lane drive belt Audi A6 C4 (1994-1997)
Replacing the timing belt Audi A8 D2 (1994-2002)
Replacing the crankshaft seal on the belt pulley side Audi A2 (1999-2005)
Link to this page in different formats


Visitor comments

No comments yet


How much will 42 + 12 =


Q7 4L(2005-2015, diesel) 
  • General information
  • Operating instructions
  • Maintenance
  • Power unit
  • Diesels 3.0 l (BUG, BUN, CAS)
  • Diesels 3.0 l (CATA, CCMA)
  • Diesels 3.0 l (CJGA/CJGC)
  • Diesels 4.2 l (BTR, CCFA/CCFC)
  • Cooling system
  • Fuel and exhaust system
  • Engine management system
  • Starting and charging
  • Transmission
  • Automatic gearbox
  • Drive shafts
  • Chassis
  • Brake system
  • Front suspension
  • Rear suspension
  • Steering system
  • Body
  • Air conditioner
  • Exterior
  • Interior
  • Electrical equipment
  • Equipment and devices
  • Electrical circuits
 
Q5 8R(2008-2017) 
  • General information
  • User manual
  • Power unit
  • Petrol engine 2.0 l
  • Petrol engine 3.2 l
  • Fuel system (petrol)
  • Diesel 2.0 liter (CA)
  • Diesel 2.0 liter (CG/CJ/CM)
  • Diesel engine 3.0 l
  • Fuel system (diesel)
  • Transmission
  • Manual gearbox 0B1
  • Manual gearbox 0B2
  • Automatic gearbox 0B5
  • Automatic gearbox 0B6
  • Chassis
  • Front suspension
  • Rear suspension
  • Brake system
  • Steering
  • Body
  • Exterior
  • Interior
  • Doors, locks and windows
  • Safety system
  • Ventilation and heating
  • Electrical equipment
  • Power devices
  • Equipment and devices
  • Lighting and alarm
  • Audio system
  • Electrical circuits
 
AudiManual.ru © 2017-2026 · Mobile version · Feedback · Sitemap: EN BG BY UA RS HR RO PL SK HU · Site search · News and articles
80 B2 · 80 B3 petrol · 80 B3 · 80 B4 · 100 C3 diesel · 100 C3 petrol · 100 C3 · 100 C4 petrol · 100 C4 · A3 Type 8L · A4 B5 petrol · A4 B5 · A4 B6 petrol · A4 B6 · A4 B7 · A4 B8 · A6 C4 · A6 C5 · A6 C5 Allroad · A8 D2 · Q5 Type 8R · Q7 Typ 4L · Audi A2 ·
This site uses cookies 🍪. Click the button to accept this fact.