



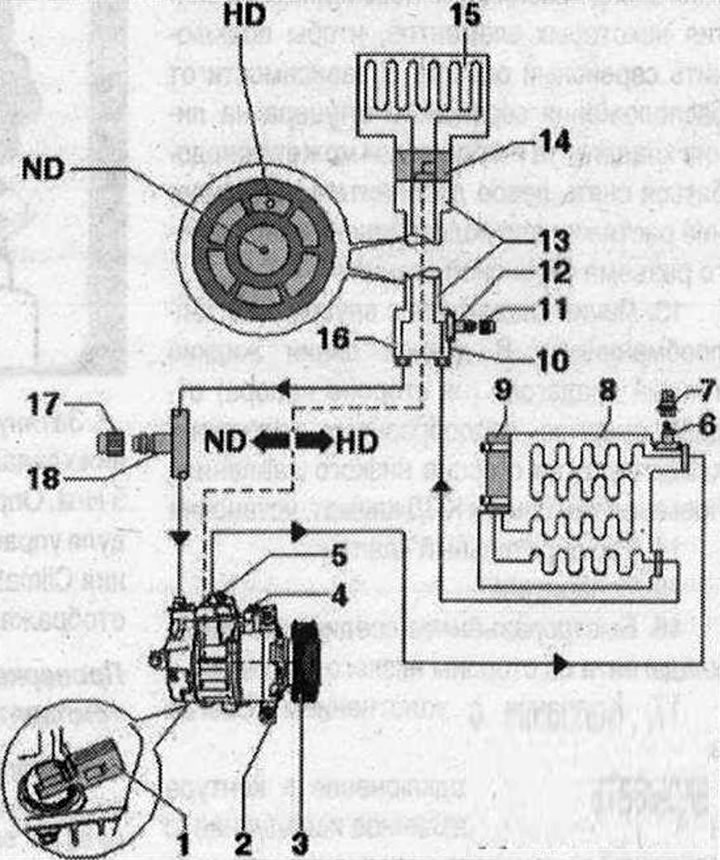
- HD = high pressure side
- ND = low pressure side
The arrows show the direction of refrigerant flow.
1. Air conditioning compressor regulating valve "N₂80"
2. Compressor climate, installation. Remove the compressor from the mount and reinstall it (for cars with 4-cylinder engine) engine and 6-cyl. TDI engine. For vehicles with a 6-cyl. FSI petrol engine, the compressor can be removed from the bracket only after draining the refrigerant from the circuit. At the beginning of production, compressors from Denso are installed (type "6 SEU14" for vehicles with a 4 "cyl. and 6" cyl. engine). Compressors from other manufacturers may be installed later. Compressors may differ depending on the production date and engine. These compressors as spare parts have different oil volumes, so pay attention to the oil volume in the compressor and the exact part number. Depending on the compressor type, different compressor oil filling volumes may be provided for the refrigerant circuit. The basis for a different amount of oil in the compressor with a refrigerant circuit similar in other parameters is the design of the compressor itself; take into account the amount of oil. Too much oil in the refrigerant circuit leads to unacceptably high pressure and to a decrease in the refrigeration capacity of the air conditioning unit. Insufficient oil can lead to a problem with the lubrication of the air conditioning compressor. When installing the refrigerant pipes and the corresponding holders, ensure sufficient distance between the belt, holder and belt pulley. Since the 2012 model year, for certain vehicles with a 4-cyl. engine, an air conditioning compressor is gradually introduced, in which an additional electromagnetic clutch of the air conditioning unit "N₂5" is installed. With the help of this magnetic clutch, the air conditioning compressor drive is completely disconnected in certain operating modes of the air conditioning unit (for example, in the "Esop" operating mode). In order for the "N₂5" to be able to receive control signals from the control and display panel, the Climatronic control unit "J255", it is necessary to install the "J255" of the correct design and perform the correct coding
3. Belt pulley / drive module of the air conditioning compressor / belt pulley with magnetic clutch "N₂5". Replace the belt pulley together with the magnetic clutch "N₂5". Valid for certain vehicles with a 4-cyl. engine from model year 2012. An overload protection is installed between the pulley / drive module and the compressor drive shaft to protect the belt / drive module in the event of blocking and difficult operation of the compressor. The overload protection stops the transmission of force to the compressor in the event of difficult operation. Rubber elements are installed between the pulley / drive module and the compressor drive shaft to dampen vibrations that may occur during compressor operation (damping function for torque fluctuations). Depending on the type of compressor and engine, different belt pulleys are installed on the compressor. Since the 2012 model year, for certain vehicles with a 4-cyl. engine, a compressor climate control unit is gradually introduced, on which an electromagnetic clutch climate control unit "N₂5" is additionally installed. With the help of this magnetic clutch, the air conditioner compressor drive is completely disconnected in certain operating modes of the climate control unit (for example, in the "Esop" operating mode). In order for "N₂5" to receive control signals from the control and display panel, the Climatronic control unit "0255", it is necessary to install "J255" of the correct design and perform the correct coding in the mode
4. Oil drain plug
5. Excess pressure valve
6. Connection with valve
7. Coolant temperature and pressure sensor "G395". The coolant temperature and pressure sensor "G395" exchanges information via the local bus with the used on-board network "J519". "J519" transmits data to the control and display panel, the Climatronic control unit "J255". Therefore, the installation of the high-pressure sensor "G65" is not allowed on this car (produces only rectangular signals). The temperature measured by the refrigerant pressure and temperature sensor "G395" differs from the actual temperature of the refrigerant in the refrigerant circuit due to the design of the "G395" and its installation location and is therefore currently not decoded and not used for climate control, installation
8. Capacitor
9. Drying tank. The tank is installed directly on the condenser
10. Quick release coupling of refrigerant line on high pressure side
11. Cap with seal. Always close
12. Service connector in the high-pressure circuit. Various designs (with primary seal valve or nipple) depending on the refrigerant line, distinctive features. For climate, service station for measuring pressure, emptying and filling the refrigerant circuit. Depending on the engine version, it may be necessary to remove some elements to connect the service connector. Depending on the location of the service nipple on the refrigerant line and the car model, it may be necessary to remove the left additional brace reinforcement to connect the service connector of the service station
13. Refrigerant line with internal heat exchanger. In this line, the liquid warm refrigerant (on the pressure side) gives off energy to the cold vaporous refrigerant (on the low pressure side), thereby increasing the efficiency of the climate control system
14. Expansion valve
15. Evaporator
16. Quick release coupling of refrigerant line on low pressure side
17. Cap with seal. Always close
18. Service connection in the low pressure circuit. Various designs (with primary seal valve or nipple) depending on the refrigerant line. Depending on the engine version, it may be necessary to remove some components to connect the service connector