
Table of contents: Removal the compressor from the… ↓ Installation ↓ Removal the compressor from the… ↓ Installation ↓
Instructions. The compressor on a car with a 4-cyl. engine and a 6-cyl. TDI engine can be removed and installed without opening the refrigerant lines. For cars with a 6-cyl. FSI petrol engine, the compressor can only be removed from the bracket after opening the refrigerant circuit. The following describes the removal and installation of the compressor on a car with a 4-cyl. TDI engine and a 6-cyl. TD1 engine with a "Denso" compressor of the "6 SEU 14" type. For cars with a 4-cyl. engine or another compressor, changes may be made (depending on the engine, it may be necessary to remove or loosen certain components). When removing from the bracket, do not drain the refrigerant circuit, do not remove the hoses and coolant lines from the compressor. Do not unscrew the coolant lines and the corresponding clamps. Secure the compressor after removal, e.g. with a wire on the car, do not hang it on the refrigerant lines. Before removing the poly V-belt, mark its direction of rotation with chalk or a felt-tip pen. The reverse direction of movement of a previously used belt may lead to its breakage. Depending on the engine and export version, different compressors may be installed.
Removal the compressor from the bracket and installing it (cars with 4-cylinder engine)
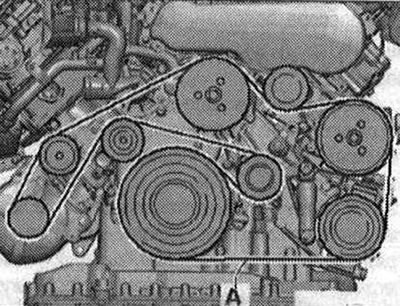
Switch off the ignition. Remove the front noise insulation. Mark the direction of rotation of the poly V-belt. Remove the poly V-belt "A". Disconnect the electrical plug "A". Unscrew the compressor bolts "B".
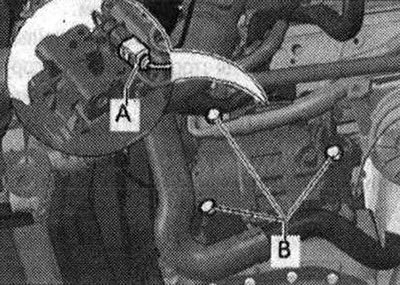
Remove the compressor and move it away from the engine without bending or stretching the hoses. Secure the compressor to the car (for example, with wire) in such a way as not to bend or stretch the hoses. If it is not possible to move the compressor far enough away from the engine, it must be completely removed.
Installation
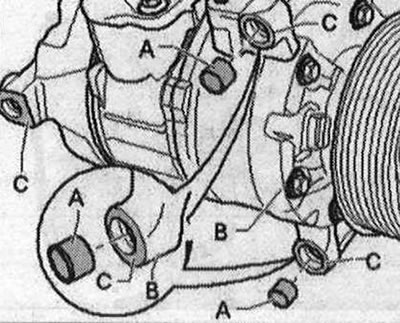
Installation is in the reverse order, in this case it is necessary to check the position of both centering bushings "A" in the bracket or in the compressor "B" before securing the compressor.
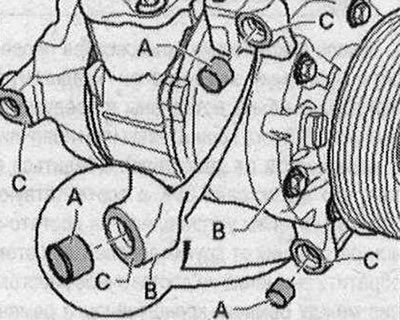
Instructions. Centering bushings "A" come in a variety of designs (different lengths), select the required version from the electronic spare parts catalog. Pay attention to the fit of the bushings "A" and the cleanliness of the contact surfaces. Incorrectly installed bushings, dirty or damaged mating surfaces "C" of the bracket or compressor can lead to misalignment of the compressor and engine. Misalignment during operation can lead to damage to the poly V-belt or compressor.
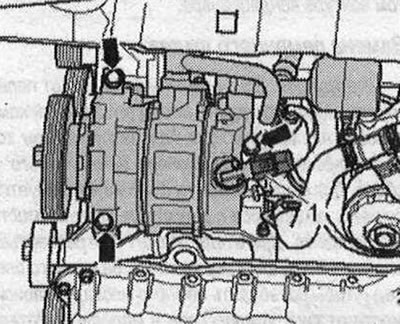
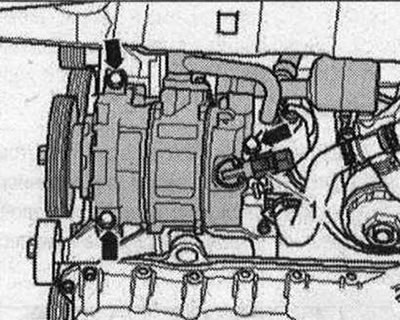
Tighten the bolts "arrows" (tightening torque: 25 Nm). Connect the plug "1" of the air conditioning compressor regulating valve "N₂80". Place the poly V-belt on the mechanic's poly V-belt pulley.
Instructions: After securing the compressor, check the refrigerant line routing; they must be inserted into the brackets provided for this purpose (if available, depending on the engine). Make sure that the coolant lines and the corresponding brackets are installed at a sufficient distance from other parts, while paying attention to the sufficient distance between the belt, bracket and belt pulley. Query the fault memory of the control and display module, Climatronic control unit "J255" and delete any displayed faults.
Removal the compressor from the mount and installing it (vehicles with 6-cyl. TDI engine)
Turn off the ignition. Remove the front noise insulation. Mark the direction of rotation of the poly V-belt "A".
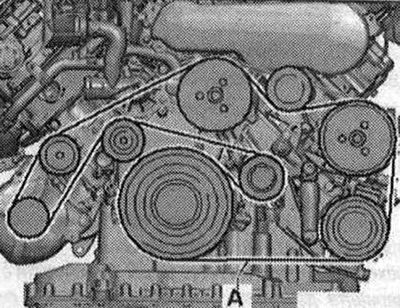
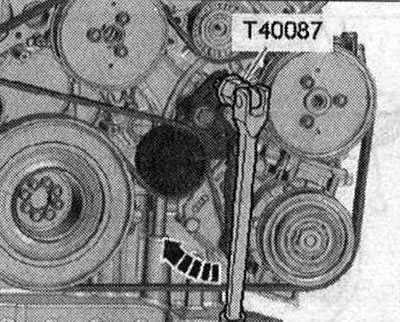
To loosen the poly V-belt, move the tensioner using the Torx T 60 "T40087" head in the "direction of the arrow". Remove the poly V-belt from the compressor pulley and relieve the tensioner.
Unscrew the left bolt "1" and nut "3" and remove the longitudinal rod "2".

Disconnect the power steering vane pump from the bracket (sometimes not necessary on a car with a flexible pressure line to the pump), tilt it to the side and attach it, for example, with wire to the engine. Do not bend or stretch the hoses to the pump. The pressure line to the vane pump is available in different designs (rigid or flexible). Disconnect the electrical plug "A". Unscrew the compressor bolts "B".
Remove the compressor and move it away from the engine without bending or stretching the hoses. Secure the compressor to the car (for example, with wire) in such a way as not to bend or stretch the hoses.
Instructions. If you cannot move the compressor far enough away from the engine, you will need to remove it completely. Depending on the engine version, you may also need to remove the panel from the car and move it forward a little (to free up some space).
Installation
Installation is in the reverse order, in this case it is necessary to check the position of both centering bushings "A" in the bracket or in the compressor "B" before securing the compressor.
Instructions. Centering bushings "A" come in a variety of designs (different lengths), select the required version from the electronic spare parts catalog. Ensure that the bushings "A" are correctly seated and that the mating surfaces are clean. Incorrectly installed bushings, dirty or damaged mating surfaces "C" of the bracket or compressor may cause the compressor and engine to be out of alignment. Out of alignment during operation may cause damage to the poly V-belt or compressor.
Tighten the bolts "arrows" (tightening torque: 25 Nm). Connect the plug "1" of the air conditioning compressor regulating valve "N₂80". Place the poly V-belt on the poly V-belt pulley.
After securing the compressor, check the refrigerant lines, they must be inserted into the brackets provided for this purpose (if available, depending on the engine). Ensure that the coolant lines and the corresponding brackets are installed at a sufficient distance from other parts, while paying attention to the sufficient distance between the belt, bracket and belt pulley. Query the fault memory of the control and display module, Climatronic control unit "J255" and delete any displayed faults.