



Table of contents: Removal ↓ Engine with a working volume of 2.8… ↓ Engines with two valves per cylinder… ↓ Engines with five valves per… ↓
Warning: Incorrect installation of the timing belt can cause very serious engine damage. If you lack experience, contact a workshop.
Removal
1. Remove the lower engine compartment cover.
2. Remove the poly V-belt.
3. Remove the poly V-belt tensioner. To do this, slowly loosen the tensioner and unscrew the Allen bolt SW 10.
4. Unfasten the timing belt cover on both sides and remove it.
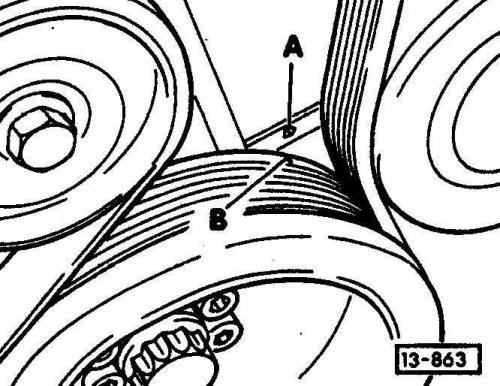
5. Set the crankshaft to the TDC position for cylinder 1. To do this, shift the gearbox to neutral, apply the handbrake and turn the crankshaft clockwise using the central bolt securing the belt pulley to the crankshaft until the mark on the belt pulley – B – is aligned with the installation mark – A. A strongly curved ring spanner or a SW 24 socket head is required here (double hexagon).
6. At the same time, the large holes in the mounting plates of the camshaft gears must be located inward relative to each other, otherwise turn the crankshaft one revolution.
7. In this position, lock the crankshaft. To do this, unscrew the ignition timing sensor from the left side of the crankcase. The sensor is located on top of the crankcase at the height of the middle cylinder.
8. Instead of the sensor, screw in the AUDI-3242 rod and tighten it lightly. The rod enters the hole on the crankshaft counterweight and locks it. Before screwing in the rod, check whether this hole is visible or tangible.
9. Remove 8 Allen bolts from the torsional vibration damper (v-belt pulley on crankshaft).
Warning: Do not loosen the center bolt.
10. Remove the lower timing belt cover.
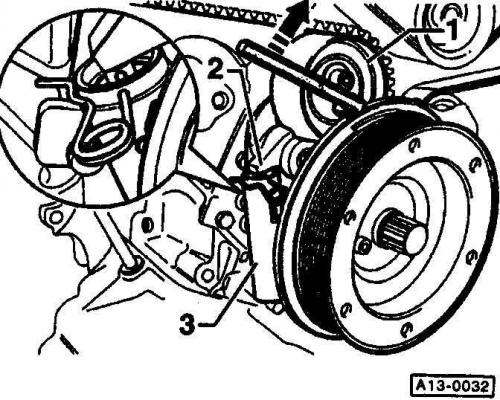
11. Loosen the timing belt tension roller mounting bolt – 1 – using an 8 mm Allen key. Using the same key, turn the tension roller to the right in the direction of the arrow, which will loosen the timing belt tension.
Engine with a working volume of 2.8 liters (30 valves)
The layout of the main systems of the 6-cylinder engine 2.6/2.8 l
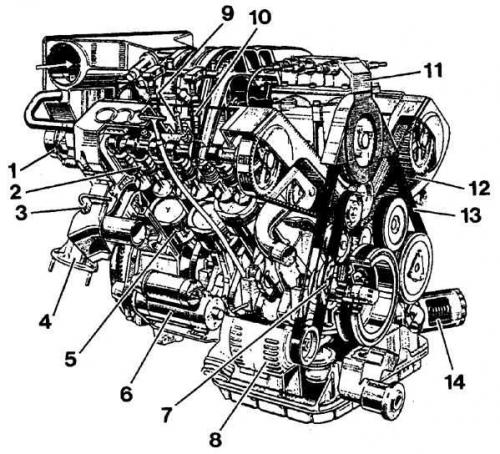
- 1. Vacuum pump
- 2. Hydraulic pusher
- 3. CO₂ extraction tube
- 4. Exhaust valve
- 5. Piston
- 6. Starter
- 7. Oil pump
- 8. Generator
- 9. Spark plug
- 10. Valve injector
- 11. Dual ignition coils (3 pieces)
- 12. Toothed belt
- 13. Poly V-belt
- 14. Oil filter
Removal
1. Turn the tension roller evenly to the right until the tension lever – 2 – sinks the tension rod so deeply that a 2 mm rod, such as a drill or spring pin, can be inserted. Insert the rod, and the tension roller will be locked.
Warning: If you reuse a used belt, be sure to mark the direction of rotation with an arrow using a felt-tip pen or marker. Installing the timing belt in the opposite direction of rotation can cause it to break and cause serious damage to the engine. Therefore, always install the belt so that the arrow on it points in the direction of engine rotation (clockwise when viewed from the front).
2. Unscrew the poly V-belt guide roller.
3. Remove the timing belt cover from the crankshaft.
4. Remove the timing belt.
Warning: The timing belt must not be bent.
5. A bent belt should always be replaced, as it may break during subsequent use, causing serious damage to the engine. If possible, do not change the position of the gears.
Installation
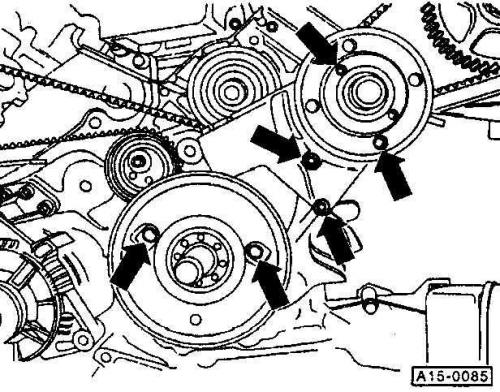
1. Loosen the bolts securing the camshaft gears on the left and right by approximately 3 turns, do not unscrew the bolts.
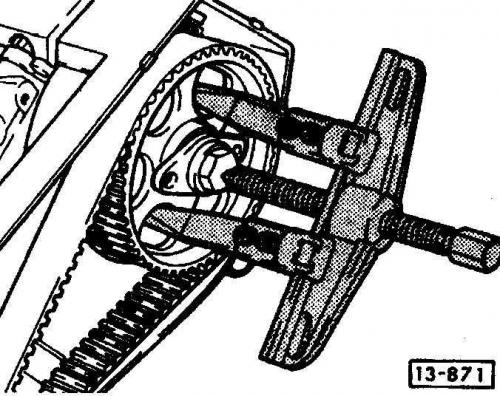
2. Move the camshaft gears on the left and right off the cones using a puller. The puller jaws should be inserted behind the rear end of the hub.
Caution: The gears must be moved off the cones enough so that they are mobile on the camshafts, but do not wobble.
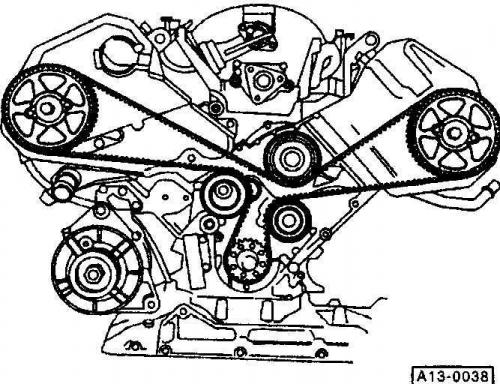
3. Place the toothed belt over both camshaft sprockets, then over the idler roller and crankshaft sprocket, and finally over the tension roller.
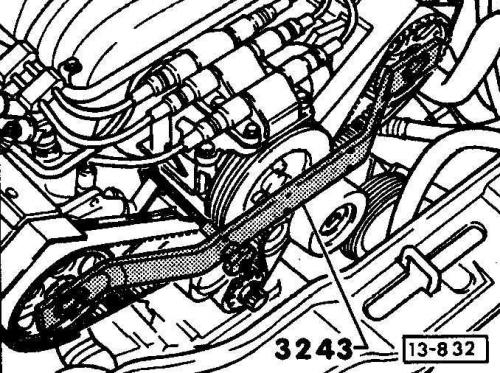
4.Install the AUDI-3243 retainer (for 2.8L engine(30 valves): AUDI-3391).
Engines with two valves per cylinder (up to 174 hp)
Execution order
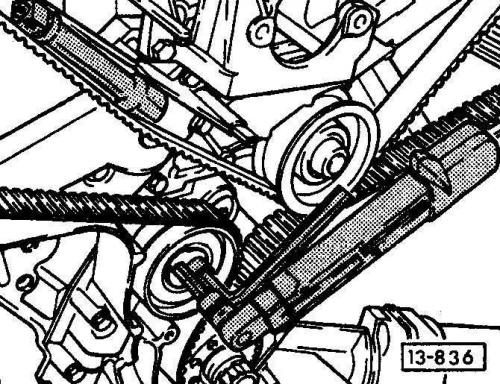
1. Tighten the tension roller mounting bolt using an Allen key, size SW 8, until the roller on the eccentric can still be easily turned by hand.
2. Turn the tension roller to the right using an Allen key SW 8 and hold it. This will tension the toothed belt.
3. Tighten the timing belt tension roller mounting bolt using a second Allen key SW 8.
4. Check the tension of the timing belt. To do this, take the timing belt with your thumb and forefinger in the middle between the camshaft gear and the coolant pump and twist it. The timing belt should only allow a 90 degree twist.
5. Otherwise, loosen the tension roller mounting bolt and tighten the tension roller accordingly until the required belt tension is achieved.
6. Turn the engine crankshaft by hand one revolution in the direction of rotation and recheck the belt tension; tighten the belt if necessary.
7. Tighten the tension roller mounting bolt to a torque of 45 Nm.
Engines with five valves per cylinder (with a working volume of 2.8 liters (30 valves), 193 hp)
Execution order
1. Using an Allen key SW 8, turn the tension roller to the right until the locking pin can be removed from the tension element. Pull out the pin.
2. Using a torque wrench with an external Allen key SW 8, tighten the timing belt tension roller to a torque of 15 Nm. Tighten the tension roller mounting bolt to a torque of 20 Nm.
3. Tighten the poly V-belt guide roller to a torque of 45 Nm.
4.Tighten the camshaft gears to a torque of 70 Nm (for a 2.8 l engine(30 valves) – 55 Nm). Unscrew the camshaft lock.
5. Unscrew the crankshaft locking pin.
6. Tighten the ignition timing sensor to a torque of 10 Nm.
7. Install the lower timing belt cover.
8. Insert the vibration damper so that the protrusion on the crankshaft gear fits into the groove of the vibration damper. Using an 8 mm Allen key, tighten the vibration damper to a torque of 25 Nm.
9. Install the left and right timing belt covers.
10. Adjust the poly V-belt tensioner so that the locking pin fits into the hole in the cylinder block. Tighten the Allen bolt to 45 Nm.
11. Secure the timing belt covers on both sides.
12. Install the poly V-belt.
13. Install the lower engine compartment cover.
14. Lower the car.