
Table of contents: Removal ↓ Installation ↓
Warning: The exhaust valves of the 6-cylinder engine with an output of up to 174 hp are filled with sodium to improve heat dissipation. These valves must not be scrapped directly, as the sodium present poses a risk of explosion when melted down. It is also not permitted to use these valves as a "special tool", such as a punch. It is therefore recommended to hand over these valves to an AUDI repair shop. If this is not possible, the following steps must be taken before scrapping: Use a hacksaw to saw through the valve stem and drop both parts into a large container filled with water. The rapidly developing chemical reaction will burn off the sodium filling, in which case you must step back and protect your eyes.
Removal
1. Remove the cylinder head.
Warning: If valve drive parts are reused, they must be installed in their original locations. To prevent parts from being swapped, it is recommended to prepare a suitable laying board.
2. Remove the camshaft.
3. Mark the plate tappets and remove them.
Warning: Place the pushers on the work surface (camshaft side) down.
4. Remove the valve springs. Workshops use a special tool for this (V.A.G-2037).
5. The crackers, and with them the valves and valve springs, can also be removed using a standard valve spring puller. To do this, the intake or exhaust pipes must first be removed, depending on the circumstances.
6. Compress the valve springs and remove the crackers. Remove the upper valve spring plate and valve springs. Remove the valve.
7. Remove the oil seal.
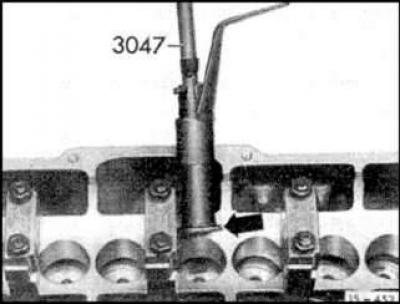
8. Remove the lower valve spring plates – arrow – using the special tool VAG-3047 or HAZET 791-5/791-2.
Installation
1. Before installing the valves, check and, if necessary, rework or grind the valve seats.
Warning: New valve spring retainers have very sharp edges in places at the bottom edge of the cracker bore. These edges can cause damage (scratch) valve stems. Replace damaged valves, remove sharp edges from valve spring plates before installation.
2. Insert the lower valve spring plate.
3. Remove any sharp edges from the valve stem surface that contacts the crackers.
4. To improve reliability, be sure to replace the valve stem seals.
5. Lightly lubricate the valve stem and insert the valve.
6. Install a new oil seal.
Warning: If you assemble without the plastic guide bushing, the valve stem seals will be damaged! The engine will consume a lot of oil.
7. Install the valve springs. If the valve springs are replaced, both must be replaced at the same time.
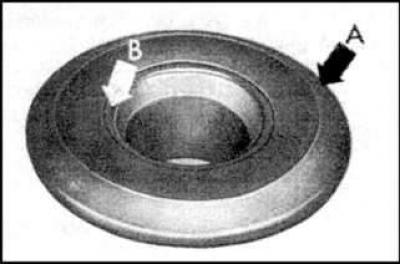
8. Insert the upper valve spring retainer. Upper valve spring retainers have a wide chamfer on the outside – A – and a chamfer on the inside – B.
9. Compress the valve springs using a valve spring compressor and insert the crackers so that they fit into the grooves of the valve stem. Loosen the spring compressor and insert the next valve.
10. Check the axial clearance of the camshaft.
11. Lubricate all plate tappets with engine oil and insert into the holes according to the markings.
12. Install the camshaft.
13. Replace the cylinder head gasket, install the cylinder head.
[The article was copied from the website AUDIMANUAL]