



Table of contents: Removal ↓ Installation ↓
Worn valve stem seals are the cause of high oil consumption by the engine. The stem seals can also be removed with the cylinder head installed. For this, special tools VAG-2036 with VAG-541/1 or HAZET 2577-2 are primarily required, and for a petrol engine also compressed air.
Warning: This is a description of the removal for a petrol engine. For a diesel engine, no compressed air is required. The piston of the corresponding cylinder must first be set to TDC.
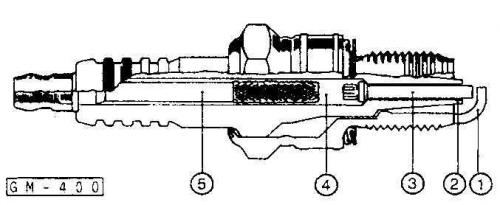
Spark plug in section
Removal
1. Remove the camshaft and tappets.
2. Set the piston of the corresponding cylinder to the BDC position. To do this, use a socket wrench to turn the crankshaft by the belt pulley mounting bolt so that the notch on the belt pulley coincides with the installation mark on the toothed belt cover (the piston of cylinder 1 is now at TDC). At the same time, the pistons of cylinders 2 and 3 are at BDC. Mark the crankshaft belt pulley at the bottom with chalk, then turn the belt pulley 1/2 turn (180 degrees), until the chalk mark coincides with the installation mark. Pistons 1 and 4 are now at BDC.
3. Remove all spark plugs.
4. Screw the VAG-653/3 or HAZET 3428 compressed air hose adapter into the spark plug hole of the corresponding cylinder.
5. If there is no adapter, you can make one from an old spark plug. To do this, remove ground electrode 1 (see fig. Spark plug in section). Use a screwdriver to break the ceramic insulator 2, then, swinging the central electrode in different directions, break it off and pull it out. Knock out the remainder of the central electrode together with the fiberglass 4 and the connecting electrode 5 with a suitable punch (approximately 3 mm).
In this case, clamp the spark plug in a vice or insert it into a suitable socket head. Caution: To avoid damaging the threads in the cylinder head, the spark plug threads must not be damaged.
6. Screw the prepared spark plug into the appropriate cylinder and connect it to the compressed air hose.
7. Continuously pump compressed air into the cylinder at a pressure of at least 6 bar.
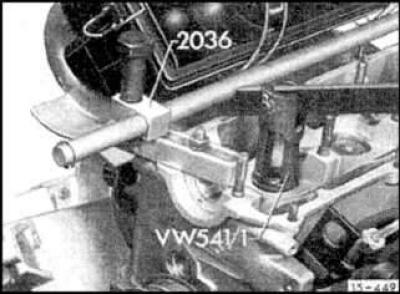
8. Screw the special tool VAG 2036 onto bearing stands 1 and 4 and compress the valve springs with the VAG 541/1 tool. You can also use the HAZET 2577 tool. In this case, screw the support device supplied with the tool onto the camshaft mounting studs and compress the valve springs with a puller.
Warning: The piston must be at BDC.
9. Remove the crackers and loosen the springs.
Warning: Loosen tightly seated crackers by lightly tapping the pry bar with a hammer.
10. Remove the valve spring retainers and valve springs.
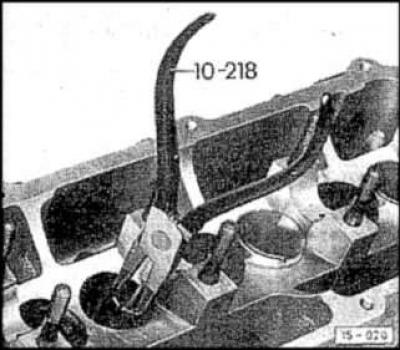
11. Remove the oil seal. Workshops use special tools for removal (VAG 10-218, VAG 3047, HAZET 791-5 or impact puller HAZET 791-2). As a rule, valve stem seals are very tightly seated. Therefore, an impact puller must be used for removal.
Installation
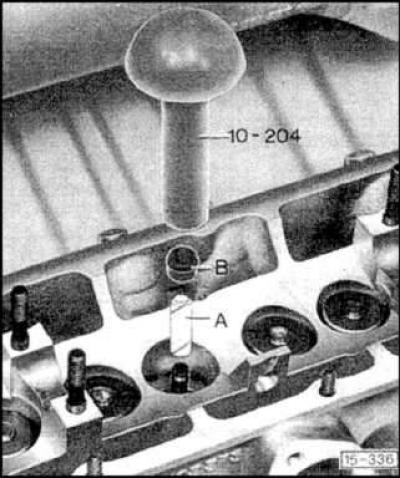
1. Plastic bushing – A – (comes with valve stem seals) place it on the valve stem. Lightly lubricate the valve stem seal – B – with oil, insert it into the VAG 10-204 or HAZET 2577 retaining device and carefully push it onto the valve guide. Remove the bushing and retaining device.
Warning: If assembly is carried out without using a plastic bushing, the valve stem seals will be damaged! As a result, the engine consumes too much oil.
2. Install the valve springs and valve spring retainer, compress the springs.
3. Insert crackers, loosen springs.
4. Replace all valve stem seals in the same manner. Install the plate tappets and camshaft.
The original publication in its entirety is posted on the website AUDIMANUAL.ru