Repair Chevrolet Repair Toyota Repair Honda Repair AvtoVAZ Repair Mercedes-Benz Repair BMW Repair Opel
Home  |  Contacts  |  Sitemap  |    
English Русский
Български
Беларускі
Український
Српски
Hrvatski
Română
Polski
Slovenský
Magyar
AudiManual.ru


  • AUDI 80
  • AUDI 100
  • AUDI A3
  • AUDI A4
  • AUDI A6
  • AUDI A8
  • AUDI Q
  • OTHER
  • ARTICLES
B8 (2007-2015) B7 (2004-2008) B6 (2000-2006) B6 (2000-2006, petrol) B5 (1994-2001) B5 (1994-2001, petrol)

Replacing valve stem seals with the cylinder head installed (Audi A4 B8)

  • Home
  • Audi A4
  • B8 (2007-2015)
  • Power unit
  • Petrol engines 1.8/2.0 l
  • Replacing valve stem seals with the cylinder head installed
            0
Removing camshafts. Mark the alignment of the rocker arm and hydraulic compensator for reassembly. Remove the rocker arm with hydraulic compensators and place it on a clean surface. Unscrew the spark plugs with a 3122B spark plug wrench. Screw on the guide plate for 2.0L engines -VAS 5161/19B- with knurled screws "VAS 5161/12" to the cylinder head, as shown in the figure. Move the piston of the corresponding cyl. to the "bottom dead center".

Removing camshafts. Mark the alignment of the rocker arm and hydraulic compensator for reassembly.…


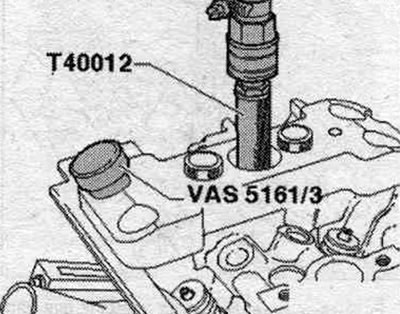
Screw the "T40012" adapter into the threaded hole of the spark plug. Turn on the compressed air supply with an excess pressure of at least 6 bar. Use a mandrel to separate the tightly seated valve crackers "VAS 5161/3" and a plastic hammer.

Screw the «T40012» adapter into the threaded hole of the spark plug. Turn on the compressed air…


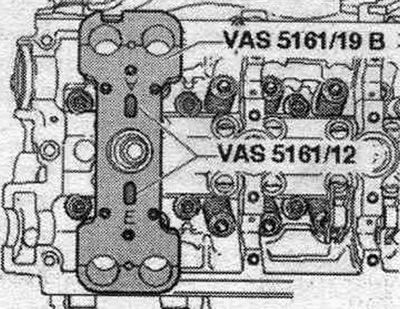
For the inlet side: Screw in the fixture "VAS 5161/6" with a hanging fork "VAS 5161/5" into the middle thread of the guide plate for 2.0 l engines -VAS 5161/19V-. Insert the mounting cartridge "VAS 5161/8" into the guide plate for 2.0 l engines -VAS 5161/19V-. Connect the push-in fork "VAS 5161/2" to adaptation "VAS 5161/6".


For the inlet side: Screw in the fixture «VAS 5161/6» with a hanging fork «VAS 5161/5» into the…


For the exhaust side: Screw in the tool "VAS 5161/6" with a hanging fork "VAS 5161/5" into the external thread of the guide plate for 2.0 l engines -VAS 5161/19V-. Press on the mounting cartridge "VAS 5161/8" and simultaneously turn the knurled screw of the mounting chuck "VAS 5161/8" to the right until the ends enter the valve checks. Turn the knurled screw slightly back and forth, this will cause the valve pins to expand and be captured by the mounting chuck. Release the push fork "VAS 5161/2". Remove the mounting cartridge "VAS 5161/8".

For the exhaust side: Screw in the tool «VAS 5161/6» with a hanging fork «VAS 5161/5» into the…


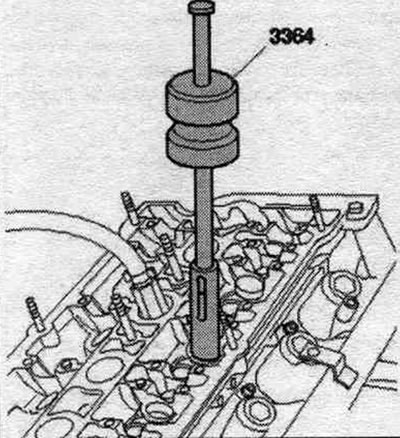
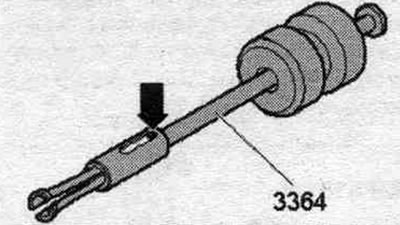
Remove the valve stem seals using the puller "3364".

Remove the valve stem seals using the puller «3364».


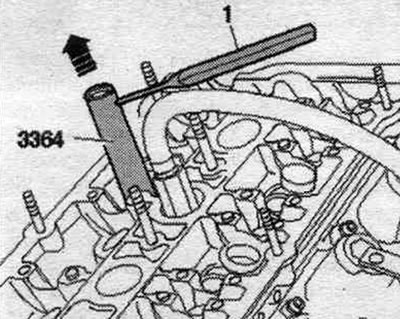
If, due to lack of space, it is not possible to use the valve stem seal puller "3364", press out the "arrow" pin with a punch and remove the attachment.


If, due to lack of space, it is not possible to use the valve stem seal puller «3364», press out…


Install the lower part of the valve stem seal remover "3364" onto the valve stem seal. Insert punch "1" into the hole in the bottom of the puller. Place the mounting lever under the puller and remove the oil seal "arrow".

Install the lower part of the valve stem seal remover «3364» onto the valve stem seal. Insert punch…


Installation


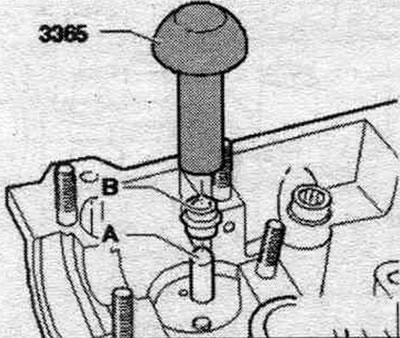
To avoid damaging the new valve stem seals "B," place the plastic sleeve "A" onto the valve stem. Lubricate the sealing lip of the valve stem seal "B" with oil, insert it into the pressing tool "3365," and carefully press it into the guide sleeve. Remove the plastic bushing "A". Insert the valve spring and valve spring retainer. Install the mounting and dismounting device "VAS 5161" as shown.

To avoid damaging the new valve stem seals «B,» place the plastic sleeve «A» onto the valve stem.…


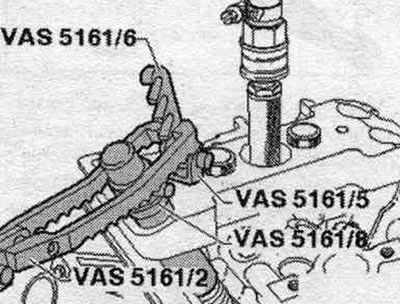
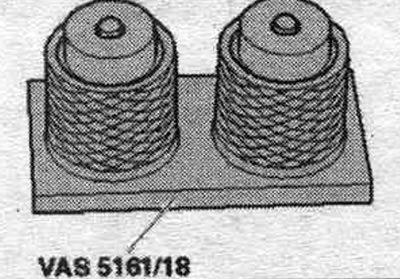
After removing the valve crackers from the mounting cartridge, they must first be inserted into the mounting fixture "VAS 5161/18". Press the mounting chuck "VAS 5161/8" on top of the mounting device and remove the valve crackers.


After removing the valve crackers from the mounting cartridge, they must first be inserted into the…


Press the mounting chuck "VAS 5161/8" push fork "VAS 5161/2", turn the knurled screw of the mounting chuck in all directions while pulling it upward. Release the push fork "VAS 5161/2" with the thumb screw pulled out. Remove the VAS 5161 mounting and dismounting tool. Install in reverse order.

[The original publication in its entirety is posted on the website Audimanual.ru]
The article was checked by auto expert Timur Bazhenov
This article is available at russian, bulgarian, belarusian, ukrainian, serbian, croatian, romanian, polish, slovak, hungarian

Share information:
Previous articles
Audi A4 B8: Petrol engines 1.8/2.0 l
Next articles

Valve train — 2.0 engine
Valve mechanism — engine 1.8
Cylinder Head (CH) — 2.0L Engine (without free play bolt)
Cylinder head (CH), 2.0L engine (with free-running bolt)
Engine lubrication system
Engine cooling system
Turbocharger — removal and installation
Fuel injection system


Similar articles on other Audi car models:
Replacing valve stem seals Audi 80 B3 (1986-1991)
Cylinder head — removal, inspection and installation Audi 100 C3 (1982-1990, diesel)
Removal and installation the cylinder head (petrol) Audi A3 Type 8L (1996-2003)
Replacing valve stem seals Audi A6 C4 (1994-1997)
Left cylinder head cover Audi A8 D2 (1994-2002)
Cylinder head Audi Q5 Type 8R (2008-2017)
Replacing valve stem seals Audi A2 (1999-2005)
Link to this page in different formats


Visitor comments

No comments yet


How much will 40 + 27 =


A4(B8, 2007-2015) 
  • General information
  • Operating instructions
  • Power unit
  • Petrol engines 1.8 l
  • Petrol engines 1.8/2.0 l
  • Petrol engines 3.0 l
  • Petrol engines 3.2 l
  • Fuel system (petrol)
  • Diesel engines 2.0 l (CA*)
  • Diesel engines 2.0 l (CJCB)
  • Diesel engines 2.7/3.0 l
  • Diesel engines 3.0 l
  • Fuel system (diesel)
  • Transmission
  • Manual gearbox 0B1
  • Manual gearbox 0B2
  • Manual gearbox 0B3
  • Manual gearbox 0B4
  • Automatic transmission 0B5
  • Automatic transmission 0B6
  • Automatic transmission 0AW
  • All-wheel drive system
  • Chassis
  • Front suspension
  • Rear suspension
  • Brake system
  • Steering system
  • Body
  • Exterior
  • Interior
  • Seats
  • Doors, locks and windows
  • Security system
  • Heating and air conditioning
  • Electrical equipment
  • Audio system
  • Power devices
  • Equipment and devices
  • Lighting and lamps
  • Electrical circuits
 
A4(B7, 2004-2008) 
  • General information
  • Introduction to manual
  • Troubleshooting
  • Operating instructions
  • Maintenance
  • Power unit
  • Petrol engines 2.0 (ALT)
  • Petrol engines 2.0 (TFSI)
  • Petrol engines 1.8 (MPI)
  • Diesel engines
  • Cooling system
  • Air conditioner
  • Fuel and exhaust system
  • Ignition system
  • Starting and charging
  • Transmission
  • Clutch
  • Manual gearbox
  • Automatic gearbox
  • Drive shafts
  • Chassis
  • Brake system
  • Front suspension
  • Rear suspension
  • Steering
  • Body
  • Exterior
  • Interior
  • Electrical equipment
  • Equipment and devices
  • Lighting and signaling
  • Windscreen wipers and washers
  • Electrical diagrams
  • Electrical diagrams (since 2007)
 
A4(B6, 2000-2006) 
  • General information
  • Vehicle Description
  • User manual
  • Maintenance
  • Power unit
  • Gasoline engine
  • Diesel engine
  • Lubrication system
  • Cooling system
  • Supply system
  • Injection system
  • Exhaust system
  • Ignition and control
  • Transmission
  • Gear box
  • Clutch and drive shafts
  • Chassis
  • Brake system
  • Car suspension
  • Steering
  • Body
  • Heating and ventilation
  • Exterior (external elements)
  • Interior (internal elements)
  • Electrical equipment
  • Power devices
  • Lighting and appliances
  • Electrical circuits
 
A4(B6, 2000-2006, petrol) 
  • General information
  • Introduction to the guide
  • Car care
  • Power unit
  • Engine repair
  • Lubrication system
  • Cooling system
  • Injection and control system
  • Ignition system
  • Power and exhaust system
  • Transmission
  • Clutch and drive shafts
  • Car gearbox
  • Chassis
  • Suspension and wheels
  • Steering
  • Brake system
  • Body
  • Interior
  • Exterior
  • Electrical equipment
  • Equipment and devices
  • Lighting and signaling
  • Power devices
  • Electrical circuits
 
A4(B5, 1994-2001) 
  • General information
  • Introduction to the guide
  • Car care
  • Maintenance (gasoline)
  • Maintenance (diesel)
  • Power unit
  • Gasoline engines
  • Diesel engines
  • Engine overhaul
  • Cooling system
  • Fuel injection (gasoline)
  • Fuel system (diesel)
  • Exhaust system
  • Ignition system
  • Transmission
  • Clutch
  • Mechanical gearbox
  • Automatic gearbox
  • Drive shafts
  • Chassis
  • Brake system
  • Car suspension
  • Steering
  • Body
  • Exterior
  • Interior
  • Doors, locks and windows
  • Heating and ventilation
  • Electrical equipment
  • Power devices
  • Equipment and devices
  • Electrical circuits
 
A4(B5, 1994-2001, petrol) 
  • General information
  • Vehicle description
  • Maintenance
  • Power unit
  • Engine repair
  • Turbocharging
  • Exhaust system
  • Cooling system
  • Ignition system
  • Fuel system
  • Motronic injection system
  • MPI and MPFI injection system
  • Transmission
  • Clutch
  • Gearbox and shafts
  • Chassis
  • Steering
  • Car suspension
  • Brake system
  • Wheels and tires
  • Body
  • Heating and ventilation
  • Body parts
  • Electrical equipment
  • Fuses and relays
  • Power devices
  • Lighting and lamps
  • Tools and devices
  • Electrical circuits
 
AudiManual.ru © 2017-2026 · Mobile version · Feedback · Sitemap: EN BG BY UA RS HR RO PL SK HU · Site search · News and articles
80 B2 · 80 B3 petrol · 80 B3 · 80 B4 · 100 C3 diesel · 100 C3 petrol · 100 C3 · 100 C4 petrol · 100 C4 · A3 Type 8L · A4 B5 petrol · A4 B5 · A4 B6 petrol · A4 B6 · A4 B7 · A4 B8 · A6 C4 · A6 C5 · A6 C5 Allroad · A8 D2 · Q5 Type 8R · Q7 Typ 4L · Audi A2 ·
This site uses cookies 🍪. Click the button to accept this fact.