Repair Chevrolet Repair Toyota Repair Honda Repair AvtoVAZ Repair Mercedes-Benz Repair BMW Repair Opel
Home  |  Contacts  |  Sitemap  |    
English Русский
Български
Беларускі
Український
Српски
Hrvatski
Română
Polski
Slovenský
Magyar
AudiManual.ru


  • AUDI 80
  • AUDI 100
  • AUDI A3
  • AUDI A4
  • AUDI A6
  • AUDI A8
  • AUDI Q
  • OTHER
  • ARTICLES
B8 (2007-2015) B7 (2004-2008) B6 (2000-2006) B6 (2000-2006, petrol) B5 (1994-2001) B5 (1994-2001, petrol)

Lamps and switches in the instrument panel (Audi A4 B8)

  • Home
  • Audi A4
  • B8 (2007-2015)
  • Electrical equipment
  • Lighting and lamps
  • Lamps and switches in the instrument panel
            0
Table of contents: Lamps and switches on the front panel ↓ Removal and installation the left… ↓ Removal and installation of the… ↓ Removal and installation the rear… ↓ Removal and installation the "E1"… ↓ Removal and installation the… ↓ Removal and installation the hazard… ↓ Removal and installation the front… ↓ Removal and installation the keypad… ↓ Removal and installation the front… ↓ Removal and installation the parking… ↓ Removal and installation the glove… ↓ Removal and installation the glove… ↓ Removal and installation the front… ↓

Lamps and switches on the front panel


1. Parking assistant button «E536».

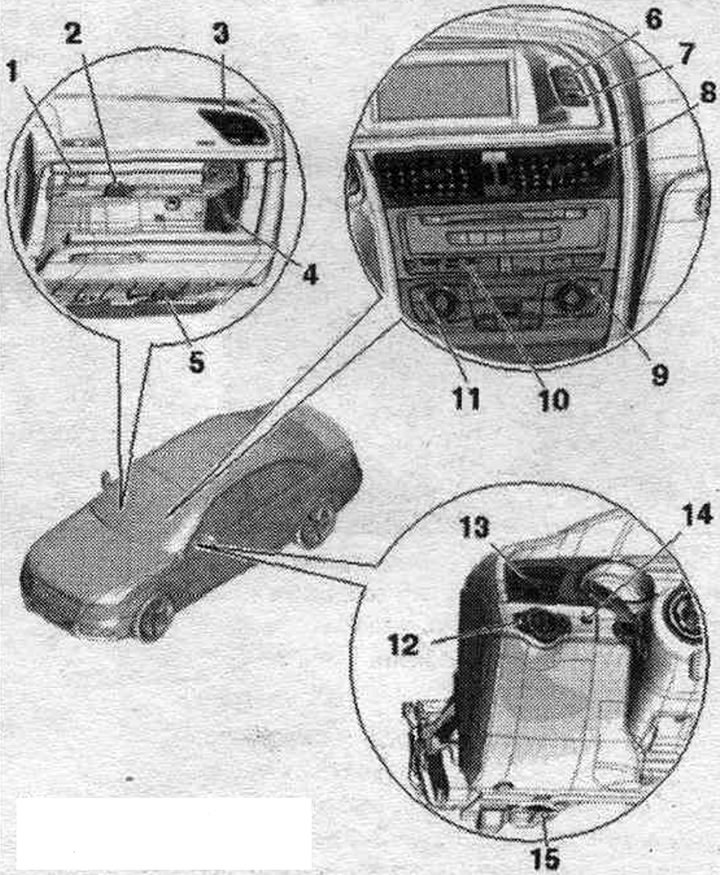
1. Parking assistant button "E536".
2. Illumination of lane. box "W6": 12 V, 5 W.
3. Right deflector illumination lamp on the front. panels "L69".
4. Front light switch. box "E26".
5. Backlight lamp. for legs in front right "L152".
6. Hazard warning light switch "E229".
7. Control lamp for airbag deactivation, front passenger seat "K145".
8. Center illumination lamp, front deflector. panels "L68": in the front deflector. panels, middle - if faulty, cannot be replaced separately.
9. Front seat adjuster. passenger compartment, heated "E95": built into used Climatronic "J255" (also designated as control panel. and indication), in case of malfunction it cannot be replaced separately.
10. Keypad: only for MMI Comfort: depending on equipment with: left: with switch module for selecting the driving profile "E592", start-stop mode button "E693", right: with switch block for Charisma "E592", rear sunblind switch. glass "E149" button for ASR and ESP "E256", parking assistant button "E266".
11. Water regulator. heated seats "E94": built into used Climatronic "J255" (also designated as control panel. and indication), in case of malfunction it cannot be replaced separately.
12. Control switch. lighting "E1": with a dimmer for lighting switches and instrument panel "E20"; with rear fog light switch "E314", fog light switch "E315".
13. Left deflector illumination lamp on the front. panels "L67".
14. Headlight corrector regulator "E102".
15. Backlight lamp. for legs in front left "L151".


Removal and installation the left and right deflector illumination lamp on the front panel "L67"/"L69"


Remove the corresponding front deflectors. panels. Unlock the clamps and disconnect connector "1" on the front deflector. panels. Carefully lift up the housing "2" for the LED with a small "arrow" screwdriver. Remove the LED indicators for the front deflectors. panels.

Remove the corresponding front deflectors. panels. Unlock the clamps and disconnect connector «1»…


Installation in reverse order. Install front deflectors. panels.

Removal and installation of the switch and instrument panel illumination regulator "E20"


The "E20" switch and instrument panel backlight regulator is located in a common housing with the "E1" light switch and cannot be replaced separately if a defect occurs. Replace the light switch.

Removal and installation the rear fog light switch "E314" and the fog light switch "E315"


The rear fog light switch "E314" and the fog light switch "E315" are located in a common housing with the light switch "E1" and cannot be replaced separately if a defect occurs. Replace the light switch.

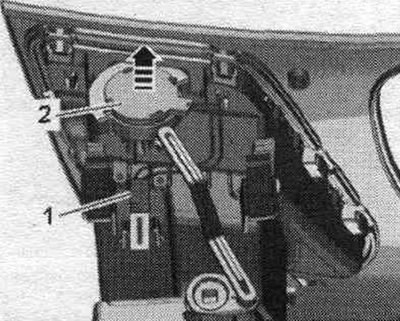
Removal and installation the "E1" light switch


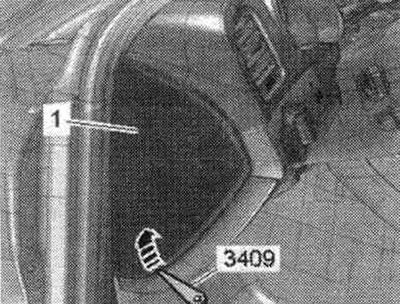
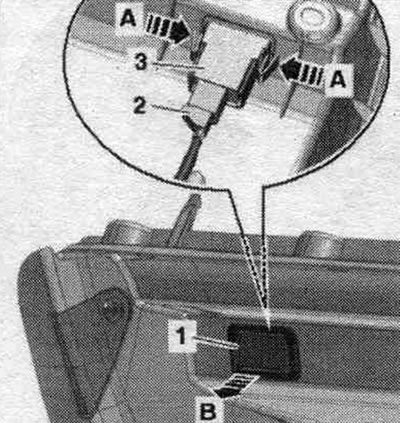
Turn off the ignition. Set the light switch to position 0. Lift the side trim "1" of the front panel with wedge "3409" "arrow" and remove.


Turn off the ignition. Set the light switch to position 0. Lift the side trim «1» of the front…


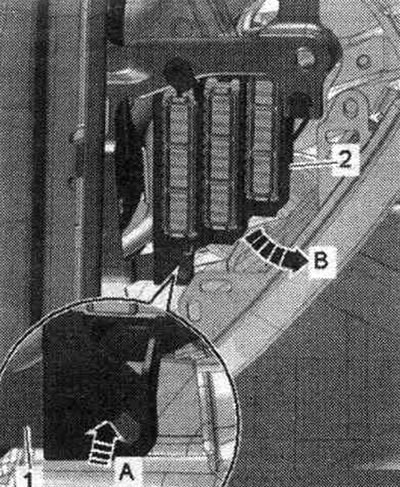
Unlock the clamp "arrow A" and fold the fuse box C "pos. 2" in the "direction of arrow B" to the center, tube "1" of the front panel and remove inward.

Unlock the clamp «arrow A» and fold the fuse box C «pos. 2» in the «direction of arrow B» to the…


Put your hand through the side opening in the lane. panel and push the light switch "E1" "pos. 1" back from the front cover. panel on the driver's side, "arrow". Disconnect the plug connection.

Put your hand through the side opening in the lane. panel and push the light switch «E1» «pos. 1»…


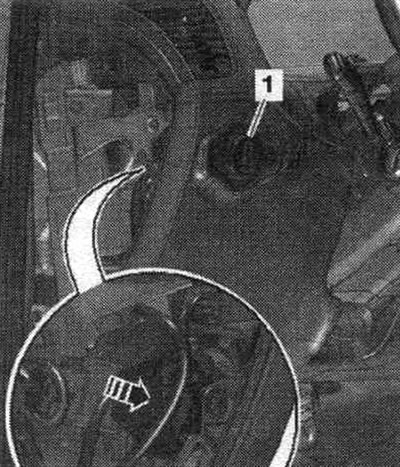
Installation in reverse order. Press the switch until the latch snaps into place in the switch housing.


Removal and installation the headlight range control regulator "E102"


Remove the front cover. panel from the driver's side.. Removing the slotted trim of the instrument cluster. Unscrew the "arrow" bolts and remove the cover of the light switch "1". Disconnect the switch connector. light "E1".

Remove the front cover. panel from the driver's side.. Removing the slotted trim of the instrument…


Disconnect connector "1" on the headlight range control "E102" and press the release button to do this. Carefully release the arrow latches with a small screwdriver. Press out the headlight range control regulator "E102" "pos. 2" from the light switch cover.

Disconnect connector «1» on the headlight range control «E102» and press the release button to do…


Installation in reverse order. Installing the light switch cover. Install the instrument cluster slot trim. Install the front cover. panels on the driver's side..


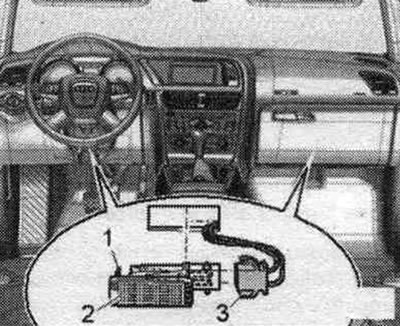
Removal and installation the hazard warning light switch "E229"


Turn off the ignition. Removing the MMI interface screen cover. Press the hazard warning light button "E229" "pos. 1" out of the mounting frame "2" "arrow".

Turn off the ignition. Removing the MMI interface screen cover. Press the hazard warning light…


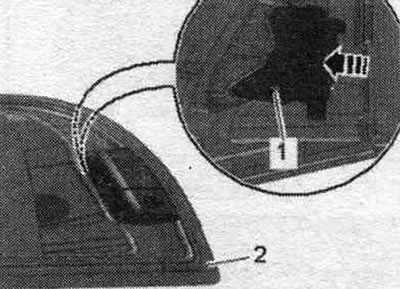
Installation in reverse order. Install the MMI screen cover.

Removal and installation the front passenger airbag deactivation indicator lamp "K145"


Airbag cut-off indicator light for front. passage. "K145" is located in the same housing as the "E229" hazard warning light switch and cannot be replaced separately if a defect occurs.

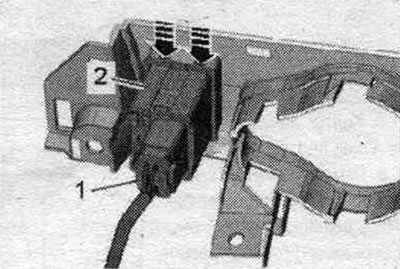
Removal and installation the keypad in the dashboard - vehicles with MMI-Comfort equipment


Remove the CD changer. Carefully release the "arrow" latches with a small screwdriver. Press the keyboard "1" out of the switch mounting socket. "2".

Remove the CD changer. Carefully release the «arrow» latches with a small screwdriver. Press the…


Installation in reverse order. Insert the key block into the switch housing until the latch engages with a clear click. Install a CD changer.


Removal and installation the front seat heating regulator "E94"/"E95"


Front heating regulators. seats are built into the used Climatronic "J255" (also designated as control panel. and indications). They cannot be replaced individually.

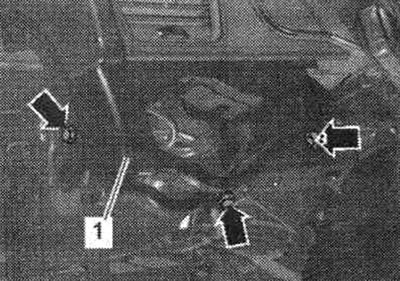
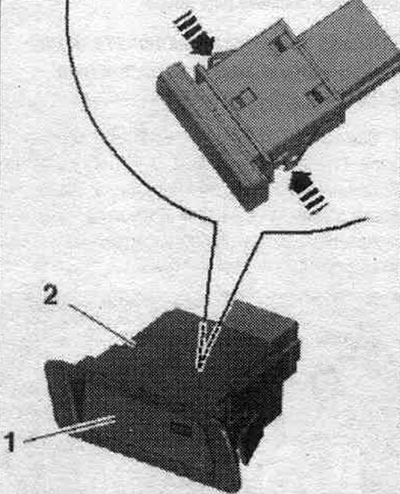
Removal and installation the parking assistant button "E536"


Remove the front compartment. Disconnect plug connection "2". Unlock the fastening clamps "arrow A" and pull the trim "3" of the parking assistant button "E536" "pos. 1" forward "arrow B".

Remove the front compartment. Disconnect plug connection «2». Unlock the fastening clamps «arrow A»…


Carefully release the arrow clamps with a small screwdriver. Remove the parking assistant button "E536" "pos. 1" forward from the cover "2".

Carefully release the arrow clamps with a small screwdriver. Remove the parking assistant button…


Installation in reverse order. Set per. box.

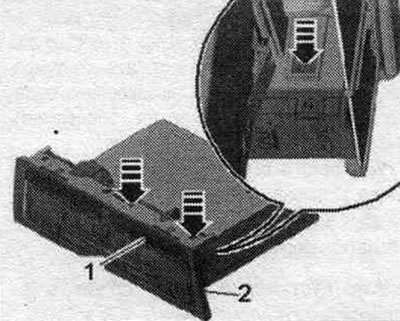
Removal and installation the glove compartment light "W6"


Set the light switch to position 0. Press in the locking tab "1" with a flat-head screwdriver and remove the front light lamp by prying it up with a lever. box "2". Disconnect plug connection "3".


Set the light switch to position 0. Press in the locking tab «1» with a flat-head screwdriver and…


To replace the lamp, loosen the fastening brackets "arrows" and remove the cover "1" above the lamp.

To replace the lamp, loosen the fastening brackets «arrows» and remove the cover «1» above the lamp.


Remove lamp "1" on the back of the front light shade. box from cartridge "2".

Remove lamp «1» on the back of the front light shade. box from cartridge «2».


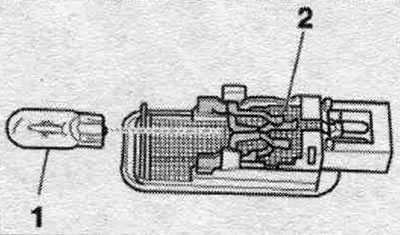
Installation in reverse order. Connect the plug connection. Insert the front light shade. box into the hole and fix it on the opposite side.


Removal and installation the glove compartment light switch "E26"


Turn off the ignition. Remove fuse box D "SD" on the right side of the front. panels and move them to the side. Disconnect plug connection "3". Remove hinge bolt "1". Unlock switch "2" by turning it counterclockwise "arrow" and remove it.

Turn off the ignition. Remove fuse box D «SD» on the right side of the front. panels and move them…


Installation in reverse order. Hanging the fuse box D "SD" on the right side of the front. panels.

Removal and installation the front footwell light "L151"/"L152"


Press in the locking tab "1" with a flat-head screwdriver and remove the backlight by prying it out with a lever. for legs "2". Disconnect plug connection "3".

Press in the locking tab «1» with a flat-head screwdriver and remove the backlight by prying it out…


Installation in reverse order. If the LED is faulty, the backlight should be replaced. for assembled legs. Insert the backlight lamp. for the legs into the hole and fix on the opposite side.
The article was checked by auto expert Timur Bazhenov
This article is available at russian, bulgarian, belarusian, ukrainian, serbian, croatian, romanian, polish, slovak, hungarian

Share information:
Previous articles
Audi A4 B8: Lighting and lamps
Next articles

Exterior rear lights, Avant — removal and installation
Rear Exterior Lights, Sedan — Removal and Installation
LED taillights, Avant from model year 2013
LED taillights, Avant up to model year 2012
Lighting and switches in the front doors
Lighting and switches in the rear doors
Lights and switches on the center console
Lighting fixtures and switches in the front seats and luggage…


Similar articles on other Audi car models:
Switches on the control panel Audi 80 B3 (1986-1991, petrol)
Instrument panel and indicator lights Audi 100 C3 (1982-1990, diesel)
Removal and installation the instrument panel Audi A3 Type 8L (1996-2003)
Switches on the instrument panel Audi A6 C5 Allroad (1999-2005)
Instrument panel Audi A8 D2 (1994-2002)
Lamps and switches in the instrument panel Audi Q5 Type 8R (2008-2017)
Instrument panel Audi A2 (1999-2005)
Link to this page in different formats


Visitor comments

No comments yet


How much will 25 + 50 =


A4(B8, 2007-2015) 
  • General information
  • Operating instructions
  • Power unit
  • Petrol engines 1.8 l
  • Petrol engines 1.8/2.0 l
  • Petrol engines 3.0 l
  • Petrol engines 3.2 l
  • Fuel system (petrol)
  • Diesel engines 2.0 l (CA*)
  • Diesel engines 2.0 l (CJCB)
  • Diesel engines 2.7/3.0 l
  • Diesel engines 3.0 l
  • Fuel system (diesel)
  • Transmission
  • Manual gearbox 0B1
  • Manual gearbox 0B2
  • Manual gearbox 0B3
  • Manual gearbox 0B4
  • Automatic transmission 0B5
  • Automatic transmission 0B6
  • Automatic transmission 0AW
  • All-wheel drive system
  • Chassis
  • Front suspension
  • Rear suspension
  • Brake system
  • Steering system
  • Body
  • Exterior
  • Interior
  • Seats
  • Doors, locks and windows
  • Security system
  • Heating and air conditioning
  • Electrical equipment
  • Audio system
  • Power devices
  • Equipment and devices
  • Lighting and lamps
  • Electrical circuits
 
A4(B7, 2004-2008) 
  • General information
  • Introduction to manual
  • Troubleshooting
  • Operating instructions
  • Maintenance
  • Power unit
  • Petrol engines 2.0 (ALT)
  • Petrol engines 2.0 (TFSI)
  • Petrol engines 1.8 (MPI)
  • Diesel engines
  • Cooling system
  • Air conditioner
  • Fuel and exhaust system
  • Ignition system
  • Starting and charging
  • Transmission
  • Clutch
  • Manual gearbox
  • Automatic gearbox
  • Drive shafts
  • Chassis
  • Brake system
  • Front suspension
  • Rear suspension
  • Steering
  • Body
  • Exterior
  • Interior
  • Electrical equipment
  • Equipment and devices
  • Lighting and signaling
  • Windscreen wipers and washers
  • Electrical diagrams
  • Electrical diagrams (since 2007)
 
A4(B6, 2000-2006) 
  • General information
  • Vehicle Description
  • User manual
  • Maintenance
  • Power unit
  • Gasoline engine
  • Diesel engine
  • Lubrication system
  • Cooling system
  • Supply system
  • Injection system
  • Exhaust system
  • Ignition and control
  • Transmission
  • Gear box
  • Clutch and drive shafts
  • Chassis
  • Brake system
  • Car suspension
  • Steering
  • Body
  • Heating and ventilation
  • Exterior (external elements)
  • Interior (internal elements)
  • Electrical equipment
  • Power devices
  • Lighting and appliances
  • Electrical circuits
 
A4(B6, 2000-2006, petrol) 
  • General information
  • Introduction to the guide
  • Car care
  • Power unit
  • Engine repair
  • Lubrication system
  • Cooling system
  • Injection and control system
  • Ignition system
  • Power and exhaust system
  • Transmission
  • Clutch and drive shafts
  • Car gearbox
  • Chassis
  • Suspension and wheels
  • Steering
  • Brake system
  • Body
  • Interior
  • Exterior
  • Electrical equipment
  • Equipment and devices
  • Lighting and signaling
  • Power devices
  • Electrical circuits
 
A4(B5, 1994-2001) 
  • General information
  • Introduction to the guide
  • Car care
  • Maintenance (gasoline)
  • Maintenance (diesel)
  • Power unit
  • Gasoline engines
  • Diesel engines
  • Engine overhaul
  • Cooling system
  • Fuel injection (gasoline)
  • Fuel system (diesel)
  • Exhaust system
  • Ignition system
  • Transmission
  • Clutch
  • Mechanical gearbox
  • Automatic gearbox
  • Drive shafts
  • Chassis
  • Brake system
  • Car suspension
  • Steering
  • Body
  • Exterior
  • Interior
  • Doors, locks and windows
  • Heating and ventilation
  • Electrical equipment
  • Power devices
  • Equipment and devices
  • Electrical circuits
 
A4(B5, 1994-2001, petrol) 
  • General information
  • Vehicle description
  • Maintenance
  • Power unit
  • Engine repair
  • Turbocharging
  • Exhaust system
  • Cooling system
  • Ignition system
  • Fuel system
  • Motronic injection system
  • MPI and MPFI injection system
  • Transmission
  • Clutch
  • Gearbox and shafts
  • Chassis
  • Steering
  • Car suspension
  • Brake system
  • Wheels and tires
  • Body
  • Heating and ventilation
  • Body parts
  • Electrical equipment
  • Fuses and relays
  • Power devices
  • Lighting and lamps
  • Tools and devices
  • Electrical circuits
 
AudiManual.ru © 2017-2026 · Mobile version · Feedback · Sitemap: EN BG BY UA RS HR RO PL SK HU · Site search · News and articles
80 B2 · 80 B3 petrol · 80 B3 · 80 B4 · 100 C3 diesel · 100 C3 petrol · 100 C3 · 100 C4 petrol · 100 C4 · A3 Type 8L · A4 B5 petrol · A4 B5 · A4 B6 petrol · A4 B6 · A4 B7 · A4 B8 · A6 C4 · A6 C5 · A6 C5 Allroad · A8 D2 · Q5 Type 8R · Q7 Typ 4L · Audi A2 ·
This site uses cookies 🍪. Click the button to accept this fact.