
Table of contents: Removal ↓ Installation ↓
Connectors on the back of the instrument panel
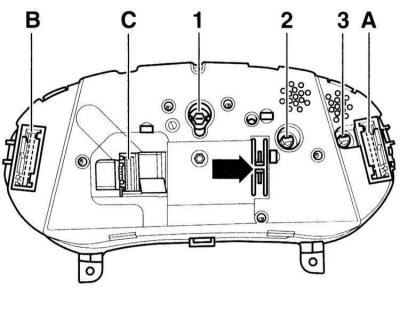
- A - 32-pin connector, blue
- B - 32-pin connector, green
- C - 20-pin connector, red. Only "Higline" version
- 1 - high beam indicator lamp, 1.2 W
- 2 - ASR traction control system indicator lamp, 1.2 W (additional equipment)
- 3 - Trailer direction indicator lamp, 1.2 W
In the instrument panel, only the control lamps, which are incandescent lamps, can be replaced. If there are any other faults in the unit, it must be replaced entirely.
If the instrument cluster needs to be replaced, the fault memory must be read out before removal. In addition, the service interval indicator and the odometer status can be read and recorded using the AUDI diagnostic tool (work of the service station).
Warning: Removal of the steering wheel is not required. The following illustrations do not show the steering wheel for better visibility.
Removal
1. Pull the steering wheel with the adjustment mechanism out completely and move it down.
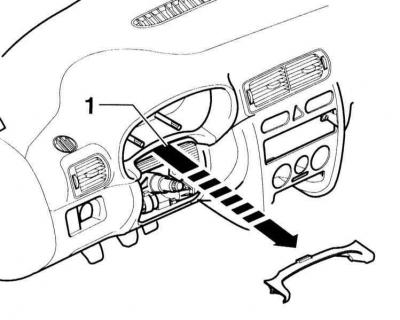
2. Press the cover –1– upwards from the side and then pull the cover out of the instrument panel.
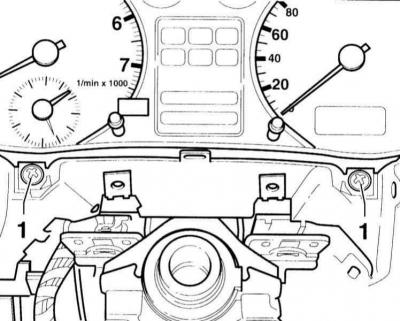
3. Remove 2 Phillips head screws –1–.
4. Pull the instrument cluster forward.
5. Cut the cable connector on the back of the instrument cluster.
6. Release the connector locks and disconnect the connector connections on the back of the instrument cluster.
7. Replace damaged lamps if possible.
Installation
1. Installation is performed in the reverse order of removal.
2. If the instrument cluster has been replaced, adjust the service interval indicator and trip meter (work of the service station).
[This publication is borrowed from the resource: AudiManual]