



2. On models with a 2DIN slot, remove the climate control panel to install the audio unit (see Chapter 3).
3. On models with a 1 DIN slot, first lift the panel to install the audio unit (1 in the illustration) in the direction of arrow A, and then pull it out in the direction of arrow B.
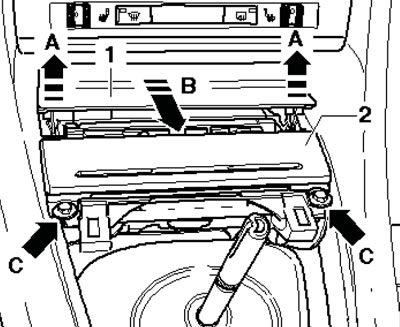
4.3. Removing the ashtray
4. Remove the bolts (arrows C in illustration 4.3) and pull the ashtray (2) out of the center console. Disconnect the ashtray light connector, remove the foam wedges from the center console and remove the sound insulation upwards.
5. Remove the gear shift lever sound insulation mounting bolts (see illustration).
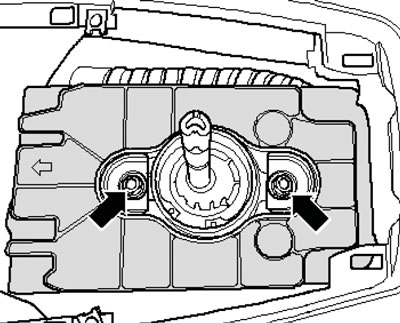
4.5. Soundproofing fastening bolts
6. Give the nuts (see illustration).
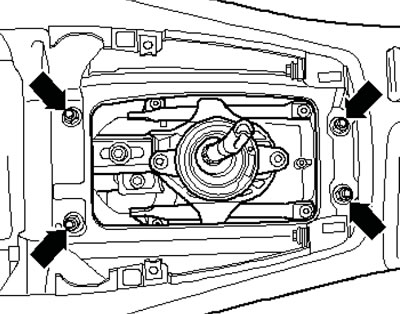
4.6. Gear shift lever assembly mounting nuts
7. If present, remove the tunnel cross member (1 in the illustration), unscrew the bolts (arrows). Disconnect the exhaust pipe at the clamp (2) and unhook the rear section of the exhaust pipe from the rubber hangers. Remove the rear section of the exhaust pipe together with an assistant. Remove the heat shield above the exhaust pipe.
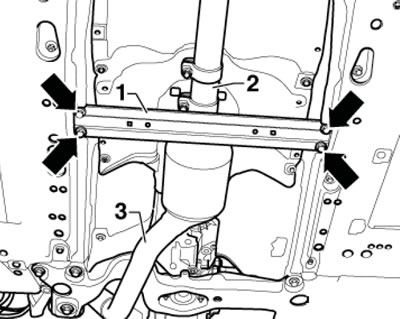
4.7. Central tunnel crossmember fastening
8. Unscrew the rod mounting bolt (2 in illustration 2.16) gear selection and push rod bolt (1).
9. Give the nut (1 in illustration 2.17) and separate the gear selector lever (2) from the gear selector shaft. Remove the gear selector lever assembly in the rear direction.
10. If it is necessary to replace individual parts of the assembly, refer to the accompanying illustrations.
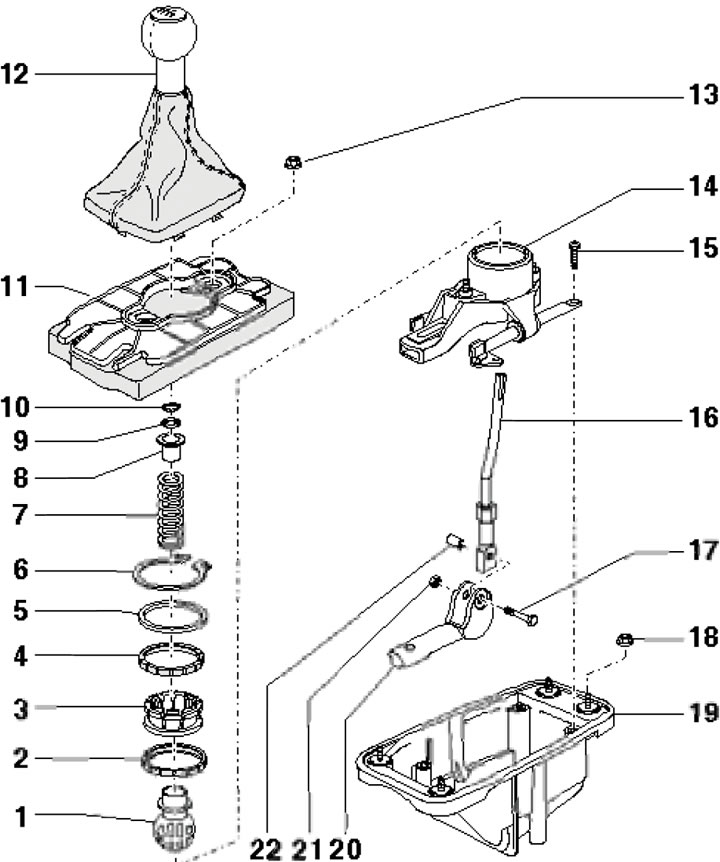
4.10. Gear shift lever assembly parts 1. Hinge; 2, 4. Rubber ring; 3. Hinge guide; 5. Washer (the jaws face the guide 3); 6, 10. Retaining ring; 7. Spring; 8. Spacer sleeve; 9. Washer; 11. Soundproofing; 12. Handle with dust cover; 13. Nut, 10 Nm; 14. Lever bearing 16; 15. Bolt with a head for a rod key; 16. Gear shift lever; 17. Bolt; 18. Nut, 10 Nm; 19. Lever body 16; 20. Connection of lever 16 with rod; 21. Self-locking nut, 10 Nm, subject to replacement; 22. Bushing
11. Installation is carried out in the reverse order of dismantling the components. Use new sealing elements. After installation, adjust the gearshift drive (see Section 5).