
2. Remove the battery (see Chapter 5).
3. Follow the steps described in paragraphs 1-3 Section 11.
4. Place under the connection (And in illustration 11.4) container for collecting the coolant, insert the hose into the connection (B) and carefully blow the coolant out of the radiator using a jet of compressed air. Remove the nozzle (C).
5. From the engine compartment side, remove the nut (And in the illustration), disconnect the refrigerant lines from the evaporator (D) and plug the openings. Tie the refrigerant lines to the side so that they do not interfere. Remove the nozzle (E).
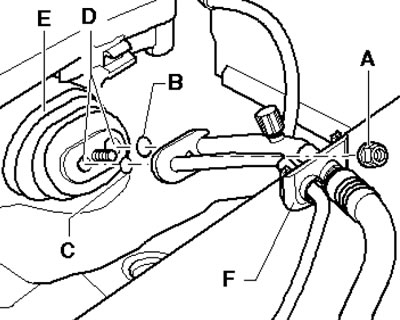
13.5. Connecting the refrigerant lines to the evaporator
6. Cover the front seats with covers, remove the main storage compartment, driver's storage compartment, center console and instrument panel (see Chapter 11).
7. Remove the support (And in the illustration) instrument panel crossbar on the front passenger side in the center console. Remove the gas pedal (see Chapter 4).

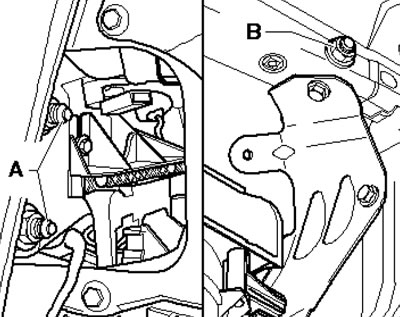
13.7. Fastening the support of the right beam of the instrument panel
8. Unscrew the bolt (A and B in the illustration) between the support (C) and the climate control system housing. Remove the support (C) of the instrument panel crossbar on the driver's side in the central tunnel. Remove the deflector in the driver's footwell, remove the brake pedal bracket (and clutches - on models with manual transmission) from the instrument panel crossbar.

13.8. Fastening the left instrument panel beam support
9. Give the nuts (And in the illustration) instrument panel crossbar on the left by approximately 15 mm, completely loosen the nuts (B) of the crossbar on the right and remove the connecting screws between the instrument panel crossbar and the window crossbar, as well as the connecting screws between the window crossbar and the water drainage gutter. Pull down the instrument panel crossbar so that on the left it is pressed against the nuts, and on the right it is still hanging on the threaded stud.
13.9. Left instrument panel beam mounting nuts
10. Remove the air duct (And in the illustration) glass blowing and air duct (B) of the central deflectors.
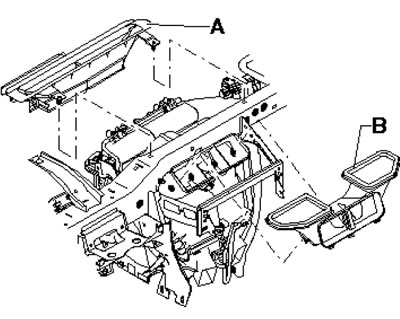
13.10. Air ducts in the upper part of the climate control system housing
11. Remove the condensate drain pipe and remove the vehicle's electrical wiring harness fasteners with clamps from the climate control system housing.
12. On diesel models with an additional electric heater, disconnect the heating element connectors (see Section 12).
13. Disconnect all connectors between the vehicle wiring harness and the electrical components of the climate control system.
Note: The climate control system wiring harness is removed together with the climate control system housing.
14. Remove the screws (And in illustration 10.3).
15. Remove the climate control system housing (And in the illustration) towards the front passenger seat. At the same time, make sure that the radiator hoses and electrical wiring are not under stress.

13.10. Air ducts in the upper part of the climate control system housing
16. Installation is performed in the reverse order of component removal. Use new refrigerant line seals and new coolant line gaskets.
[The original article is available on the website: AudiManual.ru]