
But the headlights can be checked and adjusted in an improvised way, for example, if you replaced a bulb or the entire headlight at the end of the week. However, this is only a last resort! Ask a specialist to adjust the headlights at the first opportunity.
Testing and adjustment conditions
During any inspection or adjustment the following conditions must be met:
- appropriate tire pressure;
- undamaged and clean diffusers;
- working reflectors and incandescent lamps;
- a properly loaded vehicle.
The fuel tank must be at least 90% full, the vehicle must have all the necessary equipment, including a spare tire and tools, and there must be a person in the driver's seat (you can also use a 75 kg load).
If the fuel tank is not full enough, additional loads should be placed in the trunk (water filled canisters). Audi recommends placing 52 kg in the trunk when the tank is 25% full, 35 kg when the tank is 50% full, and 17 kg when the tank is 75%.
1. Place the car on a flat surface opposite the wall. The distance between the front and the wall should be exactly 5 meters.
2. To seat the springs, press firmly vertically on the front and rear of the vehicle several times.
3. Set the manual headlight leveling adjustment to zero (rolling disk).
4. The main headlights are adjusted only with low beam. The inclination should be 10 centimeters at a distance of 10 meters. The inclination in percent (10 cm / 10 m corresponds to 1%) is indicated at the top of the headlight.
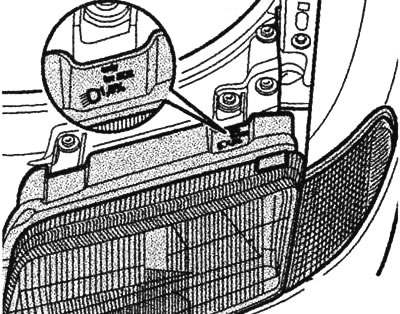
The tilt in % is indicated at the top of the headlight (the headlight shown here is not for the Audi A4)
5. Measure the distance between the ground and the midpoint between both headlights. Measure this distance on the wall and connect the two points with a straight line (S1).
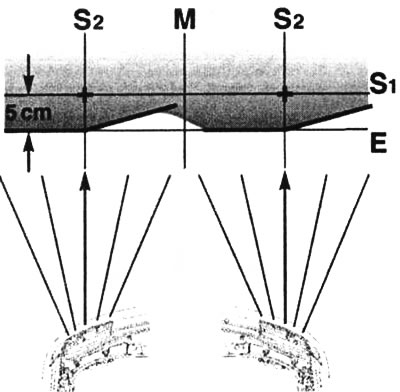
Lines and crosses on the wall for temporary headlight adjustment
6. Below at a distance of 5 cm draw a parallel line E on the wall. This line corresponds to the inclination of the low beam at a distance of five meters.
7. Looking forward through the rear window and estimating the distance, ask an assistant to draw a vertical line M exactly in the middle of the car.
8. Measure the distance between the center of the car and the middle of both headlights (left and right). Put these distances on line S1 (to the right and left of the intersection point of lines M and S1) and mark the obtained points with a cross (S2).
9. The low beam deflection points are adjusted on line E at a distance of five centimeters below these crosses.
(Read the original source on the website: «Audimanual.ru»)