
Note: The inner joint has a very tight fit on the shaft and requires a hydraulic press to remove. If such equipment is not available, replacement of the cover can be entrusted to specialists at a dealership car service or to a skilled worker at an unverified garage.
19. Secure the shaft in a vice with soft jaws and using a hammer through a chuck, carefully knock the plate securing the cover off the outer race of the inner joint (Fig. 3.19).
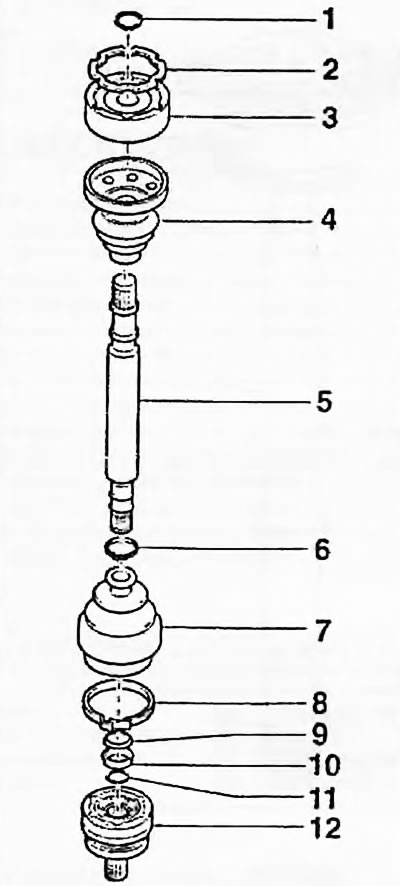
Fig. 3.19. Drive shaft components - petrol models with manual transmissions: 1. Retaining ring; 2. Gasket; 3. Inner hinge; 4. Inner cover and fixing plate; 5. Drive shaft; 6. Clamp; 7. Outer cover; 8. Clamp; 9. Plate washer; 10. Bushing; 11. Retaining ring; 12. Outer hinge
20. Remove the retaining ring from the inner end of the shaft.
21. Remove the inner joint from the shaft by firmly supporting the outer race and pressing the shaft out of the inner race.
22. Remove the inner clamp of the boot and remove the boot from the shaft.
23. Clean and inspect the inner joint as described in p.p. 7...9.
24. If the joint is worn or damaged, replace it or the entire shaft - ask the dealer about the availability of spare parts. If the joint is in good working order, purchase a repair kit, which consists of a new boot, a snap ring, clamps, a washer, a bushing and the required amount of grease of the prescribed type.
25. Wrap the sprockets with tape and put the new cover on the shaft. Remove the tape and install the retaining plate on the cover.
26. Support the shaft securely and press the inner joint onto it. Secure the joint to the shaft with a new retaining ring, installing it in the groove.
27. Spread the grease over the hinge, then squeeze the remaining grease into the boot.
28. Wipe clean the mating surfaces of the boot retaining plate and the hinge. Apply a layer of sealant (Audi/VAG recommend D3 sealant - available from dealer) onto the retaining plate. Align the holes in the plate with the holes in the outer sleeve of the hinge and press the plate onto the sleeve.
29. Make sure that the outer edge of the cover is properly secured and lift the inner edge to equalize the air pressure in the cover with the atmospheric pressure.
30. Install both clamps and squeeze the protruding part to tighten the clamps. If you do not have a special tool, you can do this quite carefully with nippers (don't overdo it - don't bite the clamp).
31. Check the freedom of movement of the joint in all directions and install it on the vehicle as described in paragraph 2.