
Table of contents: Troubleshooting the Air Blower Motor ↓ Removal the air blower motor ↓ Removal additional air blower… ↓
Supercharger location
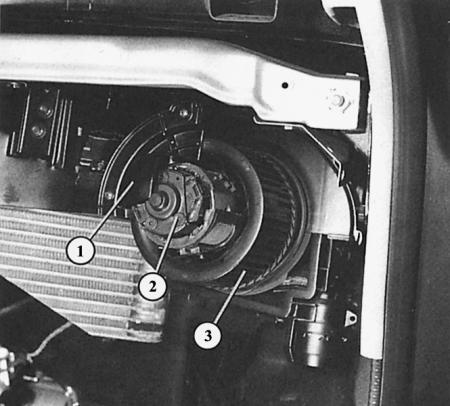
- 1 - supercharger housing;
- 2 - supercharger motor;
- 3 - fan wheel.
The photo shows the location of the supercharger in a car with air conditioning.
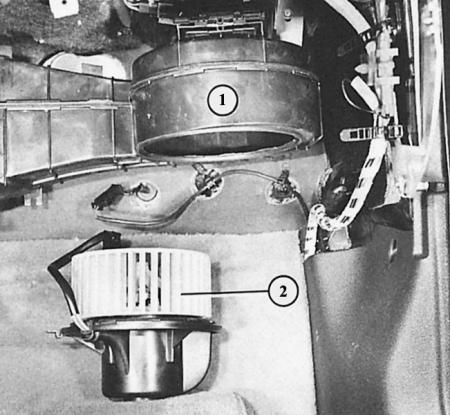
When the glove box is removed, the blower motor with the fan wheel (2) is accessible. It is inserted into the air duct (1) from below.
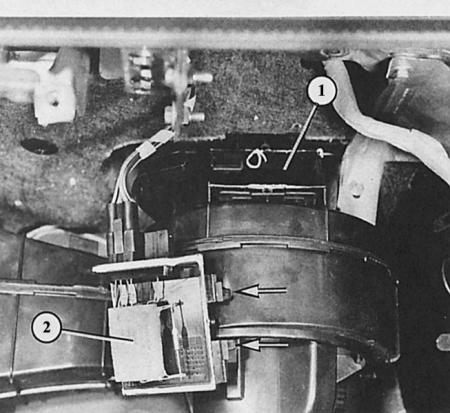
Here the additional supercharger resistors (2 – next to the thermal fuse) are removed from the mounting hole in the supercharger box (1). The plastic retaining springs are shown by the arrows.
The blower motor operates at four speeds, which are set by the rotary switch "Air supply and blower" on the instrument panel. The different speed stages are achieved by connecting resistors of different sizes (or their serial connection). The resistors are connected to the supercharger motor ground wire. Positive current supply (through the fuse) remains constant - only contact with the mass "improves" or "worsens".
Troubleshooting the Air Blower Motor
1. If the air blower does not work in any of the switch positions, first check the corresponding fuse (table in chapter Electrical equipment).
2. If, despite the switch being in good working order, the windscreen wipers also do not work, then the cause is in the X-contact unloading relay.
3. Checking the supercharger motor: Completely remove the glove box (Chapter Salon).
4. Disconnect the two-pole connector in the wire to the blower motor, connect two auxiliary wires to the now free contacts of the motor: from the positive battery to the contact to which the red wire was connected, and from the negative battery to the contact to which the brown wire was connected.
5. If the blower motor is OK, it should now spin at full speed. If not, replace it.
6. If the drive does not work at all speeds, then there may be a defect in one of the resistors.
7. Remove the additional resistors, perform a visual inspection. If one of the resistors has burned out, replace the entire support with the resistors.
8. If the additional resistances are OK, then in addition to the conductivity problem in the wire, the rotary control in the dashboard may also be the source of the malfunction – replace the entire heating control device.
Removal the air blower motor
1. Completely remove the glove box (Chapter Salon).
2. The blower motor is inserted into the air duct to the heating from below.
3. Disconnect the blower motor lead wire connector and remove the wire from the bracket.
4. Lift the locking tab on the left side of the housing above the retainer and remove the air blower housing by turning it to the left (counterclockwise).
Removal additional air blower resistors
1. Remove the glove box (Chapter Salon).
2. Press up the two plastic retaining springs at the bottom of the additional resistor mounting plate.
3. Lift the mounting board and pull it downwards. Loosen the adhesive connection if necessary.
4. When installing, pay attention to the fact that the main resistor board is completely tightly installed in the air duct. If necessary, seal it with sealant.
This article was previously published on the resource: audimanual