
Repair Chevrolet Repair Toyota Repair Honda Repair AvtoVAZ Repair Mercedes-Benz Repair BMW Repair Opel
Home  |  Contacts  |  Sitemap  |    
English Русский
Български
Беларускі
Український
Српски
Hrvatski
Română
Polski
Slovenský
Magyar
AudiManual.ru


  • AUDI 80
  • AUDI 100
  • AUDI A3
  • AUDI A4
  • AUDI A6
  • AUDI A8
  • AUDI Q
  • OTHER
  • ARTICLES
Q7 Typ 4L (2005-2015, diesel) Q5 Type 8R (2008-2017)

Checking fuel consumption in the return lines of the injectors with the engine running (Audi Q5-8R)

  • Home
  • Audi Q
  • Q5 Type 8R (2008-2017)
  • Power unit
  • Diesel 2.0 liter (CA)
  • Checking fuel consumption in the return lines of the injectors with the engine running
            0
Table of contents: Checking the fuel return flow for… ↓ Checking the fuel flow in the return… ↓ Installation of return fuel lines ↓ Checking open injectors ↓

Checking the fuel return flow for all injectors


Remove the engine casing. Disconnect the return fuel line hose "3" from the rear of the pressure reducing valve "2". Close the open end of the return fuel line with the plug "1". Lower the hose "3" (if necessary, extend it with hose "4") into a suitable container to measure the fuel consumption in the common return line. Start the engine and let it idle for 2 minutes. The nominal value after 2 minutes: from 0 ml to 50 ml. If the nominal value is reached, increase the speed to 2000-2500 rpm and check the fuel consumption in the return line again. The nominal value after 2 minutes: less than 250 ml.
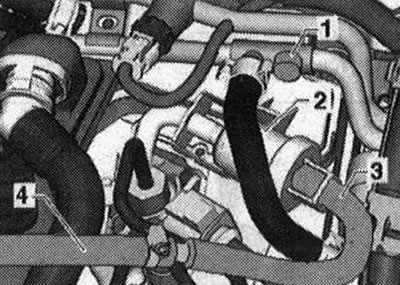
Remove the engine casing. Disconnect the return fuel line hose «3» from the rear of the pressure…


If the nominal value is exceeded, this indicates a fault 1 (or several) injectors. Check the fuel flow in the return line of each injector.

Checking the fuel flow in the return line of each injector


For each individual injector, the return fuel flow has a small value. If this value is greater for 1 of the injectors than for the others, then this injector is presumably defective. Clean all connections before removing (for example, using a standard Kaltreiniger cleaner). Dry all cleaned parts. Clamp the return fuel line after the pressure reducing valve "1" with a hose clamp up to 25 mm "3094".
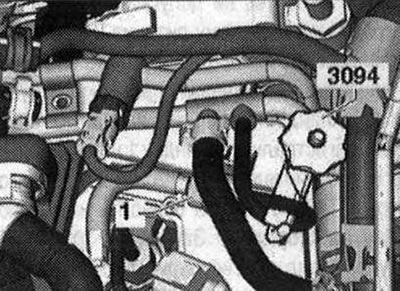


For each individual injector, the return fuel flow has a small value. If this value is greater for…


Disconnect the return lines from the injectors by pressing both clamps down and simultaneously pulling the locking device up "arrow". Put the hoses on the connectors of the return fuel lines of all 4 injectors. Insert 4 hoses into the measuring device "VAG 1348/2 B". Start the engine and let it idle for a few minutes. Do not press the gas pedal during the test, the engine must only idle. With the return fuel lines removed, increasing the engine speed will damage the injectors. The volumes of fuel supplied through the return lines of all 4 injectors, measured on a warmed-up engine at idle, should be practically the same. If the fuel consumption in the return line of 1 of the injectors is much higher than the others, it must be replaced.
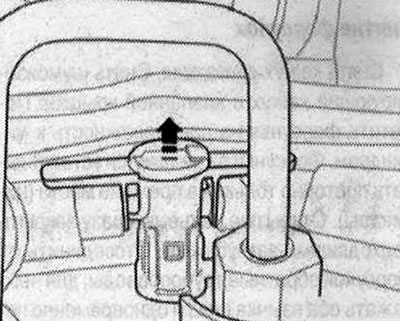
Disconnect the return lines from the injectors by pressing both clamps down and simultaneously…


Installation of return fuel lines


Replace the sealing rings of all return fuel line connectors. Before installation, lubricate all sealing rings with assembly or oil. Carefully place the return line connectors on the new injector sealing rings. The fitting should lock into place with a clearly audible click. After this, carefully press the clamps down. Check the tightness of the fuel system.

Checking open injectors


Clear the ECM event recorder. Remove the engine cover. Clean all connections before removing (for example, using a standard Kaltreiniger cleaner). Maintain cleanliness, prevent contamination from entering the fuel system. Check cylinders one by one. Dry all cleaned parts. Start checking with cylinder 1. Unscrew the union nut of the fuel line to cylinder 1 on the fuel rail and additionally, using the "T40055" socket wrench, slightly loosen the union nut on the injector. Plug the open nipple of the injector's fuel line. Close the open nipple using the "T40204" threaded plug. The electrical connector of the injector being checked must be on. Delete all entries from the event recorder. Take a test drive. If the injector is recognized correctly, there should be no "positive mismatch" errors in the event recorder. The event recorder may also contain other entries. Ignore these new entries in the event recorder (tracking error). After the test drive, query the event recorder. If the "positive mismatch" entry appears again, repeat the operations with all fuel rail fittings until no more error entries appear after the test drive. Follow the installation rules for all injection lines. Moisten the threads of the union nuts with fuel. Tighten the union nuts of the fuel injector lines by hand. Check the installation for internal stress. Install the high-pressure lines.

(The original version is on the portal «AUDImanual.ru»)
The article was checked by auto expert Timur Bazhenov
This article is available at russian, bulgarian, belarusian, ukrainian, serbian, croatian, romanian, polish, slovak, hungarian

Share information:
Previous articles
Audi Q Q5 Type 8R: Diesel 2.0 liter (CA)
Next articles

Adaptation of injectors
Filling the fuel system after installing the injection pump
Removal the high pressure fuel pump
Intake manifold parts and components
Removal injectors
Installation of injectors
Removal the air flow meter
Lambda probe parts and components


Similar articles on other Audi car models:
Checking the fan switch device when the engine is not running Audi 80 B3 (1986-1991)
Idle speed and maximum engine speed — checking and adjustment Audi 100 C3 (1982-1990, diesel)
Removal and installation of fuel lines and injectors (petrol) Audi A3 Type 8L (1996-2003)
Bleeding the fuel system (1.8L petrol engine) Audi A4 B6 (2000-2006)
Diagram 2-3. Engine control unit, fuel injectors and ignition… Audi A6 C5 Allroad (1999-2005)
Draining water from the fuel filter of a V6 TDI diesel engine Audi A8 D2 (1994-2002)
Engine — Checking Oil Level Audi A2 (1999-2005)
Link to this page in different formats


Visitor comments

No comments yet


How much will 19 + 13 =


Q7 4L(2005-2015, diesel) 
  • General information
  • Operating instructions
  • Maintenance
  • Power unit
  • Diesels 3.0 l (BUG, BUN, CAS)
  • Diesels 3.0 l (CATA, CCMA)
  • Diesels 3.0 l (CJGA/CJGC)
  • Diesels 4.2 l (BTR, CCFA/CCFC)
  • Cooling system
  • Fuel and exhaust system
  • Engine management system
  • Starting and charging
  • Transmission
  • Automatic gearbox
  • Drive shafts
  • Chassis
  • Brake system
  • Front suspension
  • Rear suspension
  • Steering system
  • Body
  • Air conditioner
  • Exterior
  • Interior
  • Electrical equipment
  • Equipment and devices
  • Electrical circuits
 
Q5 8R(2008-2017) 
  • General information
  • User manual
  • Power unit
  • Petrol engine 2.0 l
  • Petrol engine 3.2 l
  • Fuel system (petrol)
  • Diesel 2.0 liter (CA)
  • Diesel 2.0 liter (CG/CJ/CM)
  • Diesel engine 3.0 l
  • Fuel system (diesel)
  • Transmission
  • Manual gearbox 0B1
  • Manual gearbox 0B2
  • Automatic gearbox 0B5
  • Automatic gearbox 0B6
  • Chassis
  • Front suspension
  • Rear suspension
  • Brake system
  • Steering
  • Body
  • Exterior
  • Interior
  • Doors, locks and windows
  • Safety system
  • Ventilation and heating
  • Electrical equipment
  • Power devices
  • Equipment and devices
  • Lighting and alarm
  • Audio system
  • Electrical circuits
 
AudiManual.ru © 2017-2026 · Mobile version · Feedback · Sitemap: EN BG BY UA RS HR RO PL SK HU · Site search · News and articles
80 B2 · 80 B3 petrol · 80 B3 · 80 B4 · 100 C3 diesel · 100 C3 petrol · 100 C3 · 100 C4 petrol · 100 C4 · A3 Type 8L · A4 B5 petrol · A4 B5 · A4 B6 petrol · A4 B6 · A4 B7 · A4 B8 · A6 C4 · A6 C5 · A6 C5 Allroad · A8 D2 · Q5 Type 8R · Q7 Typ 4L · Audi A2 ·
This site uses cookies 🍪. Click the button to accept this fact.