
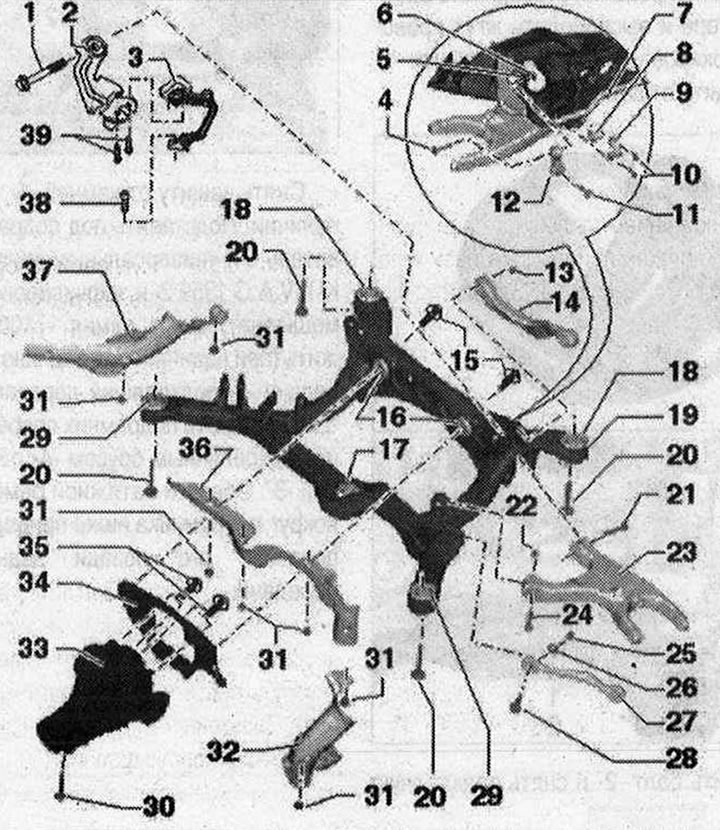
I 1. Bolt. 70 Nm + tighten by +180°. Replace each time removed. Tighten only in the vehicle position without load; 2. Mounting bracket; 3. Rear left vehicle level sender -G76-. Only install a sensor of the same design. Complete with attached parts. The sensor lever faces outward. Replacement is made per vehicle. After loosening, check the basic headlight setting. After removing and installing the vehicle level sensor or loosening the linkages on vehicles with electronic damping control, the standard suspension position must be re-adjusted. After recalibrating the adjustment position on vehicles with lane assist, the lane departure warning control unit -J759- must be recalibrated; 4. Bolt. 40 Nm + turn 90°. Replace each time removed. Tighten only in the vehicle position without load; 5. Washer; 6. Nut; 7. The stabilizer must be removed together with the connecting rod. The rubber support and clamp must not be removed from the stabilizer; 8. Rubber cushion. Replaces along with the stabilizer and clamp. The rubber support and clamp must not be removed from the stabilizer; 9. Clamp. The rubber support and clamp must not be removed from the stabilizer; 10. Bolt. 25 N'M + turn 90°. Replace each time removed. Tighten evenly; 11. Bolt. 40 N'M + turn 90°. Replace each time removed. Tighten only in the vehicle position without load; 12. Connecting rod. The connecting rod must be removed together with the stabilizer.; 13. Nut. Replace each time when removed; 14. Upper wishbone; 15. Bolt. Installed on vehicles with all-wheel drive; 16. Rear silent block for attaching the final drive of the rear axle; 17. Front silent block for mounting the final drive of the rear axle; 18. Rear hydraulic silent block for attaching the subframe. Depending on the model, different versions are installed. Oil marks on the silent block indicate wear. Always replace on both sides; 19. Subframe; 20. Bolt. 115 Nm + turn 90°. Replace each time removed. Do not loosen or tighten the bolts while the spring is still installed. Before loosening or tightening, compress the coil spring using a spring compressor; 21. Bolt. 70 Nm + tighten by +180°. Replace each time removed. Tighten only in the vehicle position without load; 22. Nut. Replace each time when removed; 23. Lower wishbone; 24. Bolt. 70 N'M + turn +180°. Replace each time removed. Tighten only in the vehicle position without load; 25. Nut. 95 Nm. Replace each time removed. Tighten only in the vehicle position without load; 26. Eccentric washer; 27. Transverse thrust. Observe the installation position. Consider different versions: aluminum and steel. Simultaneous installation of 2 racks of different types is unacceptable; 28. Eccentric bolt; 29. Front silent block for attaching the subframe. Take into account different versions. In serial set. 2 different versions were installed: traditional and hydraulic silent block. Oil marks on the hydraulic silent block indicate wear. Always replace on both sides; 30. Bolt. Installed on vehicles with all-wheel drive; 31. Clamp. Not installed on all vehicles; 32. Protection from stone impacts from the left. Not installed on all vehicles; 33. Reverse main gear. Installed on vehicles with all-wheel drive; 34. Differential wishbone. Installed on vehicles with all-wheel drive. Not installed on vehicles with a sports differential; 35. Bolt. Installed on vehicles with all-wheel drive; 36. Protection from stone impacts in the middle. Not installed on all vehicles; 37. Protection from stone impacts from the right. Not installed on all vehicles; 38. Bolt. 9 Nm; 39. Bolt. 5 Nm
Silent block
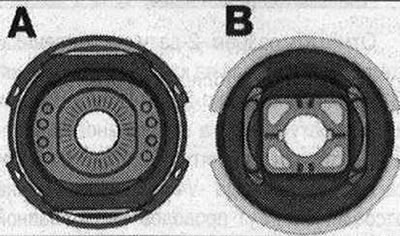
- -A- hydraulic silent block
- -B- traditional silent block
Visitor comments