
Table of contents: Checking the oil level ↓ Filling the transmission fluid ↓ Checking the condition of the… ↓
Attention! The level of transmission fluid in the automatic transmission depends on its temperature. Diagnostic equipment is required to accurately measure the temperature, so it is recommended to perform this work at a service station. Usually, the level of transmission fluid in the automatic transmission remains constant and, if no leaks are detected during visual inspection, there is no need to check the level.
When checking the level, the temperature of the transmission oil in the box should not be higher than 30-45°C. To determine the temperature, a tester is connected to the diagnostic connector in specialized workshops. Otherwise, the temperature of the fluid in the automatic transmission can only be determined approximately.
Checking the oil level
The oil level in the automatic transmission should be checked with the car parked horizontally. The transmission fluid should be warmed up to a temperature of 30°C, and the control lever should be in the P position.
Filling the transmission fluid
1. Unscrew plug 1 of the drain hole and drain the oil from the gearbox, heating it to approximately 30° (see illustration).
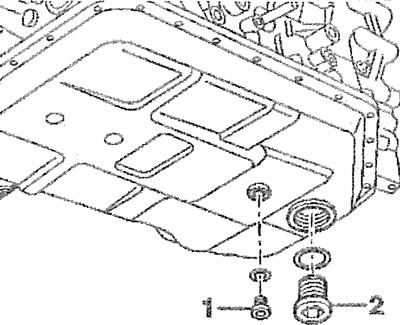
5.1. Unscrew plug 1 of the drain hole and drain the oil from the gearbox
2. Screw plug 1 back into place with a new gasket and tighten it to a torque of 40 Nm.
3. Unscrew plug 2 of the oil filler/inspection hole (see illustration 5.1).
4. Secure the VAG 1924 container with transmission oil G 052 162A above the gearbox, for example on the radiator grille.
5. Fill transmission oil from container VAG 1924 flush with the lower edge of the oil filler hole by inserting the end of the hose into hole 4 (see illustrations 5.5 and 5.5a).
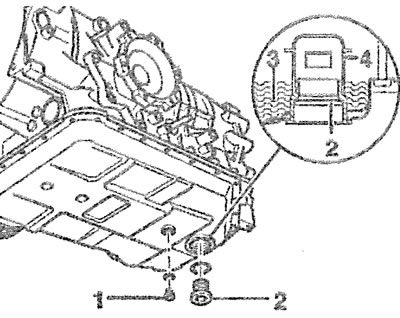
5.5. Fill the transmission oil from the VAG 1924 container flush with the lower edge of the oil filler hole by inserting the hose tip into hole 4 |
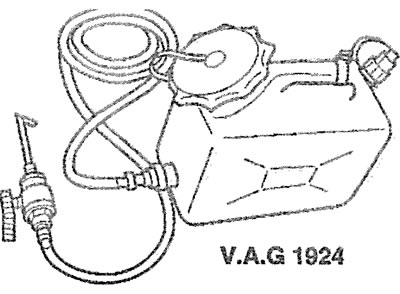
5.5a. VAG 1924 device |
6. Start the engine and let it idle, then check the transmission fluid level and add more.
7. Remove the VAG 1924 container, screw the plug into the oil filler hole and tighten it by hand.
8. Start the engine, depress the brake pedal and move the automatic transmission control lever alternately to all positions, holding in each position for approximately 2-3 seconds.
9. Turn off the engine, turn off the ignition and check the oil level in the automatic transmission, allowing the fluid to cool down. The temperature can be checked with the VAG 1551 diagnostic tester.
When the automatic transmission temperature is +35-40°C, unscrew the threaded plug 2 of the oil filler hole (see illustration 5.1). The oil level is normal if, after unscrewing the plug, oil flows out of the box in small quantities.
If the level is insufficient, add oil.
Checking the condition of the transmission fluid
When checking the automatic transmission fluid level, also check its condition. Compare it with fresh fluid by color, smell, and viscosity. If the transmission fluid is dark or almost black with a burnt smell, the friction linings are worn out.
If the fluid in the gearbox is milky in color, it means that coolant has gotten into it.
If dirt particles or metal shavings are found in the oil when checking the oil level or replacing it, the automatic transmission should be taken to a specialized workshop for repair.