
Table of contents: Removal ↓ Installation ↓
Removal
1. Place the vehicle on jack stands or a pit and remove the crossbar under the exhaust pipes, if any.
2. Loosen the bolts of the connecting clamps and remove the muffler, see the corresponding chapter.
3. Unscrew the bolts and remove the protective shields under the propeller shaft (see arrows in the illustration).
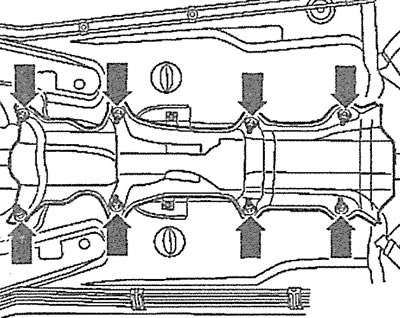
4.3. Unscrew the bolts and remove the protective shields under the propeller shaft (see arrows)
4. Unscrew the bolts and remove the protective shield above the propeller shaft near the Torsen differential (see arrows in the illustration).
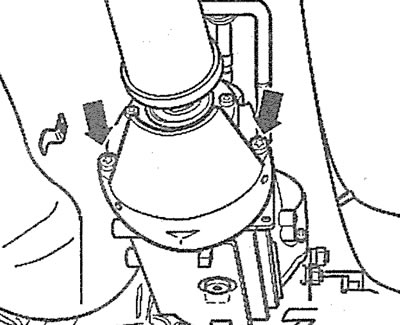
4.4. Unscrew the bolts and remove the protective shield above the propeller shaft near the Torsen differential (see arrows)
5. Check that the driveshaft and rear differential flange have marks, usually applied by the manufacturer. If not, mark the position of the driveshaft on the flange by applying paint marks A and B (see arrows in the illustration).
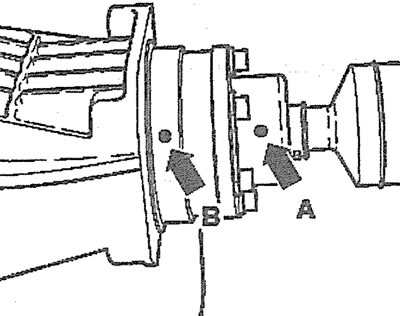
4.5. Mark the position of the cardan shaft on the flange by applying paint marks A and B (see arrows)
6. Unscrew the three upper bolts securing the propeller shaft to the gearbox and rear differential. The tightening torque of the bolts is 55 Nm.
Attention! The vehicle manufacturer recommends installing a special support under the drive shaft before removing it.
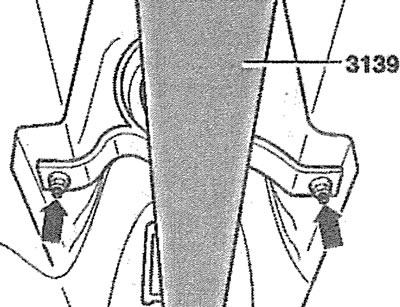
7. Install a suitable support under the propeller shaft, for example, AUDI-313S (see illustration) and unscrew the three lower bolts securing the shaft to the gearbox and rear differential.
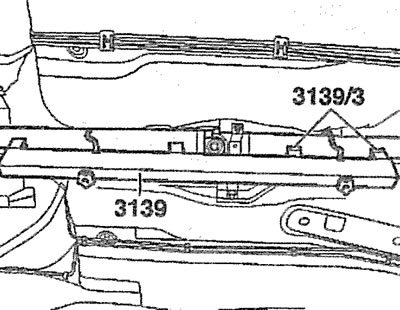
4.7. Install a suitable support under the propeller shaft, for example, AUDI-3139
Attention! The bolts securing the cardan shaft to the flanges are self-locking and must be replaced after each dismantling.
8. Unscrew the bolts of the intermediate support of the propeller shaft (see arrows in the illustration) and lower the shaft on the support. The tightening torque of the support bolts is 25 Nm.
4.8. Unscrew the bolts of the intermediate support of the propeller shaft (ohm arrows)
Installation
The installation of the cardan shaft is performed in the reverse order of removal. To avoid imbalance of the cardan shaft during installation, the mark on the shaft should be aligned with the mark on the rear differential flange.
9. Replace with new flange seals by removing the protective foil from them and gluing them onto the flanges.
Caution! Before installing the cardan shaft, clean the threads in the connecting holes with a tap to remove any remaining sealant. Otherwise, the new bolts will jam and break when dismantled again.