
Table of contents: Removal ↓ Installation ↓
Removal
1. Set the automatic transmission control lever to position 3, move sleeve 1 down until it stops, remove locking key 2 until it locks ("tooth') and remove handle 3 from the lever (see illustration).

3.1. Remove handle 3 from the automatic transmission control lever
2. Set the lever to position "P" and turn off the ignition.
3. Press the four grips A using a special hook or bent wire of the pad fastening (see illustration).
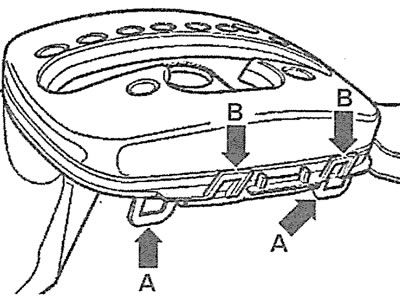
3.3. Press the four grips A using a special hook or bent wire of the pad fastening
Caution! Do not simultaneously press out the hooks B visible from above, as this will damage the connecting board. If it is not possible to press out the hooks A using the hook, the central console must be removed.
4. Lift the cover 2 of the automatic transmission control lever upwards, disconnect the plug 1 located underneath it, releasing it from the mount (see arrow A) and feed it in the direction of arrow B, and then remove the cover (see illustration).
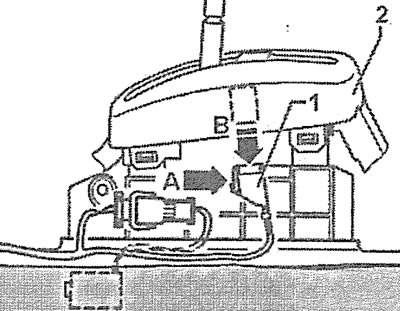
3.4 Lift the cover 2 of the automatic transmission control lever upwards, disconnect the plug 1 located underneath it, and then remove the cover
Attention! If the grips on the setup are damaged, it should be replaced with a new one.
4. Place the vehicle on jack stands and disconnect the inlet pipes from the exhaust manifolds, see the relevant chapter.
5. Unscrew the mounting bolts and remove the protective shields A and B under the propeller shaft and Torsen differential (see illustration).
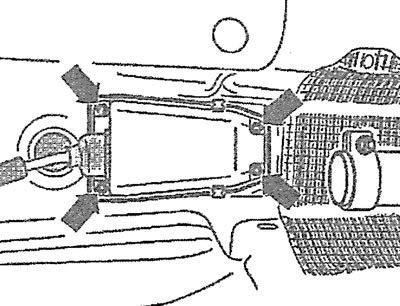
3.5. Unscrew the bolts securing the protective cover of the automatic transmission control mechanism and remove it (see arrows)
6. Disconnect the propeller shaft from the gearbox and secure it to the body with wire.
7. Move the boot on the gearshift lever cable away from the protective cover of the control mechanism.
8. Unscrew the bolts securing the protective cover of the automatic transmission control mechanism and remove it (see arrows in the illustration).
9. Disconnect the cable end from the automatic transmission control mechanism by removing clamps B and A (see arrows in the illustration).
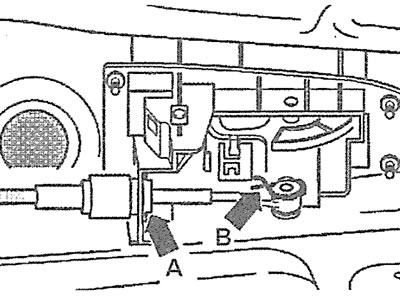
3.9. Disconnect the cable end from the automatic transmission control mechanism by removing clamps B and A (see arrows)
10. Unscrew bolts 1, 3 and 4 and remove heat shield A (see illustration).
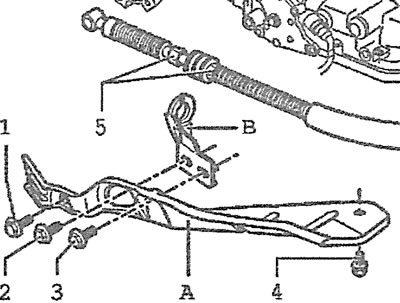
3.10. Unscrew bolts 1, 3 and 4 and remove heat shield A
Note! Bolt 3 may be longer than bolts 1 and 4. In this case, it simultaneously secures the exhaust system bracket.
11. Disconnect the cable end from the selector using the AUDI-80-200 key (see arrow in illustration).
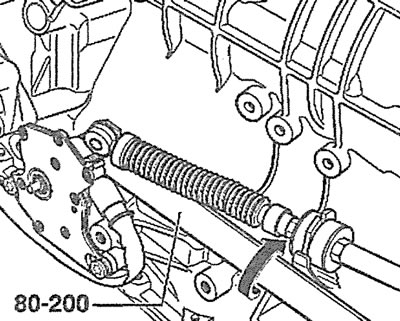
3.11. Disconnect the cable end from the selector using the AUDI-80-200 key (see arrow)
12. Unscrew bolt 2 and remove the support bracket B of the gear selection cable from the gearbox, releasing the cable end from it (see illustration 3.10). To do this, loosen the nuts 5.
13. Pull the gear selection cable into the engine compartment. To facilitate subsequent installation of the cable, it is recommended to tie a string to the end with which it is attached to the control mechanism, by which the cable can then be pulled back into its original place.
Installation
The installation of the cable is carried out in the reverse order of its removal.
14. Before installing the gear selection cable, press lever 2 on the gearbox all the way to the right to engage the parking lock (see illustration).
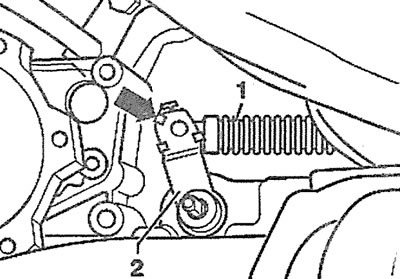
3.14. Press lever 2 on the gearbox all the way to the right to engage the parking lock