



Table of contents: Removal and installation the hood ↓ Removal and installation the hood… ↓ Adjusting the hood position ↓ Removal and installation the… ↓ Removal, installation and adjustment… ↓ Hood lock drive cable ↓
1. The hood installation details are shown in the illustration.
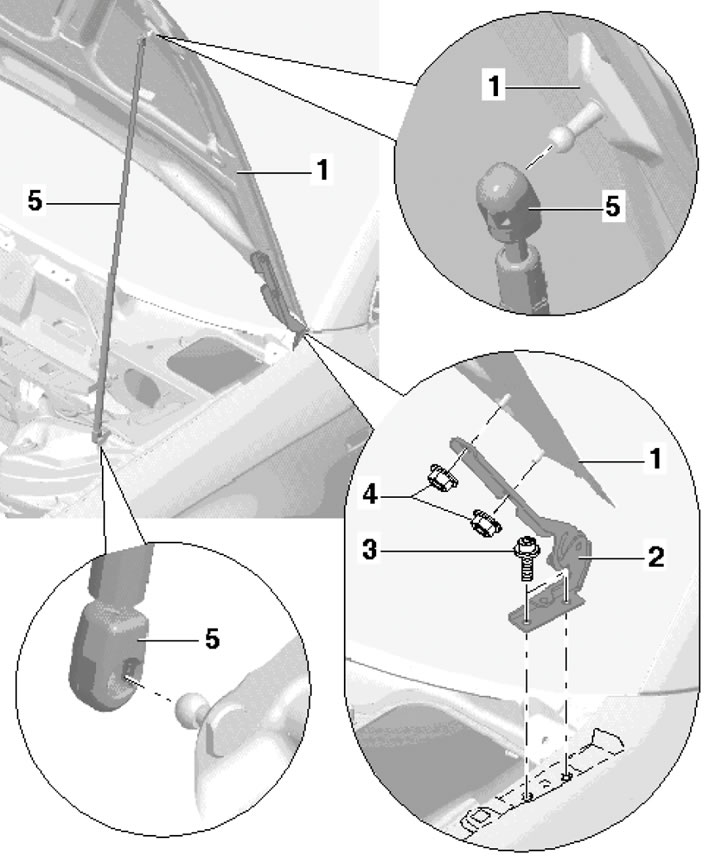
3.1. Bonnet installation details 1. Hood; 2. Hood hinge; 3. Bolt with washer, 21 Nm; 4. Nuts, 21 Nm; 5. Gas-filled bonnet strut
Removal and installation the hood
2. Disconnect the washer fluid supply hose from the hood
3. Have an assistant hold the hood from falling and separate the pillar from the hood (see subsection below).
4. Give the nuts (4 in illustration 3.1) and remove the hood.
5. Installation is performed in the reverse order of dismantling the components. After installation, adjust the position of the hood (see subsection below).
Removal and installation the hood pillar
6. Support the hood or prevent it from closing.
7. Using a screwdriver, slightly lift the retaining springs at both ends of the strut (see illustration) and remove the rack.
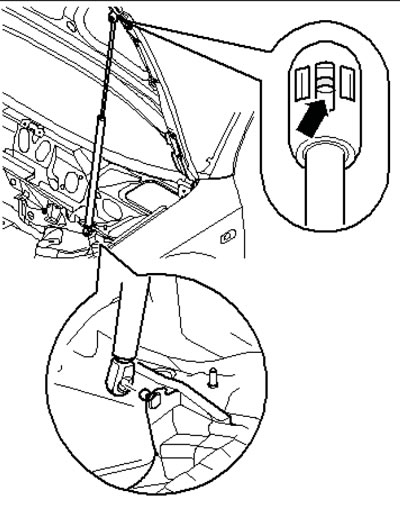
3.7. Bonnet strut spring
8. To install, press the stand into the hinge (the cylinder is at the bottom and the piston is at the top).
Adjusting the hood position
9. Center the hood between the wings, moving it on the hinges (see Specifications).
10. Adjust the hood height as described below.
11. Press in the impact protection (1 in the illustration), return the buffers (3) to the hood until they stop, then turn them out so that the hood is flush with the fenders. After adjustment, the buffers (3) should rest on the hood lock holder (impact protection buffers) must be pressed into the hood.
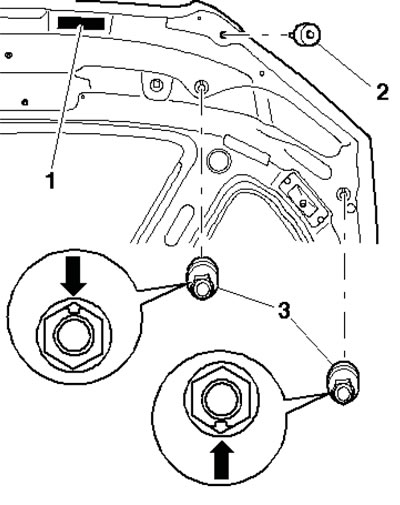
3.11. Bonnet buffers
Removal and installation the decorative radiator grille
12. Release the holders (arrows in the illustration) and tilt the top side of the grate, then separate the grate at the bottom.
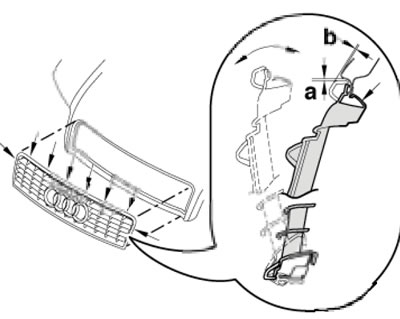
3.12. Hood lock latches a=1.5±0.5; b=0.7±0.5
13. To facilitate installation, lubricate the polyurethane seal. Fix the grille at the bottom center, and then fix its upper edge. The gaps should meet those shown in Illustration 3.12.
Removal, installation and adjustment of the hood lock and its hook
14. To remove the hook (1 in the illustration) hood lock, loosen the cap nuts (2). When installing, tighten the nut with a force of 11 Nm. The hood lock is described below.
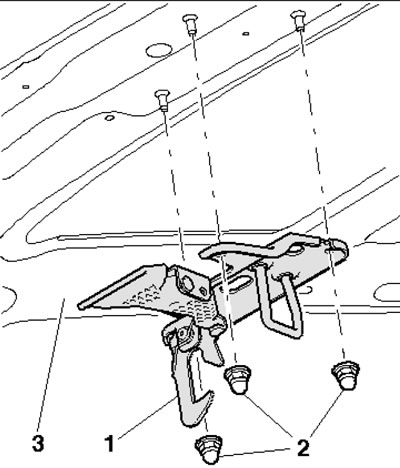
3.14. Fastening the bonnet lock hook
15. Disconnect the Bowden cable from the hood lock (see subsection below).
16. Remove the bolts (2 in the illustration) and remove the lock (1).
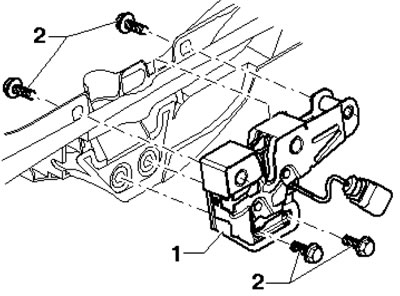
3.16. Bonnet lock fastener
17. Installation is performed in the reverse order of component dismantling. Tighten the bolts with a force of 14 Nm.
18. To adjust the hood, move the lock up or down.
19. To adjust the stop buffer on the hood lock holder (fine adjustment when adjusting headlights) screw it in or out (see illustration).
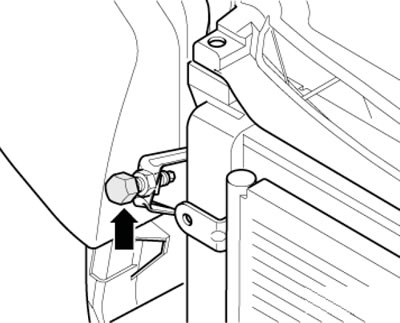
3.19. Buffer on the bonnet lock holder
Hood lock drive cable
20. The details of the cable installation are shown in the illustration.
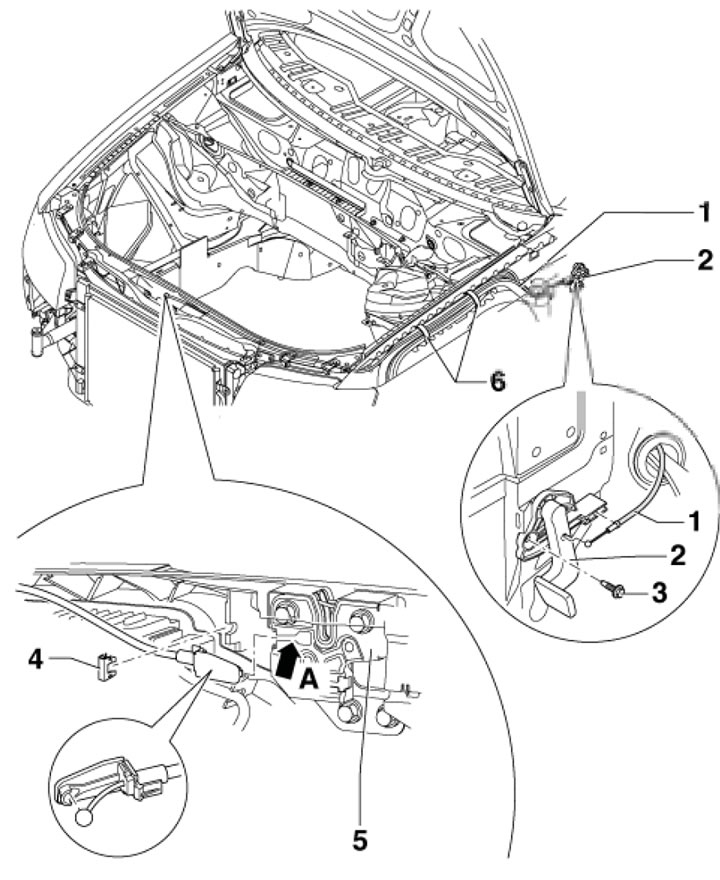
3.20. Bonnet Lock Cable Installation Details 1. Hood lock drive cable; 2. Hood lock release lever; 3. Bolt, 2.4 Nm; 4, 6. Retainer; 5. Hood lock
21. Jack up the car and place it on reliable supports.
22. Remove the front wheel arch liner (see Section 2).
23. Remove the driver's storage compartment (see Part B).
24. Unscrew the bolt (3 in illustration 3.20), press the lock (4), release the cable from the lock and unhook the eye (Ą).
25. Loosen the clamps (6 in illustration 3.20), pull the cable (1) out of them and press it into the wheel arch towards the bonnet lock holder.
26. Installation is performed in the reverse order of component removal. Move the cable ball on the hood lock to the installation position.
[The original text of the material can be found on the website: AudiManual.ru]