
Table of contents: Tightening torque of the… ↓ Installation of high pressure line ↓ Removal the high pressure pump ↓ Installation ↓
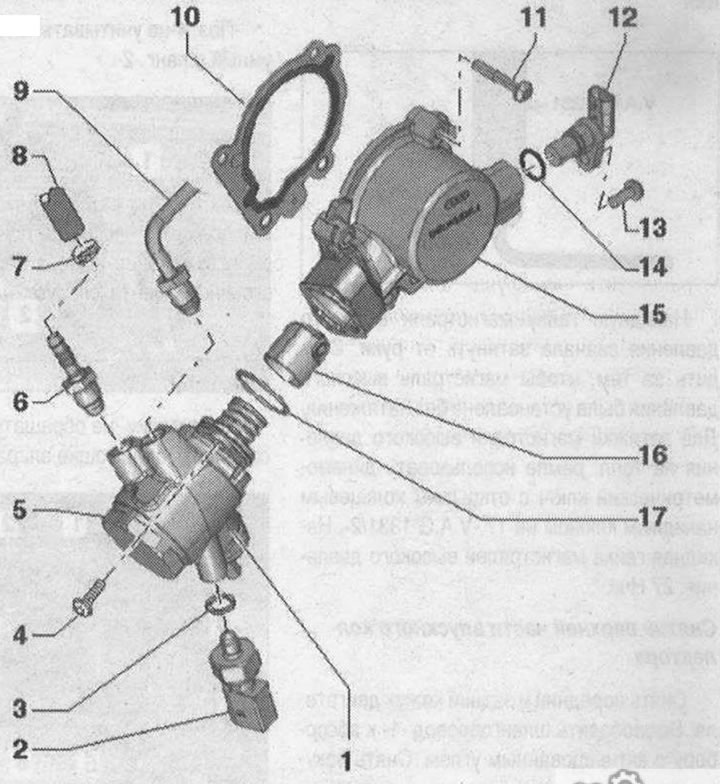
High pressure pump 1. The fuel metering valve "N₂90" cannot be removed from the high-pressure fuel pump; 2. Fuel pressure sensor of the low-pressure circuit "G410", 15 Nm; 3. Sealing cuff. Replace; 4. Bolt, 20 Nm; 5. High pressure pump with fuel metering valve "N₂90" (not removable). Before installing the fuel lines, first tighten the fuel line fittings. Do not disassemble; 6. Threaded nipple, 27 Nm; 7. Hose clamp. Replace; select a clamp of the corresponding series; 8. Fuel pre-supply hose; 9. High-pressure fuel line. To loosen and tighten the union nut, hold the nipple on the high-pressure pump. Before installation, tighten the nipple on the high-pressure pump; 10. Gasket. Replace; 11/13. Bolt, 9 Nm; 12. Hall sensor "G40"; 14. Sealing ring. Replace. Before installation, moisten with clean oil; 15. Body; 16. Roller tappet. Before installation, wet with clean oil; 17. Sealing ring. Replace. Before installation, moisten with clean oil
Tightening torque of the high-pressure line protective screen
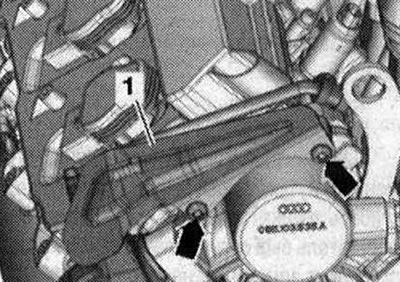
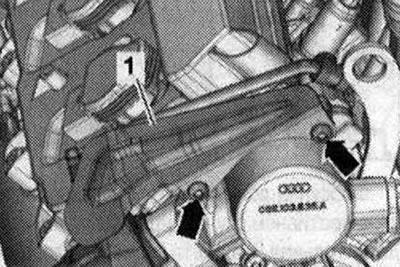
Tighten the bolts "arrows" of the protective screen "1". Tightening torque: 9 Nm.
Installation of high pressure line
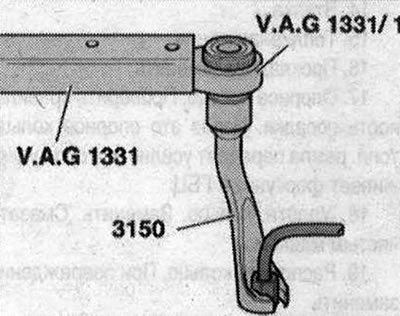
Tighten the union nut of the high-pressure line by hand. Make sure that the high-pressure line is installed without tension. To tighten the high-pressure line on the high-pressure pump, use a torque wrench with a ratchet and a 14 "3150" socket wrench. Union nut of the high-pressure line: 25 N·m.
Removal the high pressure pump
Install and remove the high-pressure fuel pump only on a cold engine. When installing the high-pressure fuel pump, ensure that dirt does not get into the fuel system. Collect leaking fuel with a rag. Always replace the sealing ring. Always secure the high-pressure fuel lines so that there is no internal mechanical stress in them. Remove the lower part of the air filter housing. Unscrew the bolts "arrows" and remove the protective screen "1".
Disconnect plug connectors "1" and "6". Remove fuel supply hose "2" and unscrew threaded connection "5". Unscrew bolts "3" and "4" on clamps. Unscrew bolts "arrows" and carefully lift high-pressure line.
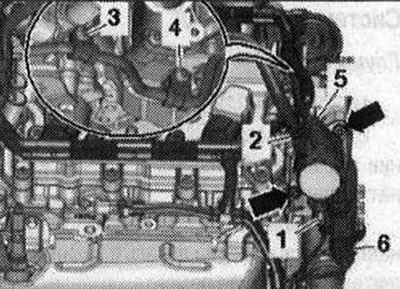
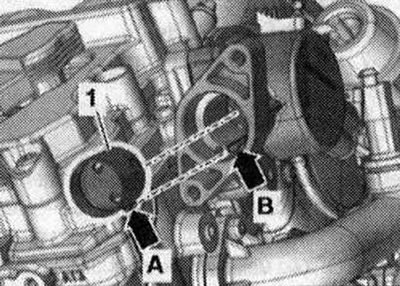
Do not change the bend shape of the fuel lines. Never bend the clamps away from the fuel line. If the clamp has been bent or the fuel line needs to be replaced, the clamps should also be replaced. Carefully remove the high-pressure fuel pump. Remove the roller tappet "1" from the housing.
Installation
Installation in reverse order: the high-pressure main pipes must not be damaged. Do not change the bend shape of the fuel lines. Never bend the clamps away from the fuel line. If the clamp has been bent or the fuel line needs to be replaced, the clamps must also be replaced. Replace the high-pressure pump sealing ring. Check the roller tappet "1" for damage; replace if necessary. Lubricate the roller tappet with oil and insert the protrusion "arrow A" into the guide "arrow B". To install the high-pressure fuel pump, the roller tappet must be in the lowest position. Turn the crankshaft by the damper bolt in the direction of engine rotation, installing the roller tappet in the cylinder head so that it reaches the lowest point. Slightly lift the high-pressure fuel line to install the high-pressure pump. Insert the high-pressure pump into the housing. Tighten the screws "arrows" by hand until they touch the flange. Then tighten the screws crosswise (approximately 1 turn of each screw until the fuel injection pump is seated) required tightening torque. If tightened from 1 side (skew), the pump may be damaged. Tightening torque: tighten union nut "5" of the fuel supply line by hand. Align without skewing or tensioning. Reconnect fuel supply hose "2". Tighten screws "3" and "4" on the clamps. Connect electrical connectors "1" and "6". Tighten the high-pressure line to the tightening torque. Install protective cover "1". Install the lower part of the air filter housing. Check the fuel system for leaks.
The full version is posted on the resource: Audimanual.ru