
Table of contents: Removal ↓ Installation ↓
Removal
Cars with gasoline engines
1. Remove the cap from the coolant expansion tank.
Caution! When the engine is hot, place a rag on the expansion tank cap before removing it to avoid being burned by hot coolant or steam. Remove the cap only when the coolant temperature is below +90°C.
2. Cars with parking heater. Unscrew the bolts (see arrows in the illustration) fastening the parking heater pipe to the noise-insulating shield.
5.2. Unscrew the bolts (see arrows) fastening the parking heater pipe to the noise insulation shield. Cars with parking heater
3. Press the fasteners 1 and 2 and remove the front part of the engine splash guard (see illustration).

5.3. Press down on fasteners 1 and 2 and remove the front part of the engine mudguard
4. Remove the front bumper (see the relevant chapter).
5. Place a suitable container or tray under the engine to collect the coolant.
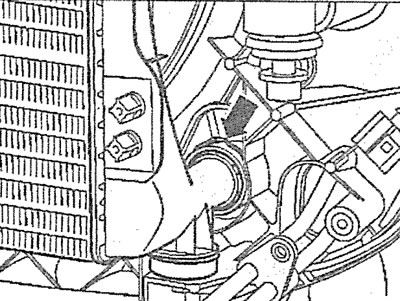
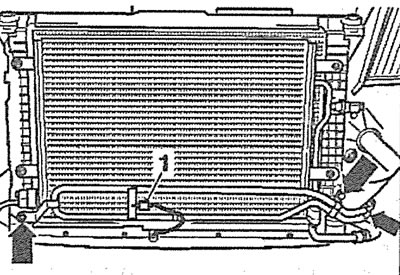
6. Unscrew the plug (see arrow in illustration) drain hole on the thermostat housing and drain the coolant.

5.6. Unscrew the plug (see arrow) drain hole on the thermostat housing and drain the coolant
7. Remove the left fairing (see arrow in illustration) additional radiator.

5.7. Remove the left fairing (see arrow) additional radiator
8. Disconnect the lower hose from the radiator by removing the mounting clamp (see arrow in illustration).
5.8. Disconnect the lower hose from the radiator by removing the mounting clamp (see arrow)
9. Cars with automatic transmission. Clean the corresponding bolts before unscrewing (see arrow in illustration) and disconnect the transmission fluid lines from the radiator.
5.9. Clean the corresponding bolts before unscrewing (see arrow) and disconnect the transmission fluid lines from the radiator. Cars with automatic transmission
Caution! Collect the leaking transmission fluid in a suitable container and prevent contaminants from entering the lines by placing plastic bags on the disconnected ends and clamping them with rubber bands.
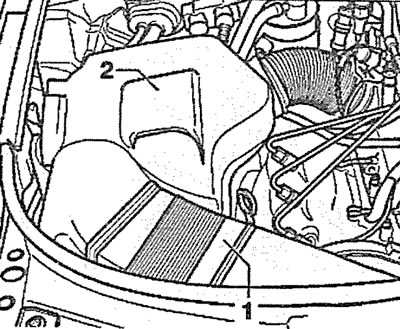
10. Press the latches and remove the air filter cover 2 (see illustration).

5.10. Press the fasteners and remove the air filter cover 2
11. Unscrew the bolts (see arrows in illustration 5.10) fastening the air intake 1 to the upper front cross member and remove the air intake.
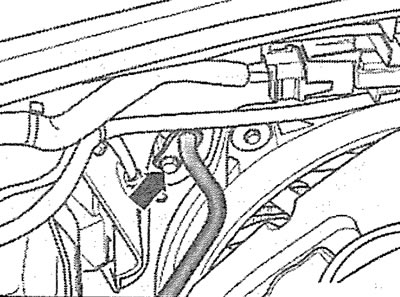
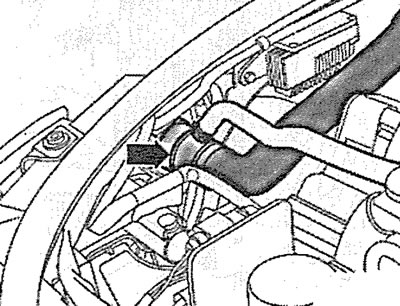
12. Disconnect the upper hose from the radiator (see arrow in illustration).
5.12. Disconnect the upper hose from the radiator (see arrow)
13. Unscrew the bolts (see arrows in the illustration), press the fasteners and remove the left and right radiator fairings.

5.13. Unscrew the bolts (see arrows), press the clamps and remove the left and right radiator fairings
14. Disconnect the outside air temperature sensor 1 and release the wire from the holder (see illustration).
5.14. Disconnect the outside air temperature sensor 1 and release the wire from the holder
15. Unscrew the bolts (see arrows in illustration 5.14) power steering line holders and move the line away from the work area without opening the system. Carefully tie up the line to avoid damaging it.
16. Vehicles with air conditioning. Disconnect plug 1 of the refrigerant pressure sensor (see illustration).

5.16. Disconnect plug 1 of the refrigerant pressure sensor. Vehicles with air conditioning
17. Unscrew the bolts (see arrows in illustration 5.16) air conditioner radiator mounts and remove the radiator. Carefully tie the radiator to the body with wire, without disconnecting the hoses and refrigerant circulation pipes from it. Do not allow the hoses to bend or twist.
Warning! Do not open the refrigerant circulation system yourself - risk of frostbite! If refrigerant gets on your skin, rinse it immediately with cold water for at least 15 minutes. The refrigerant is colorless, odorless and heavier than air. If the refrigerant leaks, people in the area of the floor on which the vehicle is installed or in rooms located below the leak may suffocate.
Caution! Do not stretch, bend or twist air conditioning pipes and hoses.
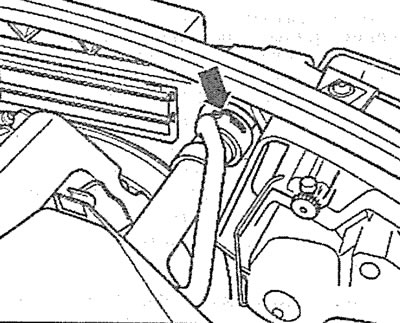
18. Release the top of the radiator from the clips by pressing them upwards with a screwdriver (see arrows in the illustration).
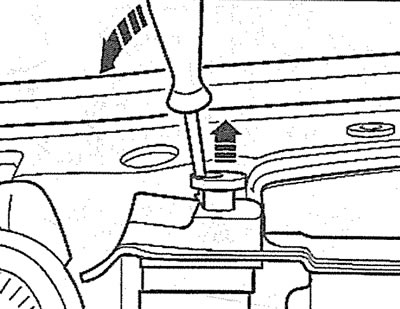
5.18. Release the top of the radiator from the clips by pressing them upwards with a screwdriver (see arrows)
19. Move the radiator forward and carefully remove it.
Diesel Engine Cars
20. Drain the coolant (see the relevant chapter).
21. Disconnect the lower hose from the radiator.
22. Remove the intercooler (see the relevant chapter).
23. Press the fasteners and remove the air filter cover 2, and also remove the air intake 1 (see illustration).
5.23. Press the fasteners and remove the cover 2 of the air filter, and also remove the air intake 1. Vehicles with a diesel engine
24. Unscrew the mounting bolts (see arrows in the illustration) and remove the upper engine protective cover.

5.24. Unscrew the mounting bolts (see arrows) and remove the upper engine cover. Diesel vehicles
25. Cars with automatic transmission. Clean the corresponding bolts before unscrewing (see arrow in illustration) and disconnect the transmission fluid lines from the radiator.

5.25. Clean the corresponding bolts before unscrewing (see arrow in illustration) and disconnect the transmission fluid lines from the radiator. Vehicles with a diesel engine and automatic transmission
26. Disconnect the upper hose from the radiator (see arrow in illustration).
5.26. Disconnect the upper hose from the radiator (see arrow). Diesel Engine Cars
27. Release the top of the radiator from the clips by pushing them upwards with a screwdriver (see arrows in illustration 5.18).
Installation
The radiator is installed in the reverse order of removal.
[Read the original source on the website AudiManual]