
Repair Chevrolet Repair Toyota Repair Honda Repair AvtoVAZ Repair Mercedes-Benz Repair BMW Repair Opel
Home  |  Contacts  |  Sitemap  |    
English Русский
Български
Беларускі
Український
Српски
Hrvatski
Română
Polski
Slovenský
Magyar
AudiManual.ru


  • AUDI 80
  • AUDI 100
  • AUDI A3
  • AUDI A4
  • AUDI A6
  • AUDI A8
  • AUDI Q
  • OTHER
  • ARTICLES
B8 (2007-2015) B7 (2004-2008) B6 (2000-2006) B6 (2000-2006, petrol) B5 (1994-2001) B5 (1994-2001, petrol)

Windshield wiper and washer, headlight cleaning system (Audi A4 B8)

  • Home
  • Audi A4
  • B8 (2007-2015)
  • Electrical equipment
  • Equipment and devices
  • Windshield wiper and washer, headlight cleaning system
            0
Table of contents: Windshield wiper and washer,… ↓ Windshield wiper ↓ Replacing windshield wiper blades ↓ Removal and installation windshield… ↓ Removal and installation the "V"… ↓

Windshield wiper and washer, headlight cleaning system
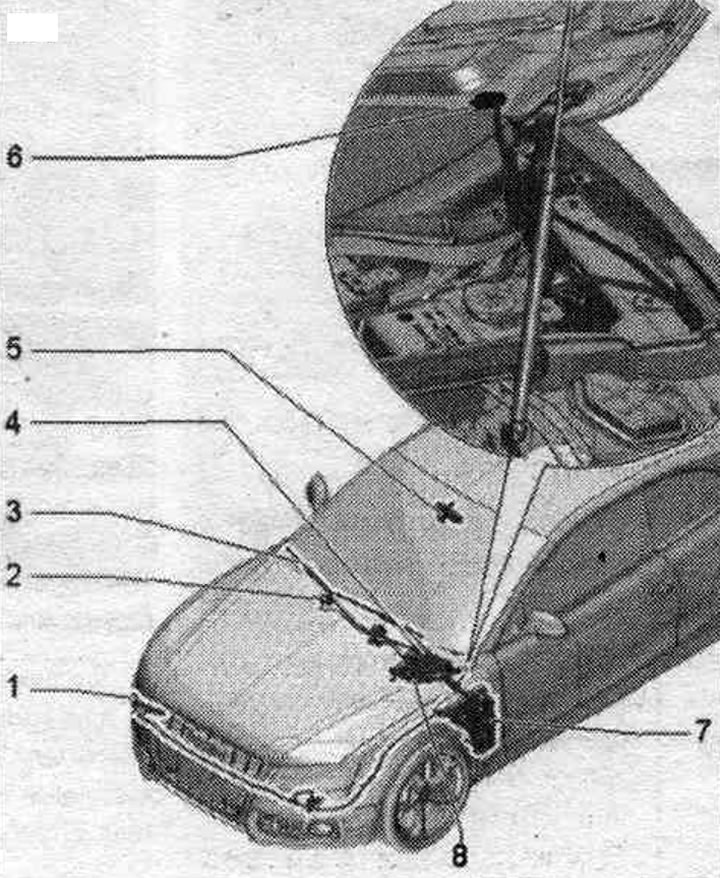


1. Headlight washer nozzle.

1. Headlight washer nozzle.
2. Nozzle.
3. Windscreen wiper arm.
4. Electric windshield wiper motor "V": from used electric windshield wiper motor "J400".
5. Rain and light sensor "G397".
6. Windshield washer line bushing in the hood.
7. Washer reservoir.
8. Filler neck of the washer reservoir.


Windshield wiper
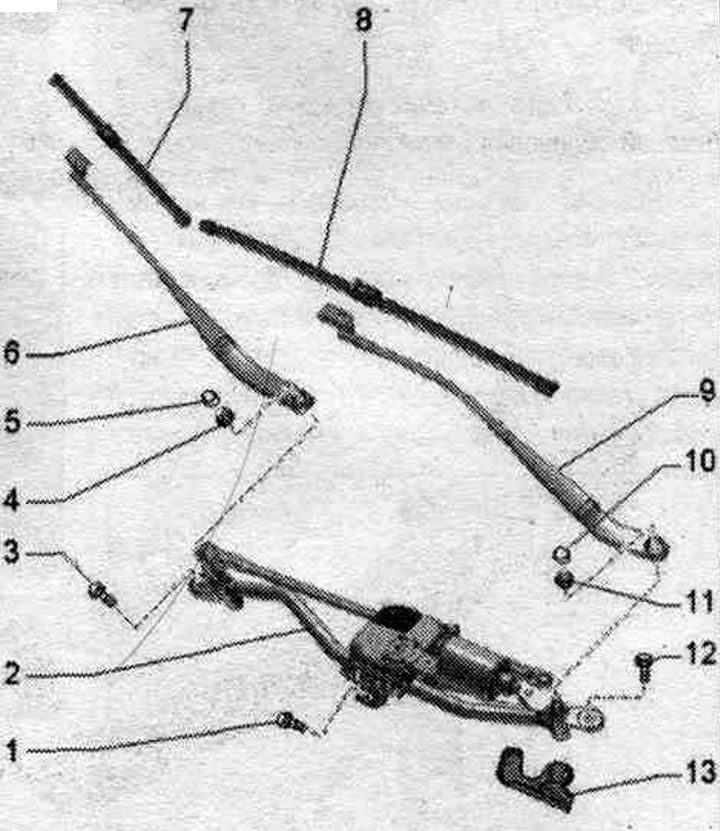


1/3/12. Bolt.

1/3/12. Bolt.
2. Electric windshield wiper motor "V": from used electric windshield wiper motor "J400".
4. Nut: 17 Nm.
5. Plug.
6. Windscreen wiper arm on the front side. passage.
7. Windscreen wiper blade, front side. passage.
8. Windshield wiper blade on the driver's side.
9. Windscreen wiper arm on the driver's side.
10. Plug.
11. Nut: 17 Nm.
13. Gutter.


Electric windshield wiper motor "V" - torque and tightening sequence


Tighten the bolts in sequence. "1, 2, 3" in 2 stages as follows.
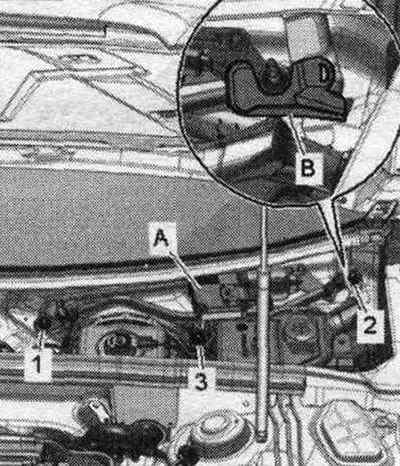
1. Tighten by hand until it stops.

1. Tighten by hand until it stops.
2. Tighten to 8 Nm.


Bringing the windshield wiper to the service position


If during the work it is necessary to activate the electric. windshield wiper motor, the hood must be closed, otherwise the power supply to the windshield wiper motor will be interrupted. Turn on the ignition. Activate via control panel. system multimedia menu item Windshield wiper installation. Windscreen wipers go into service. position. Turn off the ignition. Risk of damage to the bonnet when returning the windscreen wiper to its original position. Do not move the vehicle with the windshield wiper arms folded down. When pressing the switch. windshield washer or at a driving speed above 6 km/h, the windshield wipers automatically return to their original position.

Replacing windshield wiper blades


Bring the windshield wiper into service. position. Fold the wiper arm away from the windshield. Press the locking button "arrow A". Move the wiper blade "1" away from the wiper arm "2" "arrow B". Remove the wiper blade.
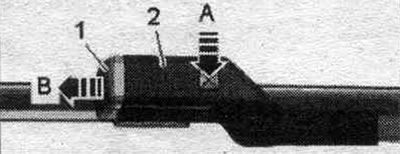


Bring the windshield wiper into service. position. Fold the wiper arm away from the windshield.…


Installation


Installation in reverse order. Insert the wiper blade "1" parallel into the arm "2" "arrow". Make sure that the wiper blade is pushed into the wiper arm until the clamp audibly engages.
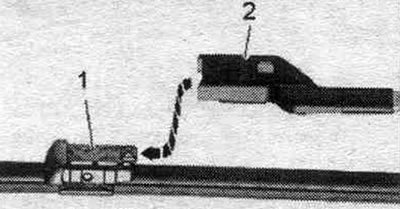
Installation in reverse order. Insert the wiper blade «1» parallel into the arm «2» «arrow». Make…


When you press the windshield wiper switch or at a speed above 6 km/h, the windshield wiper leaves the service position.

Removal and installation windshield wiper arms


If during the work it is necessary to activate the electric. windshield wiper motor, the hood must be closed, otherwise the power supply to the windshield wiper motor will be interrupted. Bring the windshield wiper into service. position. Turn off the ignition. Using a screwdriver, remove the "arrow" caps from the wiper arms "1". Loosen the nuts "2" a few turns.
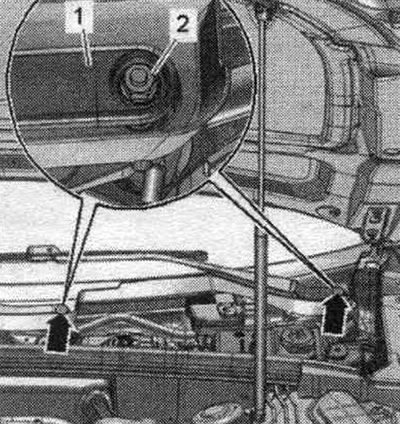


If during the work it is necessary to activate the electric. windshield wiper motor, the hood must…


Install puller "T10369/1", as shown in the figure, on windshield wiper arm "1". Install mandrel "2" on the windshield wiper shaft. Rotate bolt "3" clockwise until the wiper arm moves away from the wiper shaft. Unscrew the nuts completely and remove the wiper arms.
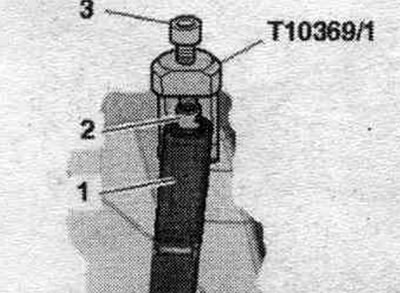
Install puller «T10369/1», as shown in the figure, on windshield wiper arm «1». Install mandrel «2»…


Installation in reverse order: adjust the wiper arms.

Adjusting the wiper arms


Remove the windshield wiper arms. Turn on the ignition. Press the windshield wiper button and turn it on. windshield wiper motor to the end position. Every second time the power is turned off. the wiper motor moves to the lower end position, which ensures that the wiper blade takes a different direction. For this e-mail. the wiper motor passes through the end position downwards and then upwards a little again. The lower end position cannot be used for reg. windshield wiper arms. It is necessary to use the final position in which the el. the wiper motor goes directly to the end position without lifting from the lower position. If necessary, press the windshield wiper button again. Turn off the ignition. Install the wiper arm with the blade installed onto the shaft and align the blade on the windshield as follows.
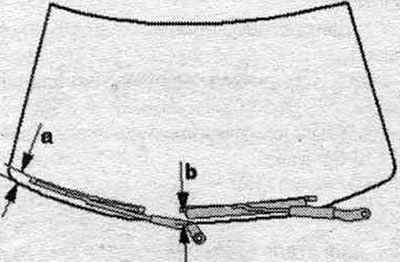


Size «a» = 0 +10 mm.

Size "a" = 0 +10 mm.
Dimension "b" = 0 +10 mm.


Dimensions indicate the distance from the ends of the brushes to the fairing grille on the lower edge of the glass. Tighten nuts "2" of wiper arms "1". Turn on the ignition. Press the windshield wiper button and move the levers to the end position. Turn off the ignition. Check again and, if necessary, adjust the position of the wiper arms. Place the arrow caps on the windshield wiper arms.

Removal and installation the "V" windshield wiper motor with the "J400" windshield wiper motor control unit


Remove the windshield wiper arms.

Vehicles manufactured before 05.2008: Pull off the "arrow" seal. Unlock and remove the "1...3" water drain gutter covers.
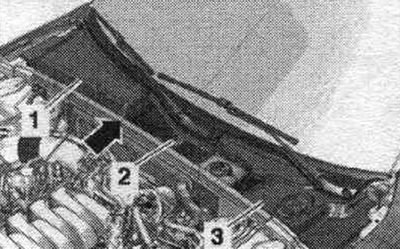
Vehicles manufactured before 05.2008: Pull off the «arrow» seal. Unlock and remove the «1...3»…


For vehicles manufactured since 06.2008: Unscrew screws "3". Unfasten clips "2" from the mountings and remove the water drainage box cover "1".
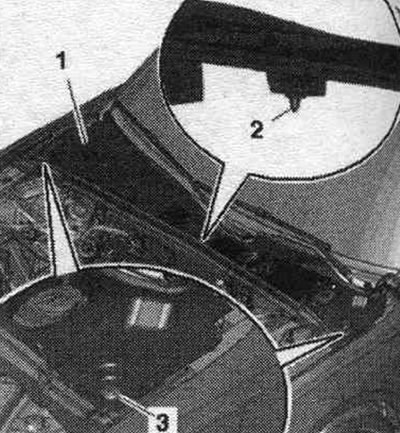


For vehicles manufactured since 06.2008: Unscrew screws «3». Unfasten clips «2» from the mountings…


All


Remove the safety spring clips "2" "arrow A". Risk of damage to the cowl. Moisten the transition between the windscreen and the cowl with a small amount of soapy solution and carefully remove the cowl starting from the edge of the glass, vertically upwards out of the retainer on the windscreen "arrows B". Remove the cowl "1", carefully releasing it from the retainers on the windscreen "arrows B".
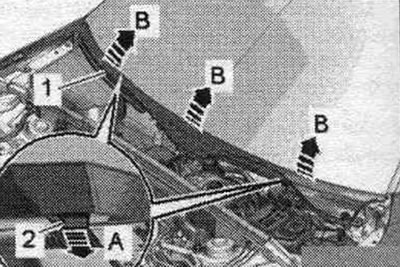
Remove the safety spring clips «2» «arrow A». Risk of damage to the cowl. Moisten the transition…


Disconnect and release the plug connector "2". Pull out the gutter "3" on the lever "arrow A". Unscrew the bolts "4, 5, 6". Rotate the wiper frame "1" with the lever and wiper motor "arrow B" upward and remove it forward in the direction of travel from the water drainage box.
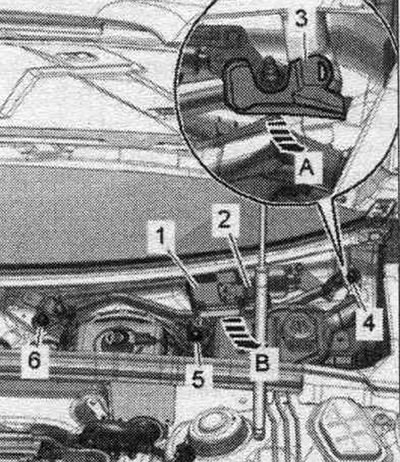
Disconnect and release the plug connector «2». Pull out the gutter «3» on the lever «arrow A».…


Installation


Installation in reverse order. Set email. windshield wiper motor with windshield wiper frame into the body. Tighten the bolts. Place the gutter on the el. windshield wiper motor. Adjust the windshield wiper arms.

The original version of the article is posted on the website: Audimanual.ru
The article was checked by auto expert Timur Bazhenov
This article is available at russian, bulgarian, belarusian, ukrainian, serbian, croatian, romanian, polish, slovak, hungarian

Share information:
Previous articles
Audi A4 B8: Equipment and devices
Next articles

Data bus diagnostic interface — removal and installation
Sound signals — removal and installation
Cigarette lighter, socket — removal and installation
Instrument cluster — removal and installation
Washer reservoir, washer tubes, nozzle — removal and installation
Rear Window Wiper — Removal and Installation
Washer reservoir, washer tubes, rear window nozzle
Washer reservoir, washer hose, headlight nozzle — removal and…


Similar articles on other Audi car models:
Windscreen washer and wiper system, headlight cleaning system... Audi 80 B3 (1986-1991)
Intermittent windscreen wiper switch, windscreen wiper and… Audi 100 C4 (1990-1994, petrol)
Right steering column switch, windshield wiper and washer, rear… Audi A3 Type 8L (1996-2003)
Electrical diagram of windshield washer and wiper, heated… Audi A6 C5 (1997-2004)
Airbag system Audi A8 D2 (1994-2002)
Windscreen wiper and washer, headlight cleaning system Audi Q5 Type 8R (2008-2017)
Removal and installation the windshield washer reservoir —… Audi A2 (1999-2005)
Link to this page in different formats


Visitor comments

No comments yet


How much will 11 + 13 =


A4(B8, 2007-2015) 
  • General information
  • Operating instructions
  • Power unit
  • Petrol engines 1.8 l
  • Petrol engines 1.8/2.0 l
  • Petrol engines 3.0 l
  • Petrol engines 3.2 l
  • Fuel system (petrol)
  • Diesel engines 2.0 l (CA*)
  • Diesel engines 2.0 l (CJCB)
  • Diesel engines 2.7/3.0 l
  • Diesel engines 3.0 l
  • Fuel system (diesel)
  • Transmission
  • Manual gearbox 0B1
  • Manual gearbox 0B2
  • Manual gearbox 0B3
  • Manual gearbox 0B4
  • Automatic transmission 0B5
  • Automatic transmission 0B6
  • Automatic transmission 0AW
  • All-wheel drive system
  • Chassis
  • Front suspension
  • Rear suspension
  • Brake system
  • Steering system
  • Body
  • Exterior
  • Interior
  • Seats
  • Doors, locks and windows
  • Security system
  • Heating and air conditioning
  • Electrical equipment
  • Audio system
  • Power devices
  • Equipment and devices
  • Lighting and lamps
  • Electrical circuits
 
A4(B7, 2004-2008) 
  • General information
  • Introduction to manual
  • Troubleshooting
  • Operating instructions
  • Maintenance
  • Power unit
  • Petrol engines 2.0 (ALT)
  • Petrol engines 2.0 (TFSI)
  • Petrol engines 1.8 (MPI)
  • Diesel engines
  • Cooling system
  • Air conditioner
  • Fuel and exhaust system
  • Ignition system
  • Starting and charging
  • Transmission
  • Clutch
  • Manual gearbox
  • Automatic gearbox
  • Drive shafts
  • Chassis
  • Brake system
  • Front suspension
  • Rear suspension
  • Steering
  • Body
  • Exterior
  • Interior
  • Electrical equipment
  • Equipment and devices
  • Lighting and signaling
  • Windscreen wipers and washers
  • Electrical diagrams
  • Electrical diagrams (since 2007)
 
A4(B6, 2000-2006) 
  • General information
  • Vehicle Description
  • User manual
  • Maintenance
  • Power unit
  • Gasoline engine
  • Diesel engine
  • Lubrication system
  • Cooling system
  • Supply system
  • Injection system
  • Exhaust system
  • Ignition and control
  • Transmission
  • Gear box
  • Clutch and drive shafts
  • Chassis
  • Brake system
  • Car suspension
  • Steering
  • Body
  • Heating and ventilation
  • Exterior (external elements)
  • Interior (internal elements)
  • Electrical equipment
  • Power devices
  • Lighting and appliances
  • Electrical circuits
 
A4(B6, 2000-2006, petrol) 
  • General information
  • Introduction to the guide
  • Car care
  • Power unit
  • Engine repair
  • Lubrication system
  • Cooling system
  • Injection and control system
  • Ignition system
  • Power and exhaust system
  • Transmission
  • Clutch and drive shafts
  • Car gearbox
  • Chassis
  • Suspension and wheels
  • Steering
  • Brake system
  • Body
  • Interior
  • Exterior
  • Electrical equipment
  • Equipment and devices
  • Lighting and signaling
  • Power devices
  • Electrical circuits
 
A4(B5, 1994-2001) 
  • General information
  • Introduction to the guide
  • Car care
  • Maintenance (gasoline)
  • Maintenance (diesel)
  • Power unit
  • Gasoline engines
  • Diesel engines
  • Engine overhaul
  • Cooling system
  • Fuel injection (gasoline)
  • Fuel system (diesel)
  • Exhaust system
  • Ignition system
  • Transmission
  • Clutch
  • Mechanical gearbox
  • Automatic gearbox
  • Drive shafts
  • Chassis
  • Brake system
  • Car suspension
  • Steering
  • Body
  • Exterior
  • Interior
  • Doors, locks and windows
  • Heating and ventilation
  • Electrical equipment
  • Power devices
  • Equipment and devices
  • Electrical circuits
 
A4(B5, 1994-2001, petrol) 
  • General information
  • Vehicle description
  • Maintenance
  • Power unit
  • Engine repair
  • Turbocharging
  • Exhaust system
  • Cooling system
  • Ignition system
  • Fuel system
  • Motronic injection system
  • MPI and MPFI injection system
  • Transmission
  • Clutch
  • Gearbox and shafts
  • Chassis
  • Steering
  • Car suspension
  • Brake system
  • Wheels and tires
  • Body
  • Heating and ventilation
  • Body parts
  • Electrical equipment
  • Fuses and relays
  • Power devices
  • Lighting and lamps
  • Tools and devices
  • Electrical circuits
 
AudiManual.ru © 2017-2026 · Mobile version · Feedback · Sitemap: EN BG BY UA RS HR RO PL SK HU · Site search · News and articles
80 B2 · 80 B3 petrol · 80 B3 · 80 B4 · 100 C3 diesel · 100 C3 petrol · 100 C3 · 100 C4 petrol · 100 C4 · A3 Type 8L · A4 B5 petrol · A4 B5 · A4 B6 petrol · A4 B6 · A4 B7 · A4 B8 · A6 C4 · A6 C5 · A6 C5 Allroad · A8 D2 · Q5 Type 8R · Q7 Typ 4L · Audi A2 ·
This site uses cookies 🍪. Click the button to accept this fact.