
Table of contents: Front Side Airbag Installation… ↓ Rear side airbag ↓ Front side airbag with pyropatron… ↓ Head Airbag ↓ Removal and installation the head… ↓ Head Airbag - Avant ↓
Front Side Airbag Installation Overview
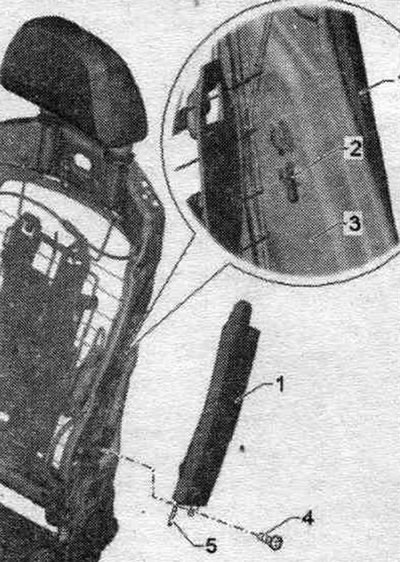
1. Side Airbag, front: driver's side: with squib side Airbag driver's side. "N199", lane side. passenger: with side airbag pyrotechnic cartridge, front passenger seat "N200"; placed in pocket, pocket not shown; the pocket is sewn to the upholstery.
2. Hook for attaching the side airbag to the seat back frame.
3. Back frame.
4. Bolt: Replace after each removal; always clean the threaded holes for bolts (for example, using a tap); use thread varnish; 8 Nm.
5. Wiring harness: from the side airbag squib on the driver's side. "N199"/side airbag pyrotechnic cartridge from the front side. passenger. "N200" to the plug block.
Front side airbag with pyropatron "N199"/"N200"
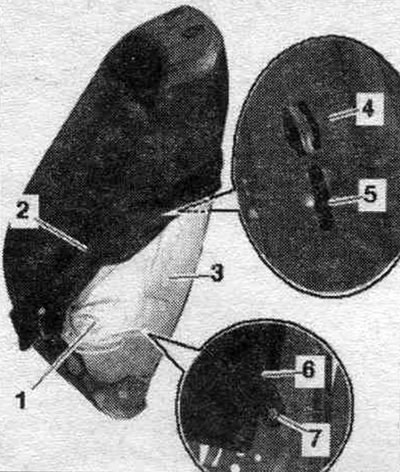
Remove the front seat. Secure the front seat. seat in the seat repair holder "VAS 6136". Remove the seat back cover. Remove the backrest. seats. Remove the backrest upholstery enough to access bolt "7" of the side airbag. To do this, carefully pull upholstery "2" with cushion "3" forward as far as possible. Unscrew bolt "7".
Option with a seat with manual adjustment: Remove the side airbag "6" with hook "5" from the backrest frame "4" and take it out of the pocket "1" sewn into the upholstery downwards, while also removing the side airbag wire harness.
Option with electrically adjustable seat: Remove side airbag "6" from backrest frame "4" using hook "5" and place it in pocket "1" sewn onto the upholstery. Remove the upholstery with the cushion from the backrest and remove the side airbag.
Installation
Installation in reverse order. Please note that the plug connections must be inserted all the way until they click into place. Always clean the threaded hole for bolt "7", for example using a tap. Replace the bolt after each removal. Install the bolt, lubricating it with thread varnish. Connect the battery ground cable with the ignition on.
Rear side airbag
1. Bolt: 9 Nm for side airbag "c" side airbag; 3 Nm for side airbag "without" side Airbag.
2. Plug connection: for side airbag.
3. Side Airbag, rear: driver's side: with squib side Airbag behind the driver's seat. "N201"; side of the lane. passenger: with rear pyropatron. side airbag front passenger compartment "N202".
4. Side airbags.
Front side airbag with pyropatron "N201"/"N202", removal and installation
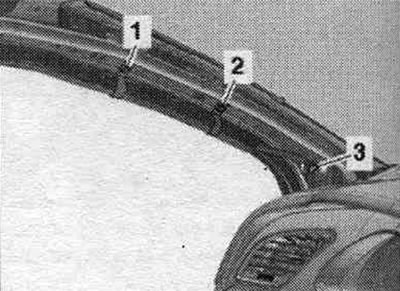
Turn on the ignition. Disconnect the battery ground cable with the ignition on. Remove the bench seat. Unscrew bolt "3". Fold the bench seat forward. Holding the seat belt strap. "1" to the side, pull the side airbag "2" forward from below "arrow". Pull the side airbag downwards and remove it from the seat belt guide without.
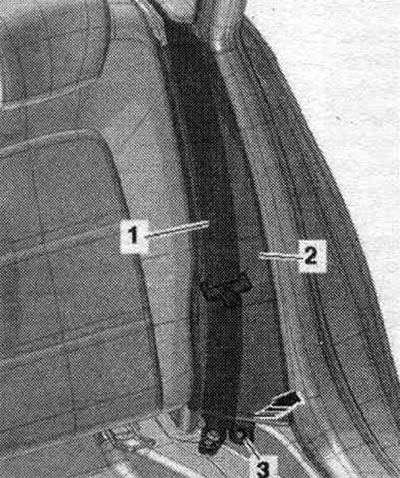
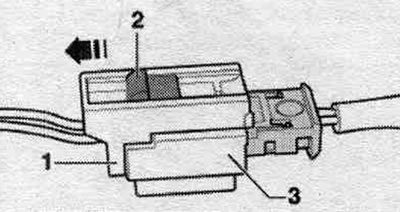
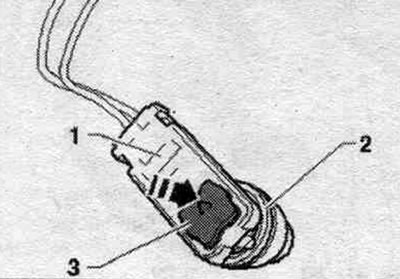
Remove the side airbag far enough so that the side airbag plug connection can be disconnected. To do this, pull the plug retainer "2" to the stop "arrow", in doing so the plug connection "1" and "3" unlocks and can be removed.
Installation
Installation in reverse order. Please note that the plug connections must be inserted all the way until they click into place. First, hang the side airbag at the top of the seat belt guide. Connect the battery ground cable with the ignition on.
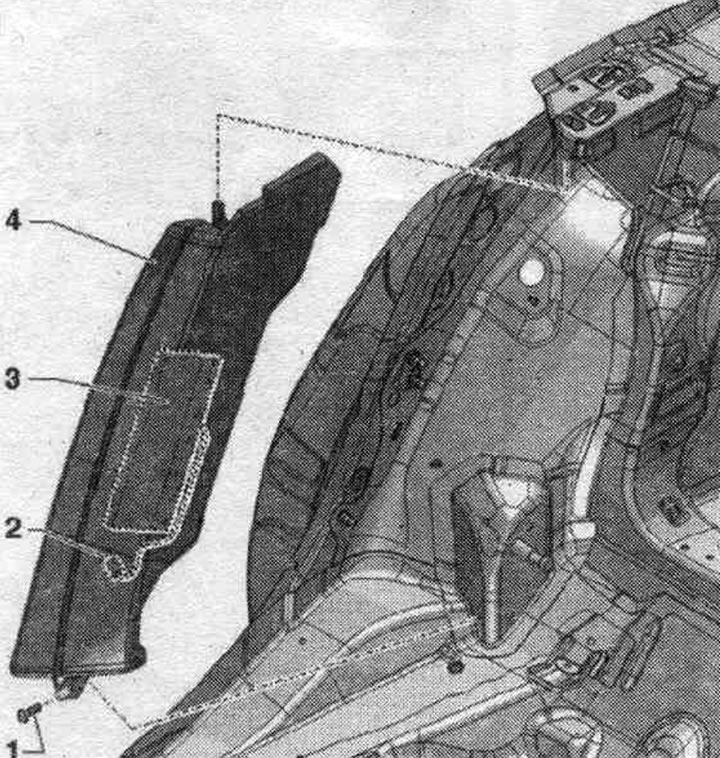
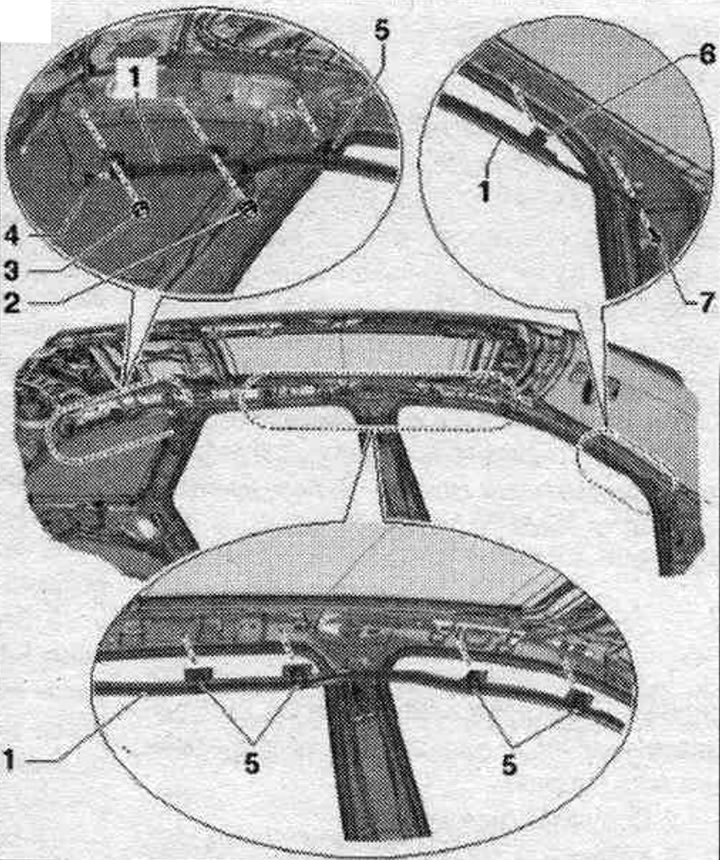
Head Airbag
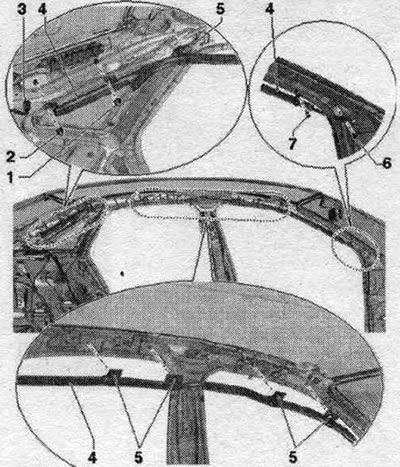
1. Nut: on ground connection pin: 9 Nm.
2. Nut: on the ground connection pin; on the right side of the car there is an additional ground wire screwed on; 9 Nm.
3. Electrical plug connection of the head airbag pyrotechnic cartridge on the driver's side. "N251" or the head airbag pyropatron from the front side. passage. "N252".
4. Head Airbag: Driver's side: with squib Airbag head driver. "N251"; side of the lane. passenger: with Airbag head pyropatron per. passage. "N252".
5. Mounting clamp.
6. Bolt: self-locking; replace after each removal; always clean the threaded holes for bolts (for example, using a tap); 3.5 Nm.
7. Clamp: depending on the design 1 or 2 pcs.; replace; factory mount with 1 clip and double adhesive tape, when reusing use with 2 clips.
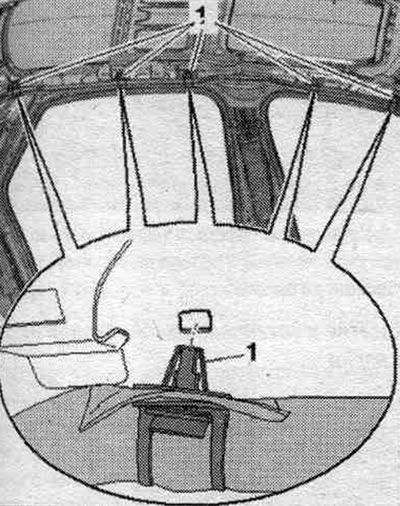
Removal and installation the head airbag with a squib "N251"/"N252"
Move the seats forward and adjust the seatbacks to a 45° position. Turn on the ignition. Disconnect the battery ground cable with the ignition on. Remove the ceiling panel and put it aside, do not remove the windshield. Remove clamp "2" and, if present, "1". Unscrew bolt "3" of the airbag head on the A-pillar.
Disconnect plug connection "4".

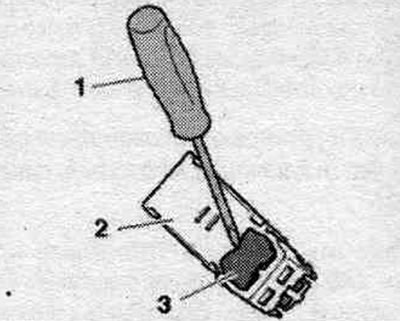
To do this, use a small screwdriver "1" to unlock the plug lock "3" and disconnect the plug connection "2" of the gas generator.
Remove cap nuts "1" and "2." Disconnect clamps "1" from the head airbag mounting plates by squeezing the "arrows" with wire cutters or ring pliers. Remove the upper airbag from the vehicle.

Installation
Installation in reverse order. Secure the clips "1" of the head airbag mounting plates. in the back.
Hang gas generator "3" on the pin and hand-tighten cap nuts "1" and "2". Tighten cap nuts "1" and "2". On the right side of the car, an additional ground wire is screwed in using cap nut "1". Connect plug connection "4." To do this, install plug connection "1" onto airbag ignition module "2." Press the locking tab on plug "3" in the direction of the arrow until the plug connection is fully seated in the airbag ignition module and locked into place. Please note that the plug connections must be inserted all the way until they click into place. Please note that the wires should not be pinched. Replace the head airbag clamps. The factory mount has one clamp and double adhesive tape; when reusing, use two clamps.
Secure the head airbag 2 with clamps "1" and "2". Tighten bolt "3" of the head airbag on the A-pillar. Install the headliner. Connect the battery ground cable with the ignition on.
Head Airbag - Avant
1. Head Airbag: Driver's side: with squib Airbag head driver. "N251". lane side. passenger: with Airbag head pyropatron per. passage. "N252".
2. Nut on ground connection pin: 9 Nm.
3. Nut on the ground connection pin: two ground wires are additionally screwed on the right side of the car; 9 Nm.
4. Electrical plug connection: for the head airbag squib on the driver's side. "N251"/head airbag pyrotechnic cartridge from the front side. passage. "N252".
5. Mounting clamp.
6. Clamp: depending on the design 1 or 2 pcs.; replace; factory mount with 1 clip and double adhesive tape, when reusing use with 2 clips.
7. Bolt: self-locking; replace after each removal: Always clean the threaded holes for the bolts (for example, using a tap); 3.5 Nm.