
Repair Chevrolet Repair Toyota Repair Honda Repair AvtoVAZ Repair Mercedes-Benz Repair BMW Repair Opel
Home  |  Contacts  |  Sitemap  |    
English Русский
Български
Беларускі
Український
Српски
Hrvatski
Română
Polski
Slovenský
Magyar
AudiManual.ru


  • AUDI 80
  • AUDI 100
  • AUDI A3
  • AUDI A4
  • AUDI A6
  • AUDI A8
  • AUDI Q
  • OTHER
  • ARTICLES
B8 (2007-2015) B7 (2004-2008) B6 (2000-2006) B6 (2000-2006, petrol) B5 (1994-2001) B5 (1994-2001, petrol)

Front door — replacing seals (Audi A4 B8)

  • Home
  • Audi A4
  • B8 (2007-2015)
  • Body
  • Doors, locks and windows
  • Front door — replacing seals
            0
Table of contents: Removal and installation the inner… ↓ Replacing the outer door seal ↓

Removal and installation the inner door seal
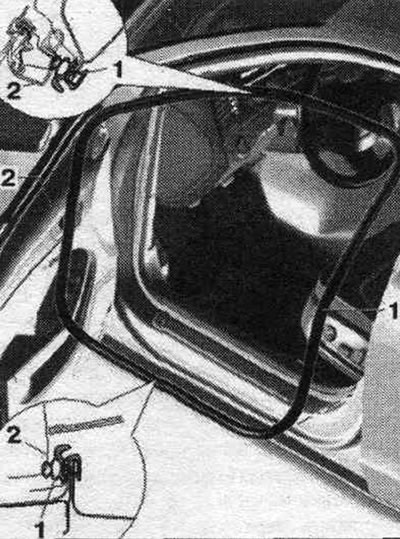


1. Inner door seal: remove the glass frame trim, disconnect the door stop from the A-pillar, put it…

1. Inner door seal: remove the glass frame trim, disconnect the door stop from the A-pillar, put it on the body edge, remove it from the body edge, when installing the vulcanized rubber seal, align it with the joint in the center of the lower hinge and press it by hand to the body flange.
2. Door.


Replacing the outer door seal


The outer door seal is glued and can only be replaced. The car and the outer door seal must be at room temperature. The bonding surfaces must be cleaned of dust and grease using cleaning agent -D 009 401 04-. Apply clutch booster -D 355 205 A2- to the bonding surfaces on the body side using applicator -D 009 500 25- and leave to dry. When installed correctly, the water drainage holes should be located on the underside of the door.
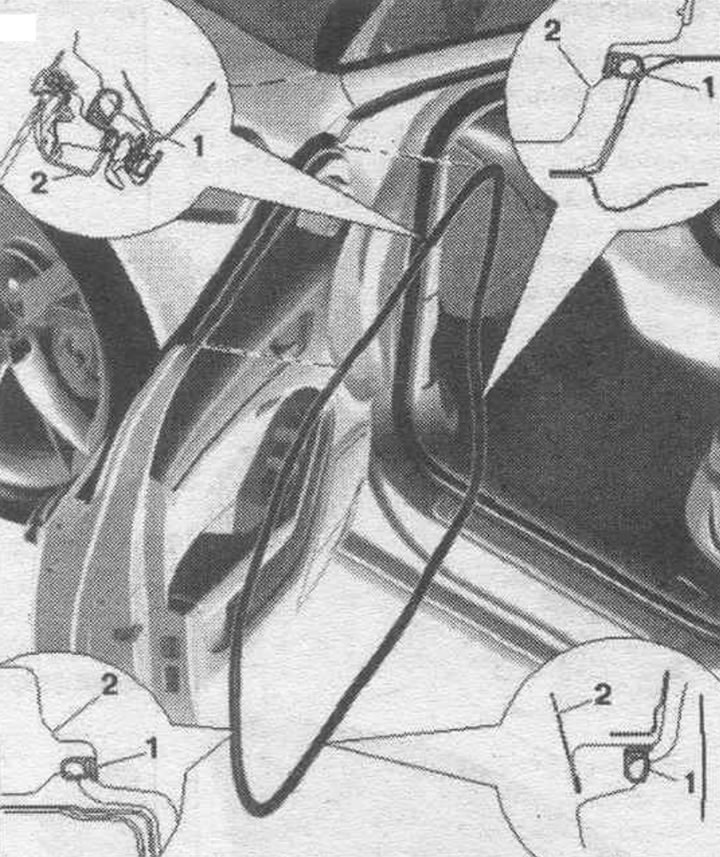
1. External door seal

1. External door seal

Before removing, mark the position of the seal on the door, for example with electrical tape. To ensure that no adhesive residue remains on the door, the seal should be pulled only in the longitudinal direction and only then removed from the door.

Removal: Pull the seal slightly from the top of the door and cut it with regular scissors, pull the seal only in the longitudinal direction, then gradually remove it upwards.

Installation: The bonding surfaces must be free of dust and grease. Clean the bonding areas with cleaner -D 009 401 04-. If necessary, remove adhesive residue with the adhesive strip remover "VAS 6349". Apply adhesion promoter -D 355 205 A2- with applicator -D 009 500 25- to the bonding areas and allow to dry. Disconnect the door opening limiter on the body. Remove the outer door seal behind the door opening limiter. Re-attach the door latch. Align the outer seal mark behind the B-pillar in the top corner. Secure the outer door seal at the top left and right with adhesive tape. When positioned correctly, the drain holes (3 pcs.) are located in the outer door seal on the underside of the door. Press in the outer door seal on both sides, starting from the middle. Remove the protective film from the bottom of the door. Press the outer door seal in the center of the bottom to the left and right. Next, gradually remove the protective film and press the outer door seal. Then press the door seal up along the A and B pillars. Then press the door seal up along the window frame. Press the base of the door seal with a roller for rolling insulating film "3356." To prevent the outer door seal from shifting or falling out, do not close the door for 2 hours. The car should be at room temperature during this time.

2. Door.


Disconnect the door opening limiter


Unscrew the "arrow" bolt of the door opening limiter. Insert the seal behind the door opening limiter and tighten the bolt to the correct torque. puffs.
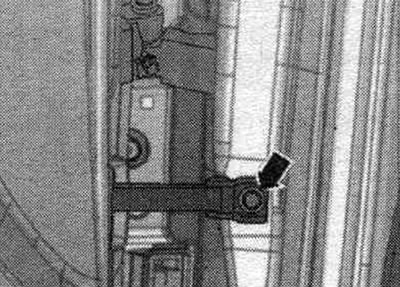
Unscrew the «arrow» bolt of the door opening limiter. Insert the seal behind the door opening…


Mark the position of the seal as shown with electrical tape on the window frame and...
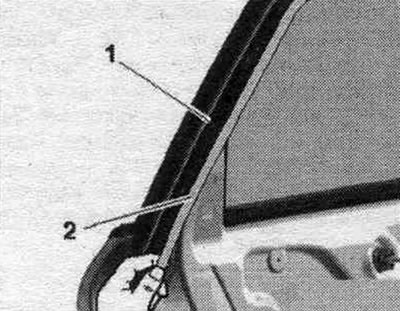
Mark the position of the seal as shown with electrical tape on the window frame and...


...in the area of the door lock.
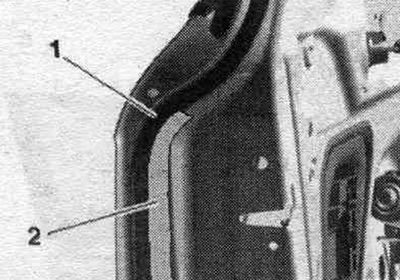
...in the area of the door lock.


Remove the seal


By pulling in the longitudinal direction, the adhesive on the door seal softens and after this the seal can be removed from the window frame without leaving any adhesive residue. Pull the outer door seal "1" sequentially as shown in the longitudinal direction "arrow" and remove it. Perform these actions sequentially on all sides and completely remove the door seal.
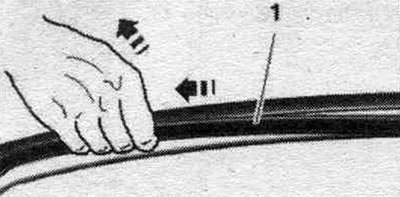


By pulling in the longitudinal direction, the adhesive on the door seal softens and after this the…


Remove any remaining adhesive from the window frame using the VAS 6349 adhesive strip remover.

Installing the outer seal of a new door


The front edge of the seal is installed on the window frame along the outer radius of the "arrow" and pressed in. To facilitate installation, mark these distances and press in the seal.
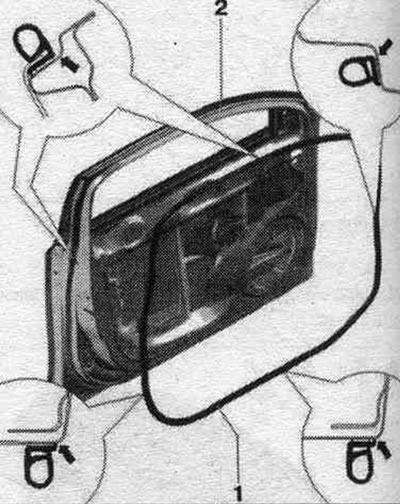
1. External door seal: after marking the radius exits, further installation is carried out…

1. External door seal: after marking the radius exits, further installation is carried out according to the instructions; from the door lock up to the lower hinge of the rear door. the edge of the seal must be adjacent to the outlet of the inner radius, as shown in the figure; from the bottom hinge of the door on the underside of the door to the door lock, the front edge of the seal should be adjacent to the outlet of the outer radius; press the seal firmly over the entire area using a roller for rolling insulating film "3356".
2. Door.


Adhesive area of the outer door seal
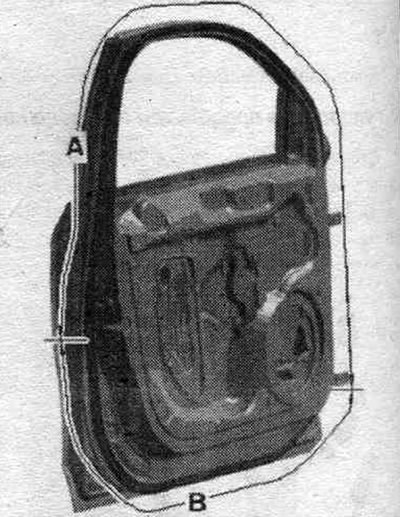


Adhesive area of the outer door seal


In section "A" from the door lock to the lower hinge of the rear door. the sealing edge should be installed at the exit of the inner radius. In section "B" the leading edge of the seal should be installed at the exit of the outer radius.

Press the outer door trim
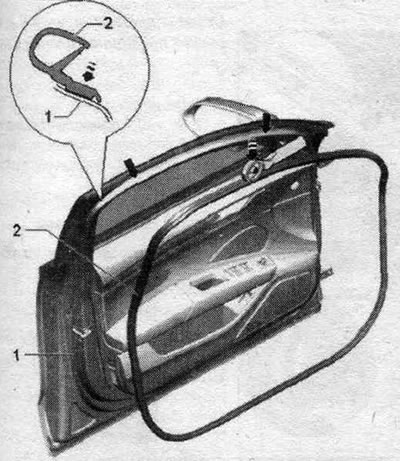


1. Front door.

1. Front door.
2. Outer door seal: When installing, first fix the outer door seal with adhesive tape at the top of the "arrow" window frame; lift the seal as indicated and press it firmly with the roller for rolling the insulating film "3356" along the perimeter of the base. The outer door seal is pressed only into the base with a roller for rolling the insulating film "3356".
The article was checked by auto expert Timur Bazhenov
This article is available at russian, bulgarian, belarusian, ukrainian, serbian, croatian, romanian, polish, slovak, hungarian

Share information:
Previous articles
Audi A4 B8: Doors, locks and windows
Next articles

Front door — position adjustment
Door opening limiter — removal and installation
Front door — removal
Rear Tailgate — Avant — Removal, Installation and Adjustment
Front door — window lift
Front door — outside door handle and door lock
Central locking — control unit replacement
Rear door — general information


Similar articles on other Audi car models:
Front and rear crankshaft seals — replacement Audi 80 B3 (1986-1991, petrol)
Front Brake Disc Pads — Checking and Replacing Audi 100 C3 (1982-1990, diesel)
Replacing the front brake pads Audi A3 Type 8L (1996-2003)
Front door window lifts Audi A6 C5 (1997-2004)
Front door speakers Audi A8 D2 (1994-2002)
Front door door Seals Audi Q5 Type 8R (2008-2017)
Removal and installation the front door opening limiter Audi A2 (1999-2005)
Link to this page in different formats


Visitor comments

No comments yet


How much will 14 + 32 =


A4(B8, 2007-2015) 
  • General information
  • Operating instructions
  • Power unit
  • Petrol engines 1.8 l
  • Petrol engines 1.8/2.0 l
  • Petrol engines 3.0 l
  • Petrol engines 3.2 l
  • Fuel system (petrol)
  • Diesel engines 2.0 l (CA*)
  • Diesel engines 2.0 l (CJCB)
  • Diesel engines 2.7/3.0 l
  • Diesel engines 3.0 l
  • Fuel system (diesel)
  • Transmission
  • Manual gearbox 0B1
  • Manual gearbox 0B2
  • Manual gearbox 0B3
  • Manual gearbox 0B4
  • Automatic transmission 0B5
  • Automatic transmission 0B6
  • Automatic transmission 0AW
  • All-wheel drive system
  • Chassis
  • Front suspension
  • Rear suspension
  • Brake system
  • Steering system
  • Body
  • Exterior
  • Interior
  • Seats
  • Doors, locks and windows
  • Security system
  • Heating and air conditioning
  • Electrical equipment
  • Audio system
  • Power devices
  • Equipment and devices
  • Lighting and lamps
  • Electrical circuits
 
A4(B7, 2004-2008) 
  • General information
  • Introduction to manual
  • Troubleshooting
  • Operating instructions
  • Maintenance
  • Power unit
  • Petrol engines 2.0 (ALT)
  • Petrol engines 2.0 (TFSI)
  • Petrol engines 1.8 (MPI)
  • Diesel engines
  • Cooling system
  • Air conditioner
  • Fuel and exhaust system
  • Ignition system
  • Starting and charging
  • Transmission
  • Clutch
  • Manual gearbox
  • Automatic gearbox
  • Drive shafts
  • Chassis
  • Brake system
  • Front suspension
  • Rear suspension
  • Steering
  • Body
  • Exterior
  • Interior
  • Electrical equipment
  • Equipment and devices
  • Lighting and signaling
  • Windscreen wipers and washers
  • Electrical diagrams
  • Electrical diagrams (since 2007)
 
A4(B6, 2000-2006) 
  • General information
  • Vehicle Description
  • User manual
  • Maintenance
  • Power unit
  • Gasoline engine
  • Diesel engine
  • Lubrication system
  • Cooling system
  • Supply system
  • Injection system
  • Exhaust system
  • Ignition and control
  • Transmission
  • Gear box
  • Clutch and drive shafts
  • Chassis
  • Brake system
  • Car suspension
  • Steering
  • Body
  • Heating and ventilation
  • Exterior (external elements)
  • Interior (internal elements)
  • Electrical equipment
  • Power devices
  • Lighting and appliances
  • Electrical circuits
 
A4(B6, 2000-2006, petrol) 
  • General information
  • Introduction to the guide
  • Car care
  • Power unit
  • Engine repair
  • Lubrication system
  • Cooling system
  • Injection and control system
  • Ignition system
  • Power and exhaust system
  • Transmission
  • Clutch and drive shafts
  • Car gearbox
  • Chassis
  • Suspension and wheels
  • Steering
  • Brake system
  • Body
  • Interior
  • Exterior
  • Electrical equipment
  • Equipment and devices
  • Lighting and signaling
  • Power devices
  • Electrical circuits
 
A4(B5, 1994-2001) 
  • General information
  • Introduction to the guide
  • Car care
  • Maintenance (gasoline)
  • Maintenance (diesel)
  • Power unit
  • Gasoline engines
  • Diesel engines
  • Engine overhaul
  • Cooling system
  • Fuel injection (gasoline)
  • Fuel system (diesel)
  • Exhaust system
  • Ignition system
  • Transmission
  • Clutch
  • Mechanical gearbox
  • Automatic gearbox
  • Drive shafts
  • Chassis
  • Brake system
  • Car suspension
  • Steering
  • Body
  • Exterior
  • Interior
  • Doors, locks and windows
  • Heating and ventilation
  • Electrical equipment
  • Power devices
  • Equipment and devices
  • Electrical circuits
 
A4(B5, 1994-2001, petrol) 
  • General information
  • Vehicle description
  • Maintenance
  • Power unit
  • Engine repair
  • Turbocharging
  • Exhaust system
  • Cooling system
  • Ignition system
  • Fuel system
  • Motronic injection system
  • MPI and MPFI injection system
  • Transmission
  • Clutch
  • Gearbox and shafts
  • Chassis
  • Steering
  • Car suspension
  • Brake system
  • Wheels and tires
  • Body
  • Heating and ventilation
  • Body parts
  • Electrical equipment
  • Fuses and relays
  • Power devices
  • Lighting and lamps
  • Tools and devices
  • Electrical circuits
 
AudiManual.ru © 2017-2026 · Mobile version · Feedback · Sitemap: EN BG BY UA RS HR RO PL SK HU · Site search · News and articles
80 B2 · 80 B3 petrol · 80 B3 · 80 B4 · 100 C3 diesel · 100 C3 petrol · 100 C3 · 100 C4 petrol · 100 C4 · A3 Type 8L · A4 B5 petrol · A4 B5 · A4 B6 petrol · A4 B6 · A4 B7 · A4 B8 · A6 C4 · A6 C5 · A6 C5 Allroad · A8 D2 · Q5 Type 8R · Q7 Typ 4L · Audi A2 ·
This site uses cookies 🍪. Click the button to accept this fact.