



Adjusting the door position
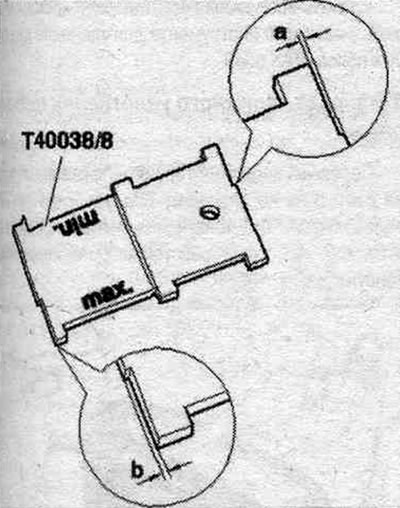
The "min and max" marks are used to check the lateral per. The groove in the center of the template is used for per. height. A 0.4 mm clearance is used to check the distance of the front door to the wing or rear. doors to the front door. A 0.6mm clearance is used to check the distance of the B-pillar panels from the rear door to the front door.
Gap sizes
All dimensional tolerances are ±0.5 mm. Joint parallelism must not exceed 0.5 mm.
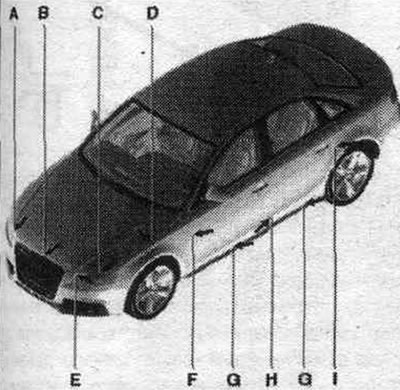
Size F = 3.5 mm.
Size G = 4.5 mm.
Size H = 3.5 mm.
Driver's side: Remove the front panel trim on the driver's side. Remove the lower A-pillar trim. Remove the relay board mount on the driver's side.
Side of the lane. passage: Remove the glove compartment.
All
Remove the A-pillar connector.
Longitudinal adjustment
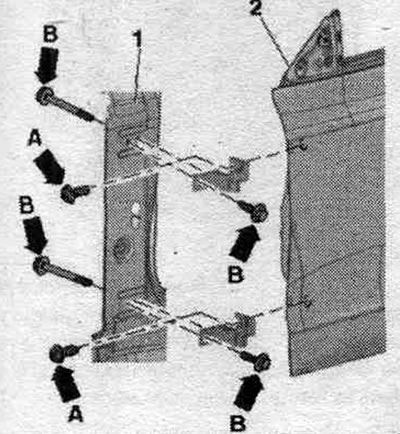
Loosen the bolts "arrow B" at the top and bottom of the hinge and on the pillar A "pos. 1". Align the door "2" in the longitudinal direction. Tighten the "arrow B" screws.
Height adjustment
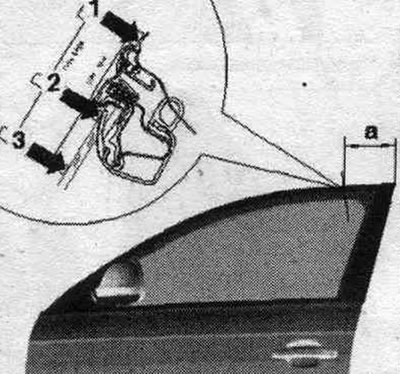
The hinge bolts on the door side are centering bolts, so adjusting the door with these bolts is generally not necessary. If adjustment is required with these bolts, they can be replaced with bolts of the same length and strength. For reg., use template "T40038/8." Set the template at a distance of "a" = 150 mm. When properly adjusted, the template should fit against the roof and decorative strip at point 1 (arrows), as shown in the figure. At point 2, the underside of the glass guide should be inside the groove.
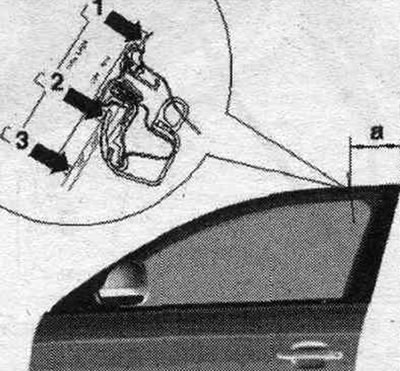
Adjustment relative to the center of the car: For per. use template "T40038/8". Set the template at distance "a" = 150. Unscrew bolts "arrows A" at the top and bottom of the hinge. Align door "2" in the longitudinal direction. Tighten the screws "arrow A". For the "min" position, points "1" and "3" should be adjacent. There should be no gap at point "2". For the "max" position, points "2" and "3" must be adjacent. There should be no gap at point "1".
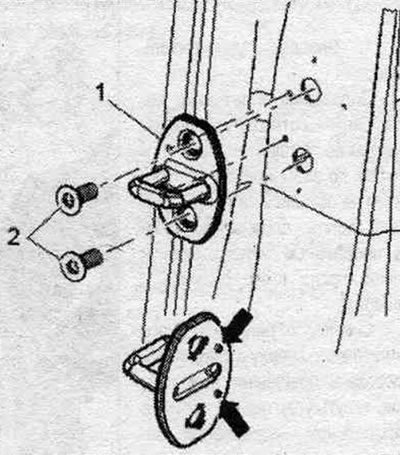
Adjusting with the lock bracket: Loosen bolts "2". Move the lock bracket "1" so that the door is flush with the body contour. Adjustments using the lock bracket are only made relative to the center of the vehicle. Do not adjust the door height using the lock bracket, as this will damage the door lock. Loosen bolts "2". Move lock bracket "1" so that the door is flush with the body contour. When adjusted correctly, the lock bracket should fit into the door lock at the center. Tighten bolts "2".
[The original material is located on the website «AUDIMANUAL.ru»]