
Repair Chevrolet Repair Toyota Repair Honda Repair AvtoVAZ Repair Mercedes-Benz Repair BMW Repair Opel
Home  |  Contacts  |  Sitemap  |    
English Русский
Български
Беларускі
Український
Српски
Hrvatski
Română
Polski
Slovenský
Magyar
AudiManual.ru


  • AUDI 80
  • AUDI 100
  • AUDI A3
  • AUDI A4
  • AUDI A6
  • AUDI A8
  • AUDI Q
  • OTHER
  • ARTICLES
B8 (2007-2015) B7 (2004-2008) B6 (2000-2006) B6 (2000-2006, petrol) B5 (1994-2001) B5 (1994-2001, petrol)

How to properly install a car on trestles (Audi A4 B6)

  • Home
  • Audi A4
  • B6 (2000-2006, petrol)
  • General information
  • Introduction to the guide
  • How to properly install a car on trestles
            0
Table of contents: Dummy goats for reliability ↓ Installing a car on trestles ↓
Audi equips its production cars with a screw jack. This jack allows you to lift the car to a sufficient height for most types of work. The lifting height can be increased by placing a thick board underneath. To prevent the jack leg from sinking into the ground, place a small 30 x 30 cm board with a thickness of 2 cm underneath.

However, the jack is only designed to lift the car; it does not provide reliable support when working with the lower parts.

Dummy goats for reliability


Anyone who has to repair their car needs jack stands. A raised car must be protected from tipping over with jack stands even during minor work, such as replacing brake pads. Never work under a raised car unless it is protected with jack stands! Warning! This is life-threatening!

Therefore, even if you are in a hurry, do not under any circumstances refuse to support the jacked up car.

Automotive supply stores offer trestles of various sizes and designs. For most types of repairs, a pair of these trestles will suffice. Tripod trestles with folding legs are especially practical. When buying, make sure that the support surface of the trestles is not too small.

To correctly position the support sawhorses 2, it is necessary to extend the stand 1 to the required height and lock it by inserting the locking pin 3 into the corresponding hole. After this, carefully lower the car so that the support contacts it appropriately.
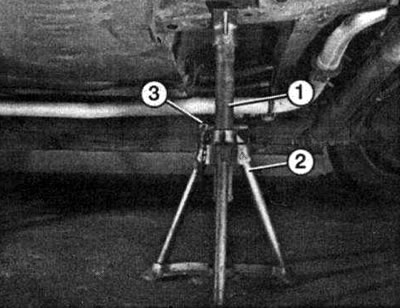
To correctly position the support sawhorses 2, it is necessary to extend the stand 1 to the…


Installing a car on trestles


1. The car must be on solid, level ground. Remove items from the trunk before starting work.

2. Apply the handbrake and, using wooden blocks or at least suitable stones, block at least one wheel on the opposite side so that the car cannot roll forward or backward. You cannot rely solely on the applied handbrake, especially since it is disengaged during certain types of work.

3. The jack and other tools are located in the spare wheel well. Fold the handle and open the jack about five turns.

Place the jack vertically under the point marked on the channel. The slot in the jack support cup should be horizontal and engage with the support on the channel.

Rotate the jack support bracket upwards first so that it just fits under the car. Position the bracket under the side member so that the crossbar in the recess is covered by the bracket grip.
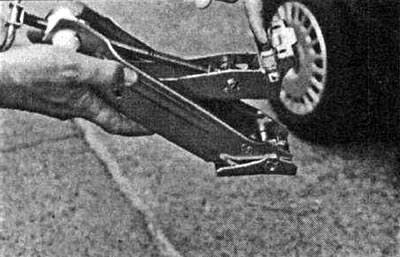
Rotate the jack support bracket upwards first so that it just fits under the car. Position the…


Attention! The car can only be lifted using the support points provided for this purpose! The channels have special reinforcement at the support points!


Press the jack support cup to the support point with your left hand, and turn the handle clockwise with your right hand, pressing the jack leg to the ground. Always make sure that the jack is vertical and does not tilt to the side!


When using a trolley jack to distribute the load, be sure to use a beam and a crossbar, which should be installed approximately in the middle of the door channel.

4. Before raising the jack to the working level, make sure once again that the jack cannot tip over. If the vertical position of the jack is not ensured, install the jack again and only then raise it to the required level.

If the jack is not used at the designated points, it may cause damage. In addition, there is a risk of injury, since the jack may slip if it is not supported properly. The jack's sliding support plate must stand level on the ground. In case of soft ground, use a strong support with a large support area, preferably a board.
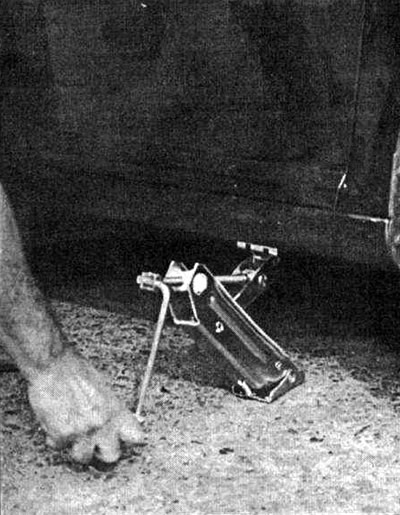
If the jack is not used at the designated points, it may cause damage. In addition, there is a risk…


5. The jack stands may only be installed in areas where the bed base is thickened. A rubber or hardwood support should be placed between the bed base and the supporting surface of the jack stands to distribute the load. Before installing the jack stands, check that no fold or brake pipe is pinched or deformed.

6. Three-legged jack stands most securely when one leg points outward and two points toward the middle of the car. When placing the car on the jacks, make sure that the jacks are in exactly this position. Otherwise, when lifting the car, the jacks that were installed on the opposite side may be pushed to the side.


The support points for the platform lift and the trolley jack are located on the vertical stiffener of the side member at the level of the markings for the car jack (front: left picture, back: right picture).
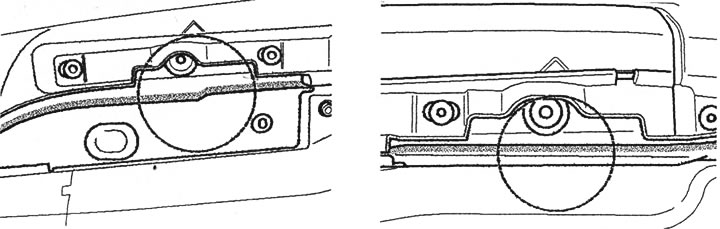
The support points for the platform lift and the trolley jack are located on the vertical stiffener…
The article was checked by auto expert Alexey Ivanov
This article is available at russian, bulgarian, belarusian, ukrainian, serbian, croatian, romanian, polish, slovak, hungarian

Share information:
Previous articles
Audi A4 B6: Introduction to the guide
Next articles

Safety First
Special tools for car repair
Basic tools for car repair
Purchase of spare parts
Towing a car
If the engine knocks at idle
Useful tips for repairmen
Tips for visiting the workshop


Link to this page in different formats


Visitor comments

No comments yet


How much will 23 + 31 =


A4(B8, 2007-2015) 
  • General information
  • Operating instructions
  • Power unit
  • Petrol engines 1.8 l
  • Petrol engines 1.8/2.0 l
  • Petrol engines 3.0 l
  • Petrol engines 3.2 l
  • Fuel system (petrol)
  • Diesel engines 2.0 l (CA*)
  • Diesel engines 2.0 l (CJCB)
  • Diesel engines 2.7/3.0 l
  • Diesel engines 3.0 l
  • Fuel system (diesel)
  • Transmission
  • Manual gearbox 0B1
  • Manual gearbox 0B2
  • Manual gearbox 0B3
  • Manual gearbox 0B4
  • Automatic transmission 0B5
  • Automatic transmission 0B6
  • Automatic transmission 0AW
  • All-wheel drive system
  • Chassis
  • Front suspension
  • Rear suspension
  • Brake system
  • Steering system
  • Body
  • Exterior
  • Interior
  • Seats
  • Doors, locks and windows
  • Security system
  • Heating and air conditioning
  • Electrical equipment
  • Audio system
  • Power devices
  • Equipment and devices
  • Lighting and lamps
  • Electrical circuits
 
A4(B7, 2004-2008) 
  • General information
  • Introduction to manual
  • Troubleshooting
  • Operating instructions
  • Maintenance
  • Power unit
  • Petrol engines 2.0 (ALT)
  • Petrol engines 2.0 (TFSI)
  • Petrol engines 1.8 (MPI)
  • Diesel engines
  • Cooling system
  • Air conditioner
  • Fuel and exhaust system
  • Ignition system
  • Starting and charging
  • Transmission
  • Clutch
  • Manual gearbox
  • Automatic gearbox
  • Drive shafts
  • Chassis
  • Brake system
  • Front suspension
  • Rear suspension
  • Steering
  • Body
  • Exterior
  • Interior
  • Electrical equipment
  • Equipment and devices
  • Lighting and signaling
  • Windscreen wipers and washers
  • Electrical diagrams
  • Electrical diagrams (since 2007)
 
A4(B6, 2000-2006) 
  • General information
  • Vehicle Description
  • User manual
  • Maintenance
  • Power unit
  • Gasoline engine
  • Diesel engine
  • Lubrication system
  • Cooling system
  • Supply system
  • Injection system
  • Exhaust system
  • Ignition and control
  • Transmission
  • Gear box
  • Clutch and drive shafts
  • Chassis
  • Brake system
  • Car suspension
  • Steering
  • Body
  • Heating and ventilation
  • Exterior (external elements)
  • Interior (internal elements)
  • Electrical equipment
  • Power devices
  • Lighting and appliances
  • Electrical circuits
 
A4(B6, 2000-2006, petrol) 
  • General information
  • Introduction to the guide
  • Car care
  • Power unit
  • Engine repair
  • Lubrication system
  • Cooling system
  • Injection and control system
  • Ignition system
  • Power and exhaust system
  • Transmission
  • Clutch and drive shafts
  • Car gearbox
  • Chassis
  • Suspension and wheels
  • Steering
  • Brake system
  • Body
  • Interior
  • Exterior
  • Electrical equipment
  • Equipment and devices
  • Lighting and signaling
  • Power devices
  • Electrical circuits
 
A4(B5, 1994-2001) 
  • General information
  • Introduction to the guide
  • Car care
  • Maintenance (gasoline)
  • Maintenance (diesel)
  • Power unit
  • Gasoline engines
  • Diesel engines
  • Engine overhaul
  • Cooling system
  • Fuel injection (gasoline)
  • Fuel system (diesel)
  • Exhaust system
  • Ignition system
  • Transmission
  • Clutch
  • Mechanical gearbox
  • Automatic gearbox
  • Drive shafts
  • Chassis
  • Brake system
  • Car suspension
  • Steering
  • Body
  • Exterior
  • Interior
  • Doors, locks and windows
  • Heating and ventilation
  • Electrical equipment
  • Power devices
  • Equipment and devices
  • Electrical circuits
 
A4(B5, 1994-2001, petrol) 
  • General information
  • Vehicle description
  • Maintenance
  • Power unit
  • Engine repair
  • Turbocharging
  • Exhaust system
  • Cooling system
  • Ignition system
  • Fuel system
  • Motronic injection system
  • MPI and MPFI injection system
  • Transmission
  • Clutch
  • Gearbox and shafts
  • Chassis
  • Steering
  • Car suspension
  • Brake system
  • Wheels and tires
  • Body
  • Heating and ventilation
  • Body parts
  • Electrical equipment
  • Fuses and relays
  • Power devices
  • Lighting and lamps
  • Tools and devices
  • Electrical circuits
 
AudiManual.ru © 2017-2026 · Mobile version · Feedback · Sitemap: EN BG BY UA RS HR RO PL SK HU · Site search · News and articles
80 B2 · 80 B3 petrol · 80 B3 · 80 B4 · 100 C3 diesel · 100 C3 petrol · 100 C3 · 100 C4 petrol · 100 C4 · A3 Type 8L · A4 B5 petrol · A4 B5 · A4 B6 petrol · A4 B6 · A4 B7 · A4 B8 · A6 C4 · A6 C5 · A6 C5 Allroad · A8 D2 · Q5 Type 8R · Q7 Typ 4L · Audi A2 ·
This site uses cookies 🍪. Click the button to accept this fact.