



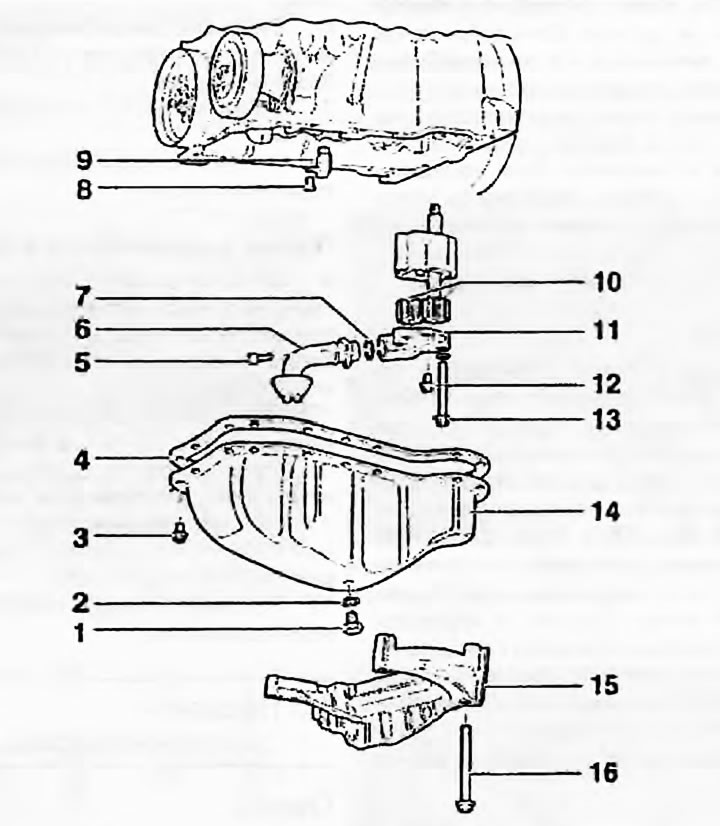
Fig. 16.2 Oil pump components: 1. Drain plug; 2. Sealing washer; 3. Pan mounting bolts; 4. Laying the pallet; 5. Oil receiver mounting bolts; 6. Oil receiver; 7. Seal hoof; 8. Oil nozzle and sump mounting bolt; 9. Oil nozzle; 10. Pump gears; 11. Lid; 12. Cover fastening bolt; 13. Oil pump mounting bolts; 14. Pallet; 15. Engine/gearbox bracket; 16. Bracket mounting bolts
Removal
1. Remove the tray.
2. Loosen the large oil pump mounting bolts and remove the pump (Fig. 16.2). To do this, you may need to pull the subframe down to create enough space to remove it.
3. Place the pump on the workbench, unscrew the bolts and remove the oil receiver. Remove the sealing ring.
4. Unscrew the two bolts and remove the cover.
Examination
5. Clean the components and check for wear or damage.
6. Using a flat feeler gauge, measure the clearance between the gears and compare it with the data given in Specifications. Similarly, measure the axial clearance by placing a steel ruler on the pump body. If the clearances exceed the permissible limits, the pump must be replaced. If the clearances are within the "tolerances", install the cover and tighten the bolts that secure it.
Installation
7. Fill the pump with oil by pouring it into the oil receiver hole and rotate the drive shaft.
8. Clean the mating surfaces and install the cover on the pump and tighten the bolts to the specified torque.
9. Clean the pump and block, attach the pump, tighten the mounting bolts and tighten them to the specified torque.
10. Install a new sealing ring onto the end of the oil pickup tube. Install the oil pickup onto the pump, install the bolts and tighten them to the specified torque.
11. Install the tray.