
Table of contents: Troubleshooting the Rear Window… ↓ Speakers in the front door trim ↓ Rear speaker ↓
This type of antenna uses three metal conductive tracks at the very top of the glass as an antenna for receiving medium waves.
The remaining conductive tracks are used for VHF reception, which also serve as heating elements. The insufficient height of this antenna system is compensated by an amplifier under the left rear roof pillar trim.
Troubleshooting the Rear Window Antenna
The rear roof pillar trim can be removed with great patience and dexterity in cars with a folding rear seat back without any other disassembly work. But in cars with a rigid back, you cannot do without dismantling it. In general, the work is easier after dismantling the rear receiving pocket and the side trim of the folding seat (Chapter Salon).
1. Remove both rear roof pillar trims.
2. Check the ground connection of the rear window heating on the right roof pillar, and also whether the antenna amplifier is securely connected to ground with the mounting screws.
3. Carefully check the top three conductive tracks on the rear window: is there a visible break? If so, repair with conductive silver varnish or install a new rear window.
4. Now comes the electrical test: Disconnect the thin white lead wire connector at the top of the amplifier, measure the voltage relative to ground. To do this, turn on the radio.
5. Battery voltage present: Power supply to the amplifier is OK. No voltage: Fix the break in the wire.
6. On the same wire, measure the current between the amplifier connector and the removed wire.
7. The ammeter should show 30–50 mA, otherwise the antenna amplifier does not consume current and, therefore, it is faulty – replace it.
8. Next check: disconnect the lower wire on the heated rear window, turn on the ignition and rear window heater, measure the voltage in the wire.
9. It should have battery voltage, otherwise there is a fault in the power supply wire or in the amplifier, outline the damage.
10. Disconnect the lower (thick white) wire on the amplifier, measure the voltage with the ignition on and the rear window heating on:
11. If there is battery voltage, then the current supply wire is OK, perhaps the amplifier is faulty. If not, then vice versa.
Speakers in the front door trim
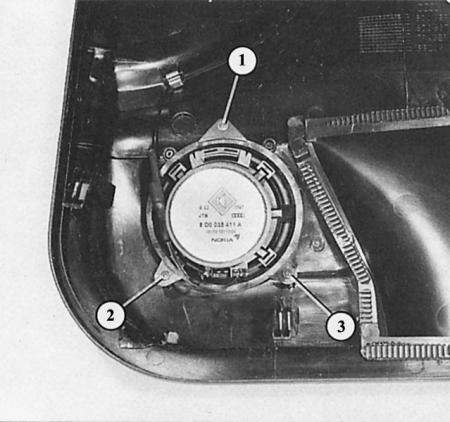
The midrange speaker, located at the bottom, is also screwed to the rear door trim. The numbers "1" through "3" indicate the mounting screws.
1. Remove the front door trim.
2. Carefully remove the foam damping film located behind the door trim.
3. Disconnect the wire connector in the connecting wire from the lower to the upper speaker.
4. Midrange speaker: Loosen the three speaker mounting screws and remove the wire guide.
5. Tweeter: Loosen the Phillips head screw on the back of the speaker, remove the speaker.
Rear speaker
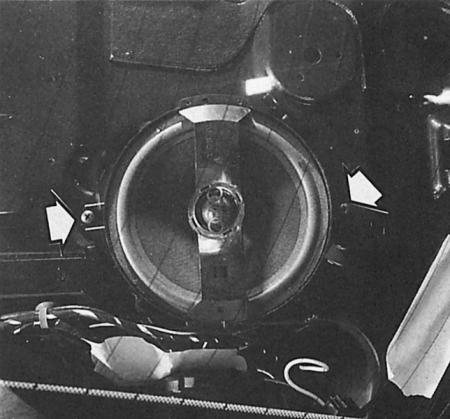
The rear speaker is screwed to the metal body from above under the receiving pocket (arrows). To remove it, you must first remove the rear receiving pocket.
1. Remove the rear receiving pocket (chapter Salon).
2. Loosen the Phillips head screws and remove the speaker.
A link to the original source is available on the website audimanual