



Table of contents: Clutch release master cylinder -… ↓ Clutch slave cylinder - removal and… ↓ Clutch hydraulic drive - air removal ↓
The first signs of wear of the driven clutch disk are manifested as clutch slippage. The fact that the clutch disk is slipping can be recognized when driving in high gear in the "Full Load" mode. The number of engine revolutions increases, but the speed does not change. In order to finally make sure that the friction linings of the driven disk are worn out, use the following method.
1. Apply the parking brake and start the engine.
2. Engage 3rd gear and "give" gas. If the handbrake is normal, the engine will stall. But if the engine continues to run, it is time to change the clutch disc. If gear shifting is difficult with a warm engine or the shifting is accompanied by a grinding noise, then we can assume a defective clutch, which does not disengage correctly. The gearbox, as a rule, is not to blame in such cases. In order to support your assumptions, use the following technique.
3. Start the engine.
4. Press the clutch pedal, wait about 3 seconds, and then try to engage 1st or reverse gear. If shifting is difficult or a grinding noise is heard in the gearbox, then there is a clutch separation defect. Difficulty separating the clutch or the clutch pedal "failing" indicates the presence of air in the clutch hydraulic drive. Removing air from the hydraulic drive will not eliminate this defect. It is necessary to find the cause and location of the air leak and eliminate them. First of all, it is necessary to inspect the master and slave cylinders and make sure that there are no traces of brake fluid on them. To check the clutch slave cylinder, it must first be cleaned.
5. Replace the clutch cylinders if they are leaking.
6. Check the hydraulic clutch drive and bleed it.
7. Repeat the check.
Caution! Although the clutch hydraulic drive uses brake fluid from the expansion tank, its leakage from the clutch hydraulic drive does not affect the brake system in any way. The clutch hydraulic drive intake nipple is located high enough on the expansion tank, so there is enough fluid left for the brake system.
Clutch release master cylinder - removal and installation
8. Remove as much fluid as possible from the expansion tank with brake fluid.
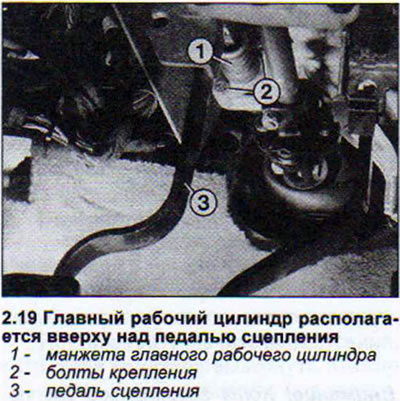
9. Remove the trim under the instrument panel in the driver's side footwell.
10. Place a rag under the master cylinder and disconnect the feed hose. The remaining fluid will flow out onto the rag.
11. Disconnect the pressure supply hose to the working cylinder, located in the engine compartment on the left side, next to the brake booster.
12. Remove the two Allen bolts securing the master cylinder.
13. Remove the lock washer securing the cylinder push rod to the clutch pedal and remove the mounting bolt.
14. Remove the cylinder.
When installing a new master cylinder, its pusher must be positioned so that the clutch pedal is almost 10 mm higher than the brake pedal.
Caution! The return spring must ensure that the clutch pedal returns to its original position. The pedal itself in the resting position must not touch the brake and clutch pedal bracket.
15. To make adjustments, loosen the lock nut on the pusher and turn the pusher around its axis to the right or left.
16. Tighten the lock nut.
18. Remove air from the clutch hydraulic drive.
Clutch slave cylinder - removal and installation
19. Place the front of the car on jack stands (see illustration).
20. Disconnect the hydraulic hose from the working cylinder.
Caution! Place a container underneath to collect any liquid flowing out of the hose.
21. Remove the slave cylinder mounting bolts and pull the cylinder out of the gearbox by pushing it backwards. If necessary, use a rust remover and a pry bar.
22. Lubricate the new cylinder with a thin layer of grease and its pusher with molybdenum paste.
23. Install the slave cylinder in place so that the corresponding holes for the mounting bolts align.
24. Tighten the mounting bolts to 25 Nm.
25. Remove air from the hydraulic drive.
Clutch hydraulic drive - air removal
If there is no device for removing air from the hydraulic drive, which is used in workshops, bleeding the hydraulic drive is performed in the same way as bleeding the brake drive.
26. Loosen the bleed nipple of one of the front wheel brake mechanisms, as well as the nipple of the clutch slave cylinder by approximately one and a half turns.
27. Connect both fittings with a hose.
28. Slowly press the brake pedal several times to allow the brake fluid to flow from the brake mechanism through the clutch hydraulic drive. Do not press the brake pedal abruptly. This may cause the hose to break.
29. Monitor the brake fluid level in the expansion tank. As soon as air bubbles stop coming from the clutch hydraulic drive into the tank, tighten both fittings and remove the connecting hose.
30. Check the brake fluid level in the expansion tank.
Content source: the specified website: AudiManual.ru