
1. From inside the car, remove the plastic covering from the front of the tray under the handbrake lever. Unscrew the screw.
2. Remove the rear ashtray, unscrew the two screws securing the rear part of the central console.
3. Remove the central console above the handbrake lever.
4. Block the front wheels, then jack up the rear of the car and support it on axle stands. Remove the heat shield where used (photo).

5. Unscrew the fastening nut at the end of the handbrake lever rod and remove the cable compensator (photo).

6. Remove the rubber covers.
7. From inside the vehicle, remove the retaining ring and remove the lever pivot pin (photo).

8. Move the handbrake lever slightly back, then remove it from the suspension.
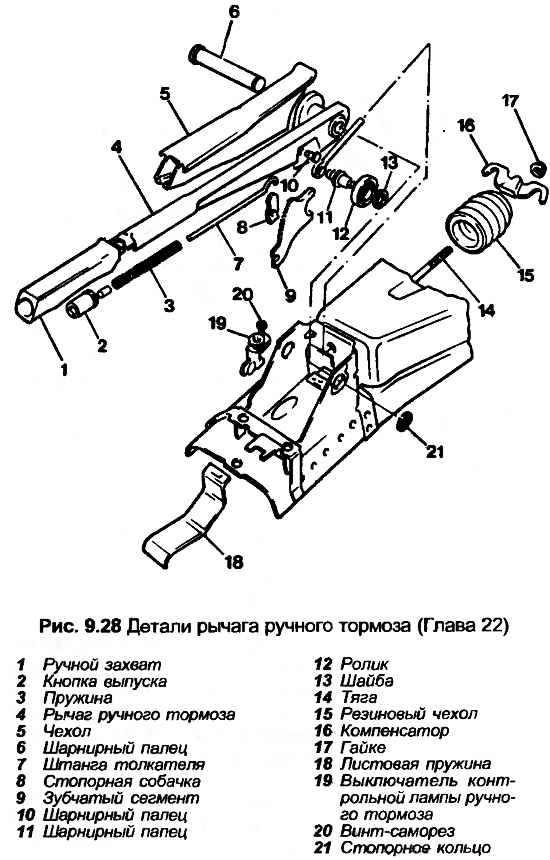
9. If necessary, the handbrake lever can be disassembled as follows. Remove the handbrake, unscrew the release button. Remove the spring. Remove the rubber boot. To remove the latch, ratchet, push rod, rod and roller, it is necessary to cut off two hinge pins.
10. Check the condition of the parts, in particular the latch and ratchet, replace them as necessary. The latch and ratchet should be replaced together.
11. Assemble the handbrake lever in the reverse order of disassembly, rivet the hinge pins.
12. Installation is carried out in the reverse order. Lubricate the pivot pins with a universal lubricant. Make sure that the groove in the ratchet is inserted into the front suspension. Finally, adjust the handbrake as described in Chapter 23.