
Repair Chevrolet Repair Toyota Repair Honda Repair AvtoVAZ Repair Mercedes-Benz Repair BMW Repair Opel
Home  |  Contacts  |  Sitemap  |    
English Русский
Български
Беларускі
Український
Српски
Hrvatski
Română
Polski
Slovenský
Magyar
AudiManual.ru


  • AUDI 80
  • AUDI 100
  • AUDI A3
  • AUDI A4
  • AUDI A6
  • AUDI A8
  • AUDI Q
  • OTHER
  • ARTICLES
Q7 Typ 4L (2005-2015, diesel) Q5 Type 8R (2008-2017)

Installing a new balance shaft module (Audi Q5-8R)

  • Home
  • Audi Q
  • Q5 Type 8R (2008-2017)
  • Power unit
  • Diesel 2.0 liter (CG/CJ/CM)
  • Installing a new balance shaft module
            0
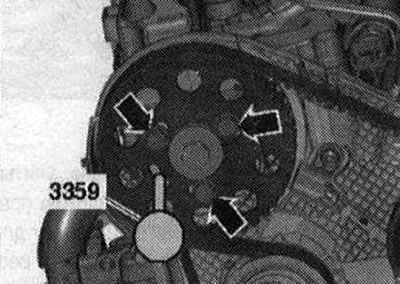
Fix the camshaft using the locking pin of the direct injection pump of the diesel engine "3359".

Fix the camshaft using the locking pin of the direct injection pump of the diesel engine «3359».


The cylindrical gear drive of the balance shaft module must be installed with a tooth profile clearance of 0.038...0.072 mm. To achieve the required tooth profile clearance, a coating of the appropriate thickness is applied to the new intermediate gear. The coating is located on individual sections of the perimeter on the teeth. Over a short period of time, the coating wears off and the required clearance appears. A new balance shaft module must always be installed with a new intermediate gear with a coating. Replace bolts that were tightened with additional tightening. Risk of slipping of the thrust bearing washer behind the intermediate gear. When installing the balance shaft module, do not loosen the intermediate gear bolt of the shaft more than specified. Mounting position of the thrust bearing washer. Loosen bolt "1" of the intermediate gear by approximately 45°. If the cylinder block does not have installation sleeves for centering the balance shaft module, insert installation sleeves. Install the balance shaft module onto the cylinder block. The intermediate gear coating must not be damaged.
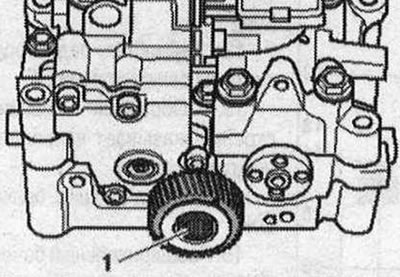


The cylindrical gear drive of the balance shaft module must be installed with a tooth profile…


Tighten the balance shaft module bolts.
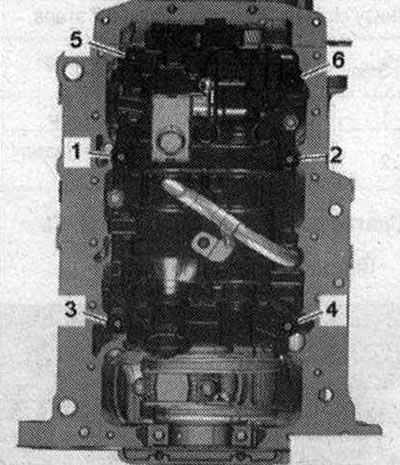
Tighten the balance shaft module bolts.


Fix the balance shaft using the locking device "T10255"; if necessary, rotate the shaft. The journal of the locking device must enter the groove of the balance shaft.
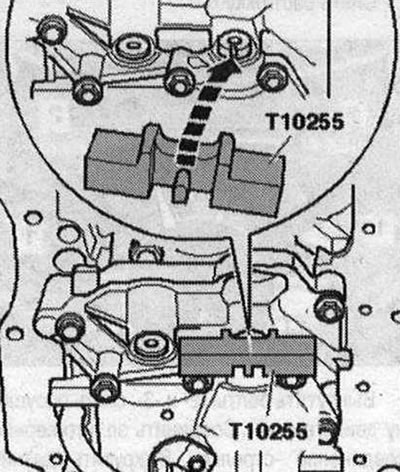
Fix the balance shaft using the locking device «T10255»; if necessary, rotate the shaft. The…


Carefully place the gear on the balance shaft, moving the intermediate gear slightly to the side. The coating of the intermediate gear must not be damaged. The threaded holes of the balance shaft must be located, if possible, in the center of the longitudinal holes of the balance shaft gear. If the longitudinal holes in the balance shaft gear do not coincide with the threaded holes, it is necessary to turn the gear by the corresponding number of teeth and put it on again. Tighten the bolts "arrows" of the balance shaft gear. Remove the locking device "T10255".
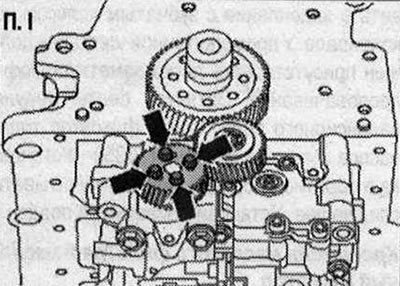


Installing a new balance shaft module

I


The following 3 stages of work must be completed simultaneously (assistance from a second mechanic is needed). Press the intermediate gear "3" with force, if necessary with a wooden block, "in the direction of the arrow" into the gear mesh of gear "2" and balance shaft gear "1". At the same time, slightly turn the balance shaft gear counterclockwise. Tighten the intermediate gear bolts. Remove the high-pressure fuel pump retainer "3359". After installation, there should be no play in the intermediate gear. This can be checked manually, without applying much force.
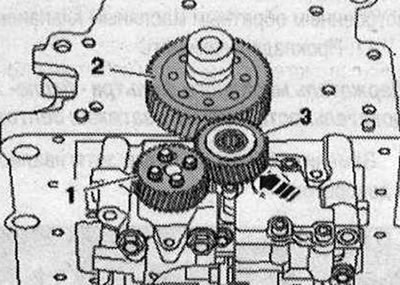
The following 3 stages of work must be completed simultaneously (assistance from a second mechanic…


Installation is in reverse order, taking into account the following: Install the oil pan.

(The original material is located on the website: «AudiManual.ru»)
The article was checked by auto expert Timur Bazhenov
This article is available at russian, bulgarian, belarusian, ukrainian, serbian, croatian, romanian, polish, slovak, hungarian

Share information:
Previous articles
Audi Q Q5 Type 8R: Diesel 2.0 liter (CG/CJ/CM)
Next articles

Removal the balance shaft module
Removal the oil pump
Removal the oil pan
Oil pan, oil pump, balance shaft block
Installation of a previously used balance shaft unit
Oil filter bracket and oil cooler
Removal the oil pressure sensor
Cooling system


Similar articles on other Audi car models:
Intermediate shaft — removal, inspection and installation Audi 80 B3 (1986-1991, petrol)
Piston/Connecting Rod Assemblies — Installing and Checking… Audi 100 C3 (1982-1990, diesel)
Checking, assembling and installing the connecting rod and… Audi A3 Type 8L (1996-2003)
Oil pump drive, high-pressure fuel pump and balance shaft Audi A4 B8 (2007-2015)
Checking the drive shaft protective boot Audi A6 C5 (1997-2004)
Checking the drive shaft protective cover Audi A8 D2 (1994-2002)
Balance shaft and crankshaft frame — design description Audi A2 (1999-2005)
Link to this page in different formats


Visitor comments

No comments yet


How much will 34 + 33 =


Q7 4L(2005-2015, diesel) 
  • General information
  • Operating instructions
  • Maintenance
  • Power unit
  • Diesels 3.0 l (BUG, BUN, CAS)
  • Diesels 3.0 l (CATA, CCMA)
  • Diesels 3.0 l (CJGA/CJGC)
  • Diesels 4.2 l (BTR, CCFA/CCFC)
  • Cooling system
  • Fuel and exhaust system
  • Engine management system
  • Starting and charging
  • Transmission
  • Automatic gearbox
  • Drive shafts
  • Chassis
  • Brake system
  • Front suspension
  • Rear suspension
  • Steering system
  • Body
  • Air conditioner
  • Exterior
  • Interior
  • Electrical equipment
  • Equipment and devices
  • Electrical circuits
 
Q5 8R(2008-2017) 
  • General information
  • User manual
  • Power unit
  • Petrol engine 2.0 l
  • Petrol engine 3.2 l
  • Fuel system (petrol)
  • Diesel 2.0 liter (CA)
  • Diesel 2.0 liter (CG/CJ/CM)
  • Diesel engine 3.0 l
  • Fuel system (diesel)
  • Transmission
  • Manual gearbox 0B1
  • Manual gearbox 0B2
  • Automatic gearbox 0B5
  • Automatic gearbox 0B6
  • Chassis
  • Front suspension
  • Rear suspension
  • Brake system
  • Steering
  • Body
  • Exterior
  • Interior
  • Doors, locks and windows
  • Safety system
  • Ventilation and heating
  • Electrical equipment
  • Power devices
  • Equipment and devices
  • Lighting and alarm
  • Audio system
  • Electrical circuits
 
AudiManual.ru © 2017-2026 · Mobile version · Feedback · Sitemap: EN BG BY UA RS HR RO PL SK HU · Site search · News and articles
80 B2 · 80 B3 petrol · 80 B3 · 80 B4 · 100 C3 diesel · 100 C3 petrol · 100 C3 · 100 C4 petrol · 100 C4 · A3 Type 8L · A4 B5 petrol · A4 B5 · A4 B6 petrol · A4 B6 · A4 B7 · A4 B8 · A6 C4 · A6 C5 · A6 C5 Allroad · A8 D2 · Q5 Type 8R · Q7 Typ 4L · Audi A2 ·
This site uses cookies 🍪. Click the button to accept this fact.