
Removal
Drain the coolant.
Remove the front bumper.
Disconnect the upper and lower hoses from the radiator. To do this, remove the retaining clips (see fig. 3.3) on the side of the couplings, then disconnect the hoses.
Cars with automatic transmission. Clean the pipe connections and disconnect the pipes from the transmission oil cooler. Wipe up any spilled oil with a rag. Make sure that no dirt gets into the pipes. Protect the exposed pipes from contamination with plastic plugs and rubber rings.
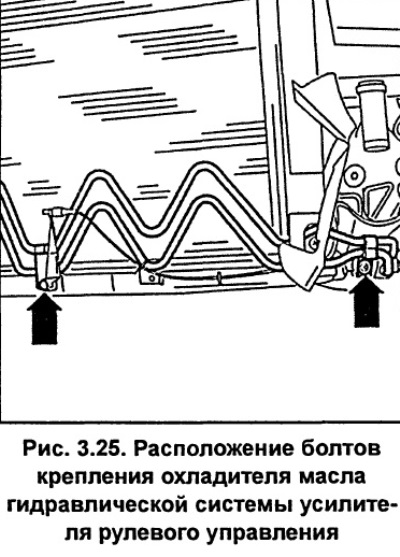
Unscrew the power steering hydraulic oil cooler (at the bottom of the radiator, Fig. 3.25). Do not disconnect the pipes, otherwise oil will leak out.
Cars with air conditioning
Safety instructions: Do not open the air conditioning circuit. Refrigerant may cause frostbite if it comes into contact with the skin. Air conditioning pipes and hoses must not be twisted, bent or kinked.
Unscrew screws 4 on both sides of the radiator and remove the air guides (Fig. 3.26).
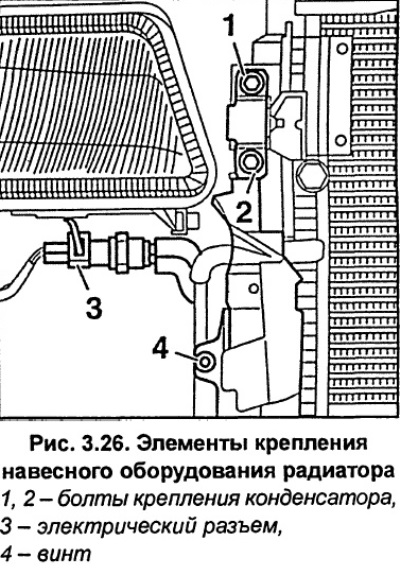
Unscrew bolts 1 and 2 securing the condenser to the radiator and move it forward as far as possible (Fig. 3.26).
Disconnect the electrical connector 3 of the air conditioner (Fig. 3.26).
Use soft wire to suspend the capacitor so that the hoses/pipes are not strained.
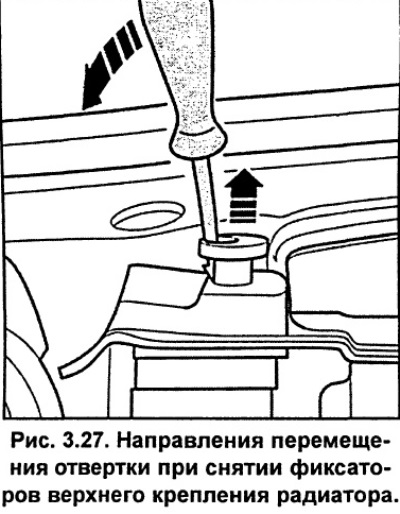
Remove the upper radiator mounting clips (see fig. 3.27).
Tilt the radiator forward and remove it from the rubber mounts along with the fan shroud and fan.
Examination
If the radiator was removed due to reduced flow capacity, flush it with a stream of water in both directions. Blow the radiator out with compressed air from the outside.
If the radiator is leaking, do not try to weld or solder the leak, as this will damage the plastic parts of the radiator.
Minor radiator leaks can be repaired using radiator sealant.
Installation
Replace worn rubber radiator mounts.
Install the radiator with a fan in the top direction.
Secure the top of the radiator with clamps.
Use new sealing rings for the coolant hoses. Connect the coolant hoses to the radiator and secure them with the retaining clips.
Screw the power steering hydraulic oil cooler to the bottom of the radiator and tighten its mounting bolts to a torque of 10 Nm.
Cars with air conditioning. Screw the condenser and air guides to the radiator, tightening their mounting bolts to 10 Nm. Connect the air conditioner electrical connector (see fig. 3.26).
Cars with automatic transmission. Screw the transmission cooling pipes to the radiator with new sealing rings. Before installation, soak the sealing rings in oil. At the service station, add oil to the automatic transmission.
Connect the electrical connectors to the temperature sensor and radiator fan and secure their wires in the holders.
Install the front bumper.
Fill the cooling system with coolant and bleed air from the system.
Please note: When installing a new radiator, it is necessary to completely renew the coolant.
After a test drive, check all connections for leaks.
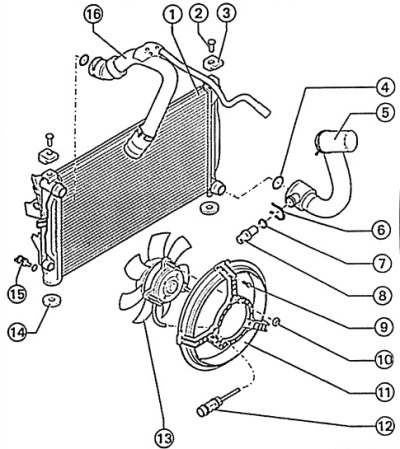
Fig. 3.24. Cooling system components and radiator of cars with V6 engines
1 - radiator,
2 - retainer,
3 - rubber gasket,
4 - sealing ring,
5 - hose,
6 - fixing bracket,
7 - sealing ring,
8 - radiator fan temperature sensor,
9 - bolt,
10 - nut,
11 - fan casing,
12 - electrical connector,
13 - fan impeller,
14 - rubber washer,
15 - coolant drain screw,
16 - hoses
This article was previously published on the resource AUDIMANUAL.ru