
Table of contents: Car with FIS and on-board computer ↓ Current fuel consumption ↓ Fuel range ↓ Travel time ↓ A reminder to take a break from… ↓ Average fuel consumption ↓ Average speed of movement ↓ Menu indication ↓ Selecting and entering menu commands ↓ Types of indication ↓ The setup process (part 1) ↓ The setup process (part 2) ↓ Functional example (part 1) ↓ Functional example (part 2) ↓ Functional example (part 3) ↓
Car with FIS and on-board computer
The on-board computer analyzes and displays the current and average fuel consumption, average speed, fuel range and travel time.
The on-board computer analyses and displays the following information on the displays (FIS): current fuel consumption travel time average speed This information is displayed on the FIS display in the sequence given above.
All indicators (fuel range, travel time, average fuel consumption, average speed and current fuel consumption) are indicated in metric and, in certain export variants, in the English system of units.
Use
The on-board computer is controlled by two switches mounted in the windshield wiper control handle.
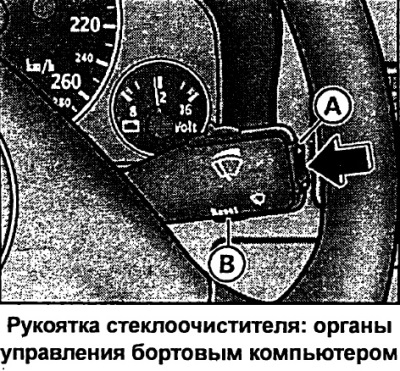
Feature selection
- Press the top or bottom side of the function switch A repeatedly. The 5 functions of the on-board computer are displayed sequentially.
Erasing information
- Perform a selection of the current function.
- Press and hold the reset button B (Reset) for at least one second.
The reset button can be used to set the following zero values:
- travel time
- average fuel consumption
- average speed of movement
The trip computer only works when the ignition is on. When the ignition is on, the last function at the time the ignition was turned off is displayed. By briefly pressing the function switch A or the reset button B, you can also turn off the indication of the need to break in driving.
Note: When the battery terminals are disconnected, all accumulated values are erased.
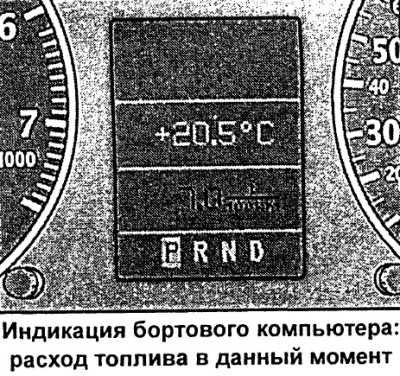
Current fuel consumption
Car with FIS and on-board computer
Current fuel consumption indication helps you save fuel.
The display shows the current fuel consumption value, measured in l/100 km. Using this display, you can select the driving mode that corresponds to the optimal fuel consumption.
Consumption is calculated for each 30-meter section of the route. When the car is stopped, the last calculated value is displayed.
If after starting the engine the function for determining the current fuel consumption is called, then during the first 30-40 meters of the route its average value is displayed.
Fuel range
Car with FIS and on-board computer
This indication helps when planning your movement.
The display shows the range in kilometers. This display shows how many kilometers the car can travel on the actual remaining fuel in the current driving mode. The range by fuel is determined by discrete values, counted in 10 km increments.
The calculation of the power reserve is based on the fuel consumption over the last 30 km of the journey. With more economical subsequent movement, the power reserve increases.
Travel time
Car with FIS and on-board computer
Travel time indicator reminds you to take a break from driving.
The display shows the travel time counted from the moment of the last reset of the memory data of the storage device. When the ignition is off, the travel time value is saved. When driving continues, the subsequent time count is added to it.
If you want to start counting the travel time from a certain point, clear the memory by pressing the "Reset" button.
A reminder to take a break from movement
Two hours after the start of the journey, regardless of the programmed function, an automatic switchover to the travel time indication occurs. A flashing "2:00" indication reminds the driver to take a break from driving.
This indication can be switched off by briefly pressing the top or bottom side of the function switch or the "Reset" button.
If you now leave the ignition on or if the break is less than 10 minutes, then every two hours after that the reminder about the need to stop for a rest will be repeated with the travel time indication of 4:00, 6:00, etc. If the break lasts more than 10 minutes with the ignition off, the travel time countdown data is reset.
Average fuel consumption
Car with FIS with on-board computer
This indication helps when planning your movement.
The display shows the average fuel consumption in litres per 100 km since the last memory reset. This display allows you to select the driving mode that corresponds to the optimum fuel consumption.
When the ignition is switched off, the average fuel consumption value is stored in memory. When driving further, the subsequent consumption data is taken into account.
If you want to determine the average fuel consumption again, you must reset the memory data by pressing the "Reset" button. When driving the first 30 m after resetting, the display shows zero.
Average speed of movement
Car with FIS with on-board computer
This indication helps when planning your movement.
The display shows the average speed in km/h since the last memory reset.
When the ignition is switched off, the average speed value is stored in memory. When driving again, new data is also taken into account.
If you want to determine the average speed again, you must reset the memory data by pressing the "Reset" button.
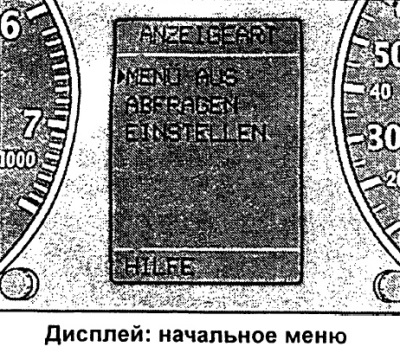
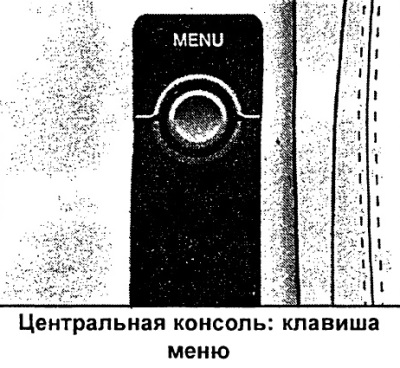
Menu indication
Car with independent heating and air monitoring system in tires
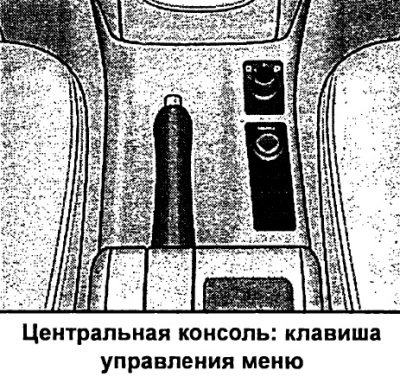
Through the corresponding commands of your vehicle's menu, it is possible to configure, activate and control individual functions (for example, an autonomous heater). In addition, using the menu you can display the necessary information on the display (FIS) (for example, an on-board computer). The device operates only when the ignition is on. Control is performed by the Menu button on the central console.
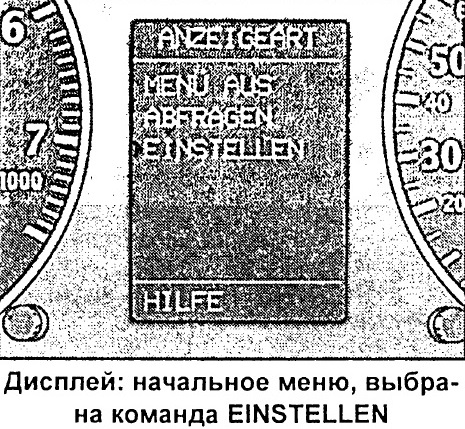
The start menu informs you about the different types of display indication. The following indication types are possible:
- MENU AUS (menu shutdown)
- ABFRAGEN (request)
- EINSTELLEN (setup, installation)
- HILFE (help)
Selecting and entering menu commands
The Menu button and the rotary/push button on the centre console can be used to display the menu, read out data and make settings.

Functions of the Menu key and rotary/push button.
Calling the menu
- Press the Menu key.
Selection and customization
- Rotate the rotary/push button.
Enter and confirm
- Press the rotary/push button.
When you rotate the button, the arrow for selecting commands moves along the menu/it is possible to change the settings parameters.
Pressing the rotary/push button confirms the selected command/enters the set parameters into the system.
Types of indication
The FIS initial menu allows you to select 4 types of indication.
The following functions correspond to the four types of indication of the initial menu:
Menu aus (menu shutdown)
- on-board computer,
- fault monitoring system/parameters of the radio system or telephone,
- outside temperature,
- speed alarm,
- open door/trunk warning,
- display commands/indication of the engaged gear of the automatic transmission,
- display of telephone, telematics and navigation system.
Navigation system controls (depending on the configuration) can be located on the LCD screen or center console.
Abfragen (request)
- Service (maintenance)
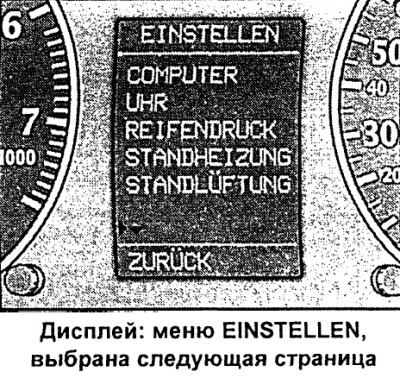
Einstellen (setup, installation)
- Computer
- Uhr (hours)
- Reifendruck (tire pressure)
- Standheizung (autonomous heater)
- Standluftung (autonomous fan)
- Geschwindigkeitswarnung (speed alarm)
Help (help)
This function will help you to correctly select and enter the necessary commands.
Calling the auxiliary menu
FIS has a help function.
The help function is called as follows:
- Press the Menu key. The start menu appears.
- Turn the rotary/push button to set the command selection arrow to HILFE (help).
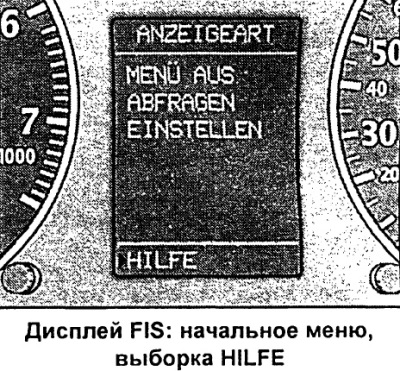
- Confirm the selection by pressing the rotary/push button.
To exit the auxiliary menu, press the rotary/push button.
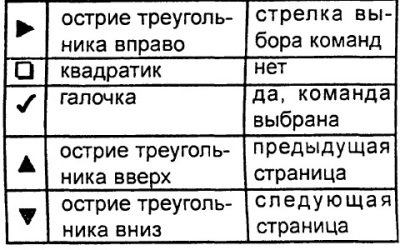
Meaning of display symbols:
The setup process (part 1)
The settings are made via menu commands.
The setup process is as follows:
- Press the Menu key. The start menu appears.
- Turn the rotary/push button to set the command selection arrow to EINSTELLEN (setup).
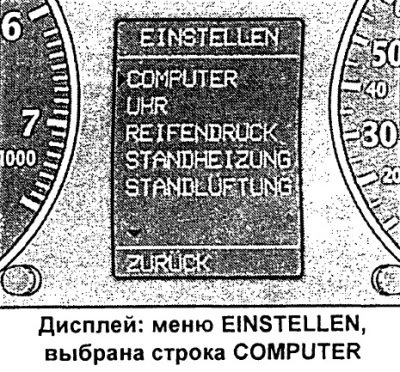
- Confirm the selection by pressing the rotary/push button. The selected menu appears, for example, the menu shown in the figure.
- To correctly position the command selection arrow, you may need to use the symbols (next page) or d (previous page). Confirm this also by pressing the rotary/push button.
The setup process (part 2)

Continue the setup process as follows:
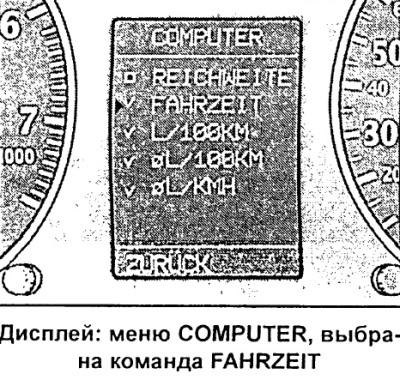
- Select and confirm the current setting type. The corresponding setting mode appears, for example, as shown in the figure.
- Turn the rotary/push button to set the command selection arrow to the current line.
- If necessary, press the rotary/push button to select a check mark ("yes") or a square ("no"), or vice versa.
- To return to a higher menu level, set the command selection arrow to ZURUCK (back) and press the rotary/push button.
Some settings require the input of numerical values, such as setting the date. This is also done by turning the rotary/push button.
Functional example (part 1)
The example provided shows the complete setup process carried out through menu commands.
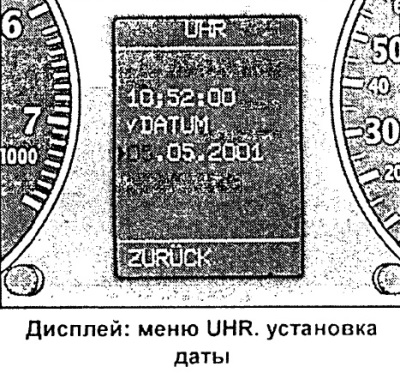
If you want, for example, to set a calendar date, then you need to:
- Press the Menu key. The start menu appears.
- Turn the rotary/push button to set the command selection arrow to EINSTELLEN (setup).
- Confirm selection by pressing the rotary/push button. The submenu EINSTELLEN (setting) appears.
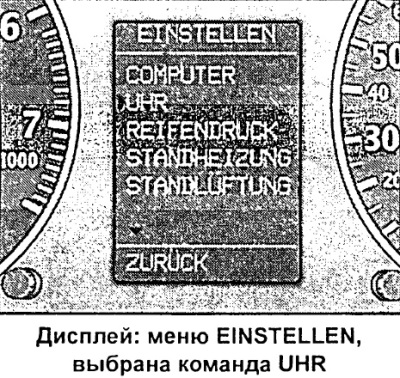
- Turn the rotary/push button to set the command selection arrow to UHR (hours).
- Confirm selection by pressing the rotary/push button. The UHR (clock) setup menu appears.
Functional example (part 2)

Continue the date setting process as follows:
- Turn the rotary/push button to set the command selection arrow to DATUM.
- If there is a square before the DATUM line, press the rotary/push button. A check mark should now appear. The last date set is displayed.
- Position the command selection hand in front of the date display and press the rotary/push button. The day display starts flashing.
- Turn the rotary/push button left or right to set the correct numerical value for the day. Press the rotary/push button. The month display now flashes.
- In the same way, set the month and year if necessary.
Functional example (part 3)
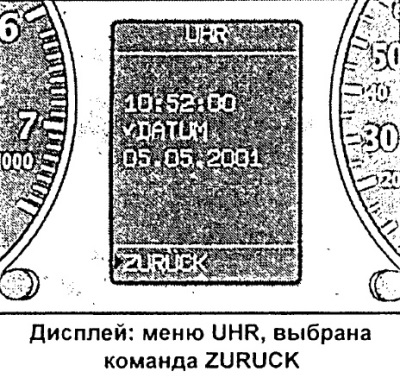
To exit the date setting menu, do the following:
- Set the command selection arrow to ZURUCK (back).
- Press the rotary/push button. The EINSTELLEN (setup) menu appears again.
- Press the rotary/push button again. The start menu appears again.
The original text is available on the website: AUDImanual